|
For the latest version, please use Virtual Appliance 1.0.3! |
First Deployment
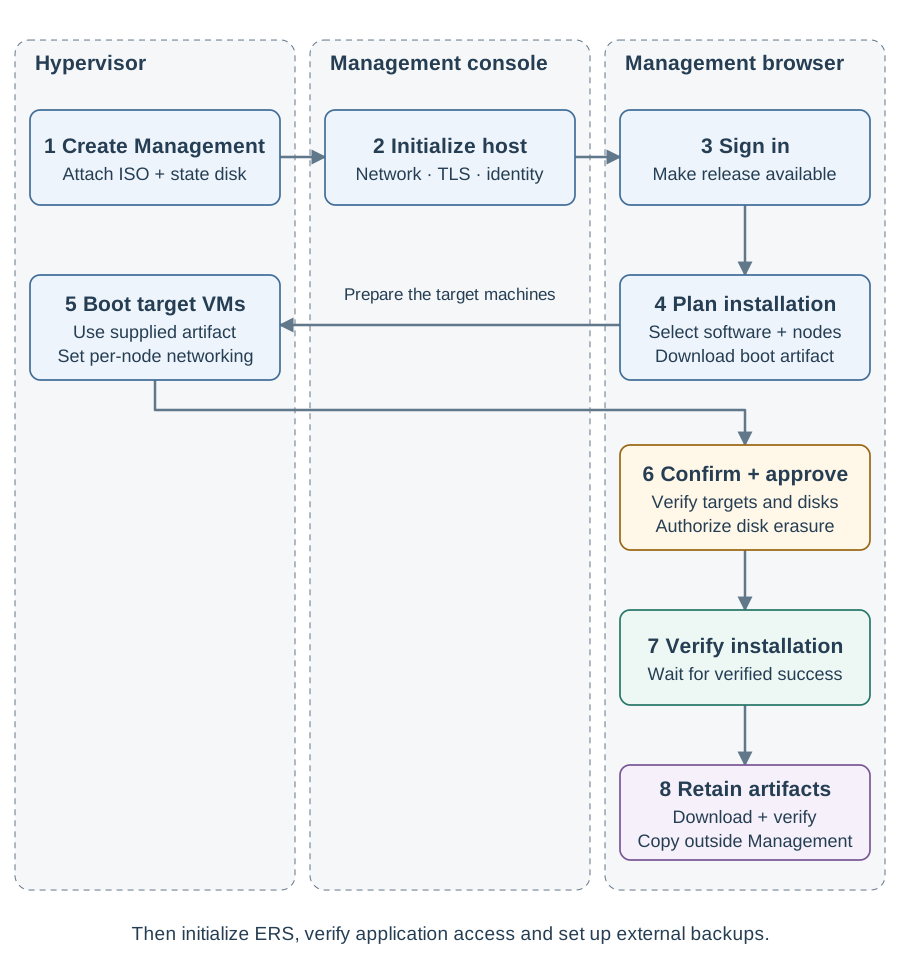
Follow this sequence to deploy Management, install Virtual Appliance and initialize ERS. Work from a browser with access to Management and a hypervisor account that can create and configure the required virtual machines.
Before you begin
Check the hardware requirements, reserve IP addresses and DNS names and configure the firewall rules. Use the installation introduction to choose the Management deployment and connected or air-gapped preparation path. Installation erases the explicitly selected disks.
Deploy and initialize Management
-
Choose one Management deployment path:
-
Docker Compose: download the image, prepare the host and persistent volume, configure TLS and start the container.
-
Management ISO VM: create the VM with the ISO and state disk, restrict SSH to approved maintenance sources before first boot, then initialize its host from the console. The ISO’s factory SSH credentials are supplied for setup convenience.
-
-
Open the configured Management HTTPS URL. Verify its certificate and sign in as
mtg-adminwith the password entered during setup. -
For the ISO VM, complete Required ISO host SSH setup. You must configure SSH according to your organization’s policy, rotate the factory host credentials using the agreed persistent procedure and verify both after reboot before production use.
-
Under Settings > Bundles, make the intended release bundle Available locally. Follow Bundles and registries for retrieval or browser upload.
Management is ready when its web application is reachable, sign-in succeeds and the intended release is available locally. ISO deployments also require the SSH policy and credential-rotation checks above before production use.
Install the Appliance
-
Start the installation wizard. Select the release, topology and platform, then enter the network and node plan.
-
Submit the plan. On Download and boot the Talos artifact, download the matching boot artifact and checksum.
-
Create the appliance targets using the Proxmox or VMware guide. Use the per-node network values supplied by Management.
-
Return to Management to discover and confirm the targets, assign the three disk roles on each node and approve the destructive installation.
-
Wait for Verified success for the selected appliance release. Download the artifact bundle and wait for Checksum verified.
-
Copy that bundle to an access-controlled location outside Management before closing the installation.
Initialize ERS and accept the Deployment
-
Follow Initialize ERS to configure the application and PKI for the installed appliance.
-
Complete Post-installation checks, including application access and health.
-
Set up backups and external retention. Keep the installation artifact bundle and release material with the deployment’s recovery records.
For later sessions, use Reconnect an Appliance. If a step fails, keep the reported stage and available diagnostics and consult Troubleshooting.