|
For the latest version, please use Certificate Lifecycle Manager 6.12.0! |
Integrating MTG SCEP with Microsoft Intune
This guide walks you through configuring Microsoft Intune to work with MTG SCEP for automated certificate enrollment on your devices.
Prerequisites: Azure AD administrative privileges and access to your MTG CLM environment.
Azure AD App Registration
Create an Azure AD application that MTG SCEP will use to authenticate with Microsoft Intune. This application provides the client credentials needed for SCEP request validation.
Step-by-step Instructions
-
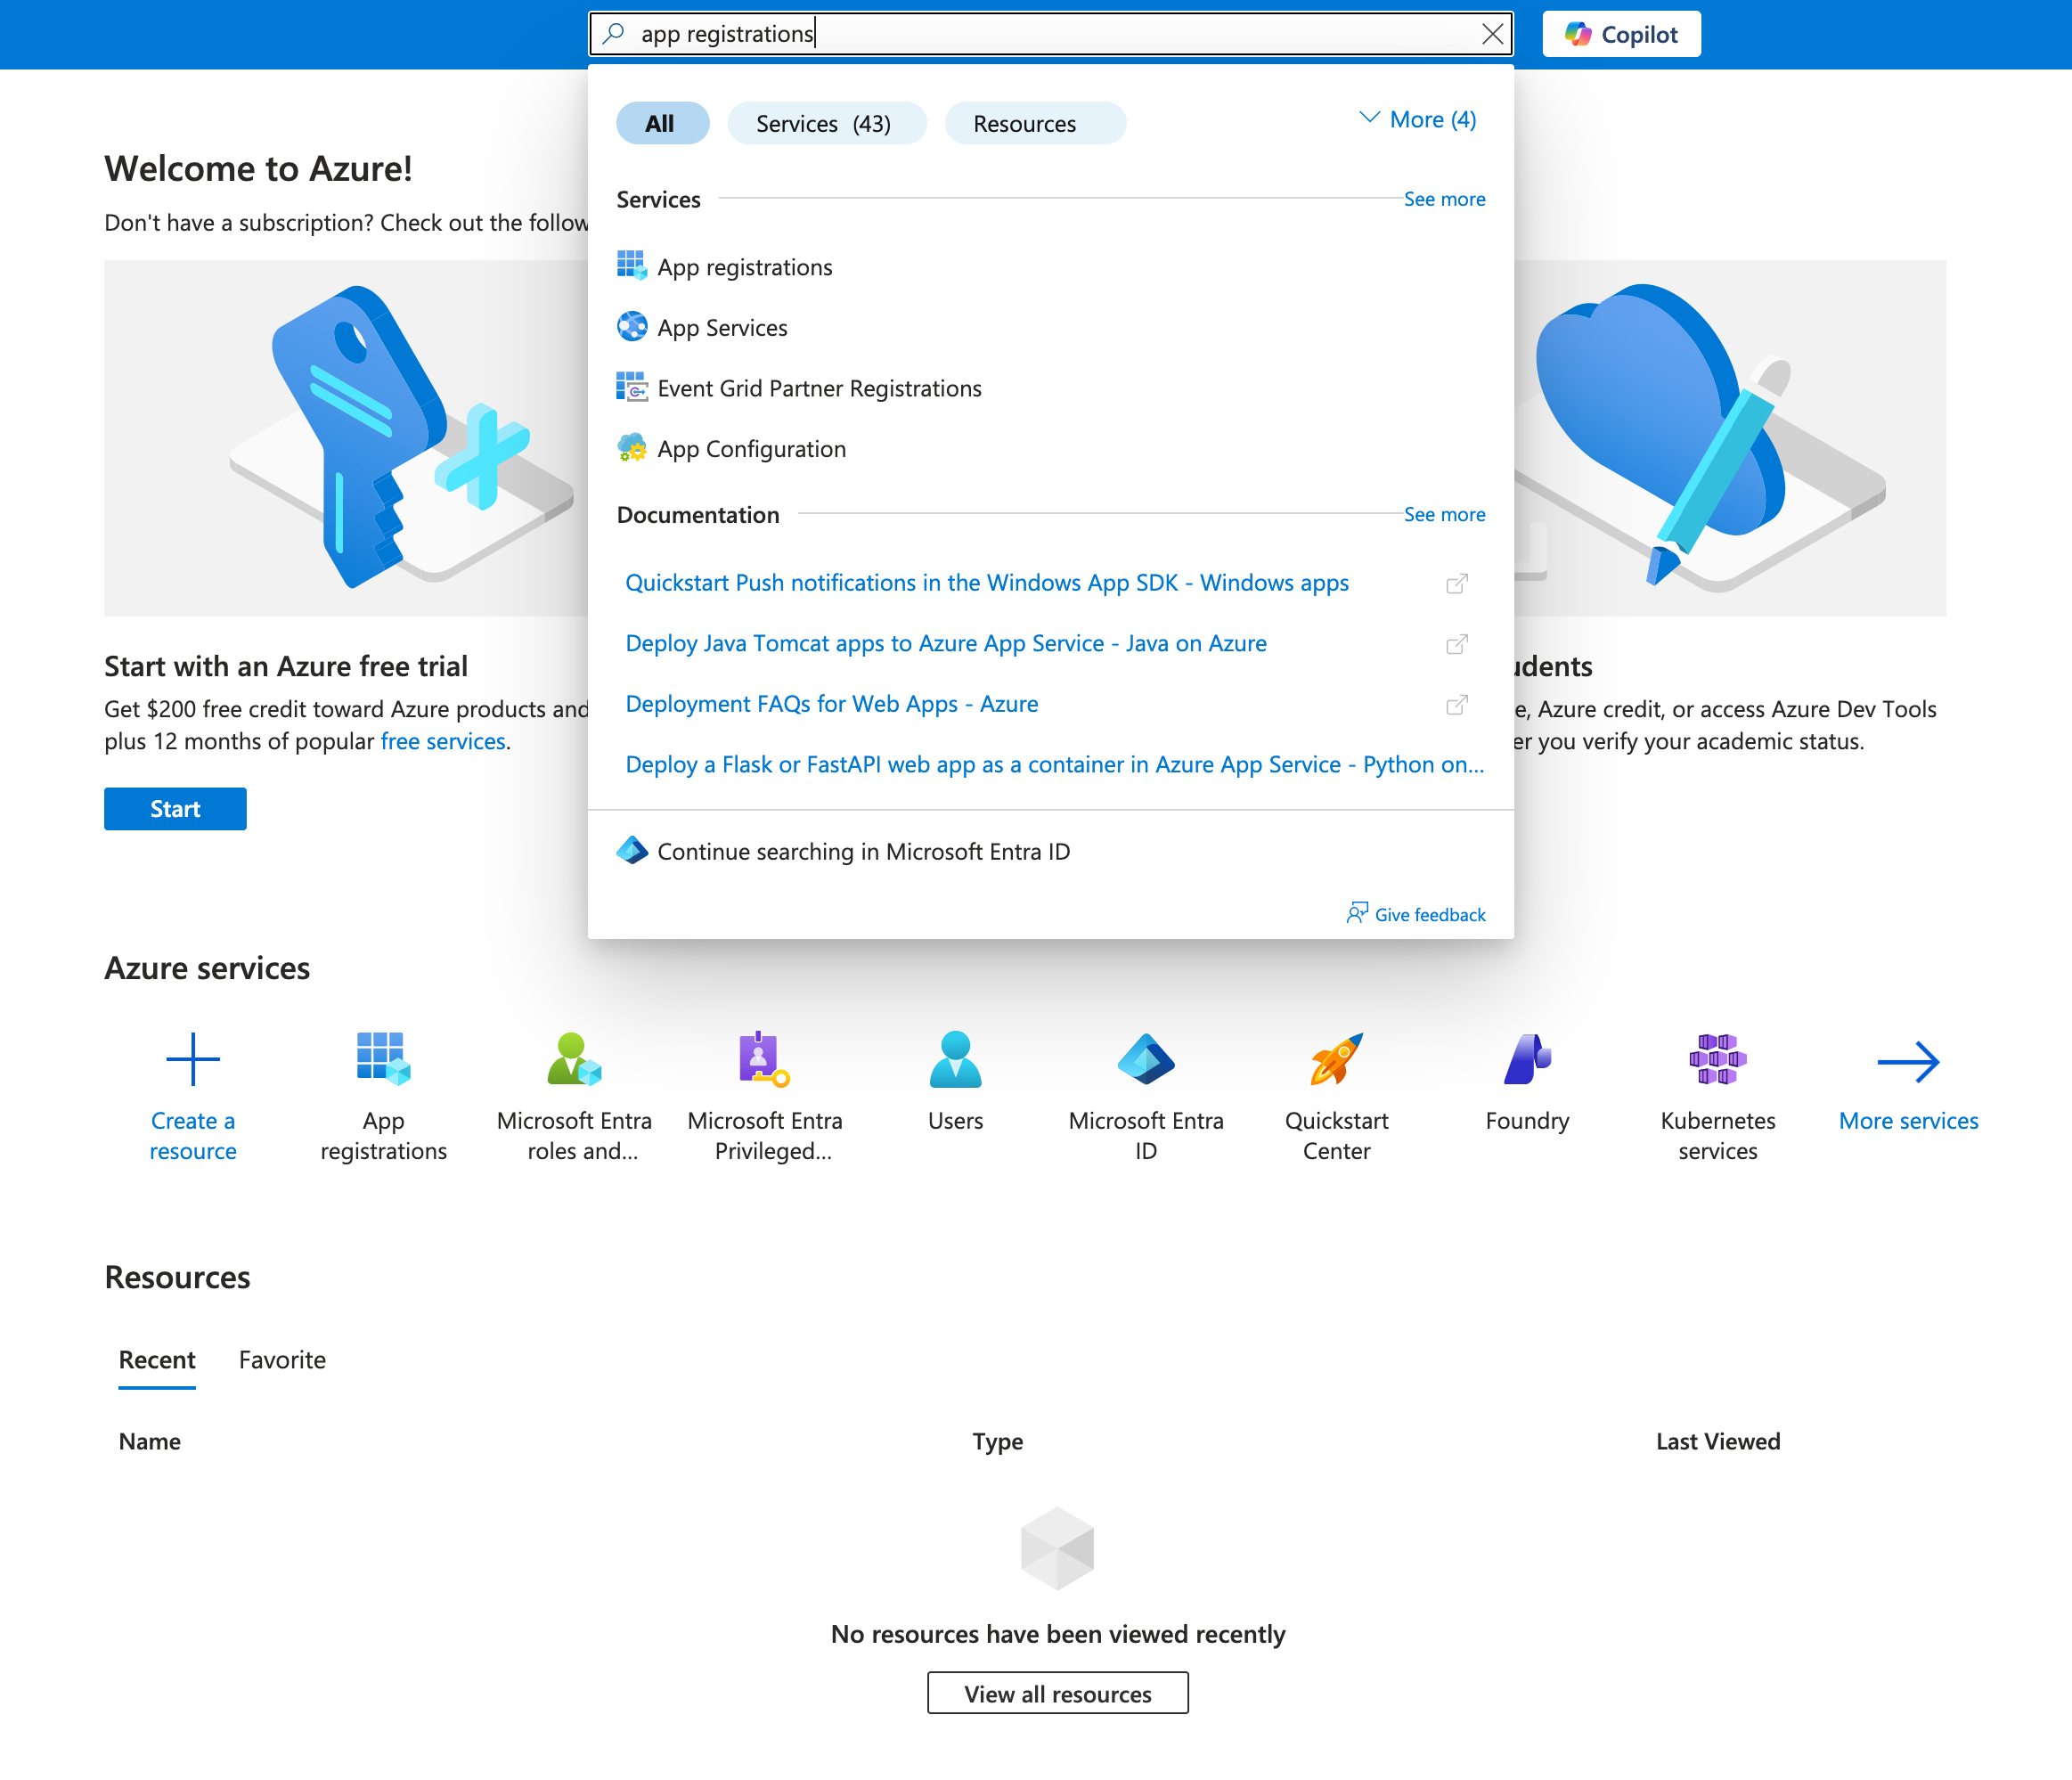
Access Azure Portal
Navigate to portal.azure.com and sign in with your Azure AD administrative account.
-
Navigate to App Registrations
In the search bar at the top, type "App registrations" and select it from the results.
Click to reveal screenshot
-
Create New Registration
Select New registration at the top of the App registrations page.
-
Configure Application Details
Complete the registration form:
-
Name: Enter a descriptive name such as "MTG SCEP Integration"
-
Supported account types: Select "Accounts in this organizational directory only (Default Directory only - Single tenant)"
-
Redirect URI:
-
Platform: Select "Web"
-
URI: Enter
localhost
Click to reveal screenshot

-
The redirect URI is a placeholder required by Azure AD for app registration. The SCEP integration uses application permissions, not delegated authentication, so this URI is never actually called. However, Azure AD requires a valid format. -
-
Register the Application
Click Register at the bottom of the form.
-
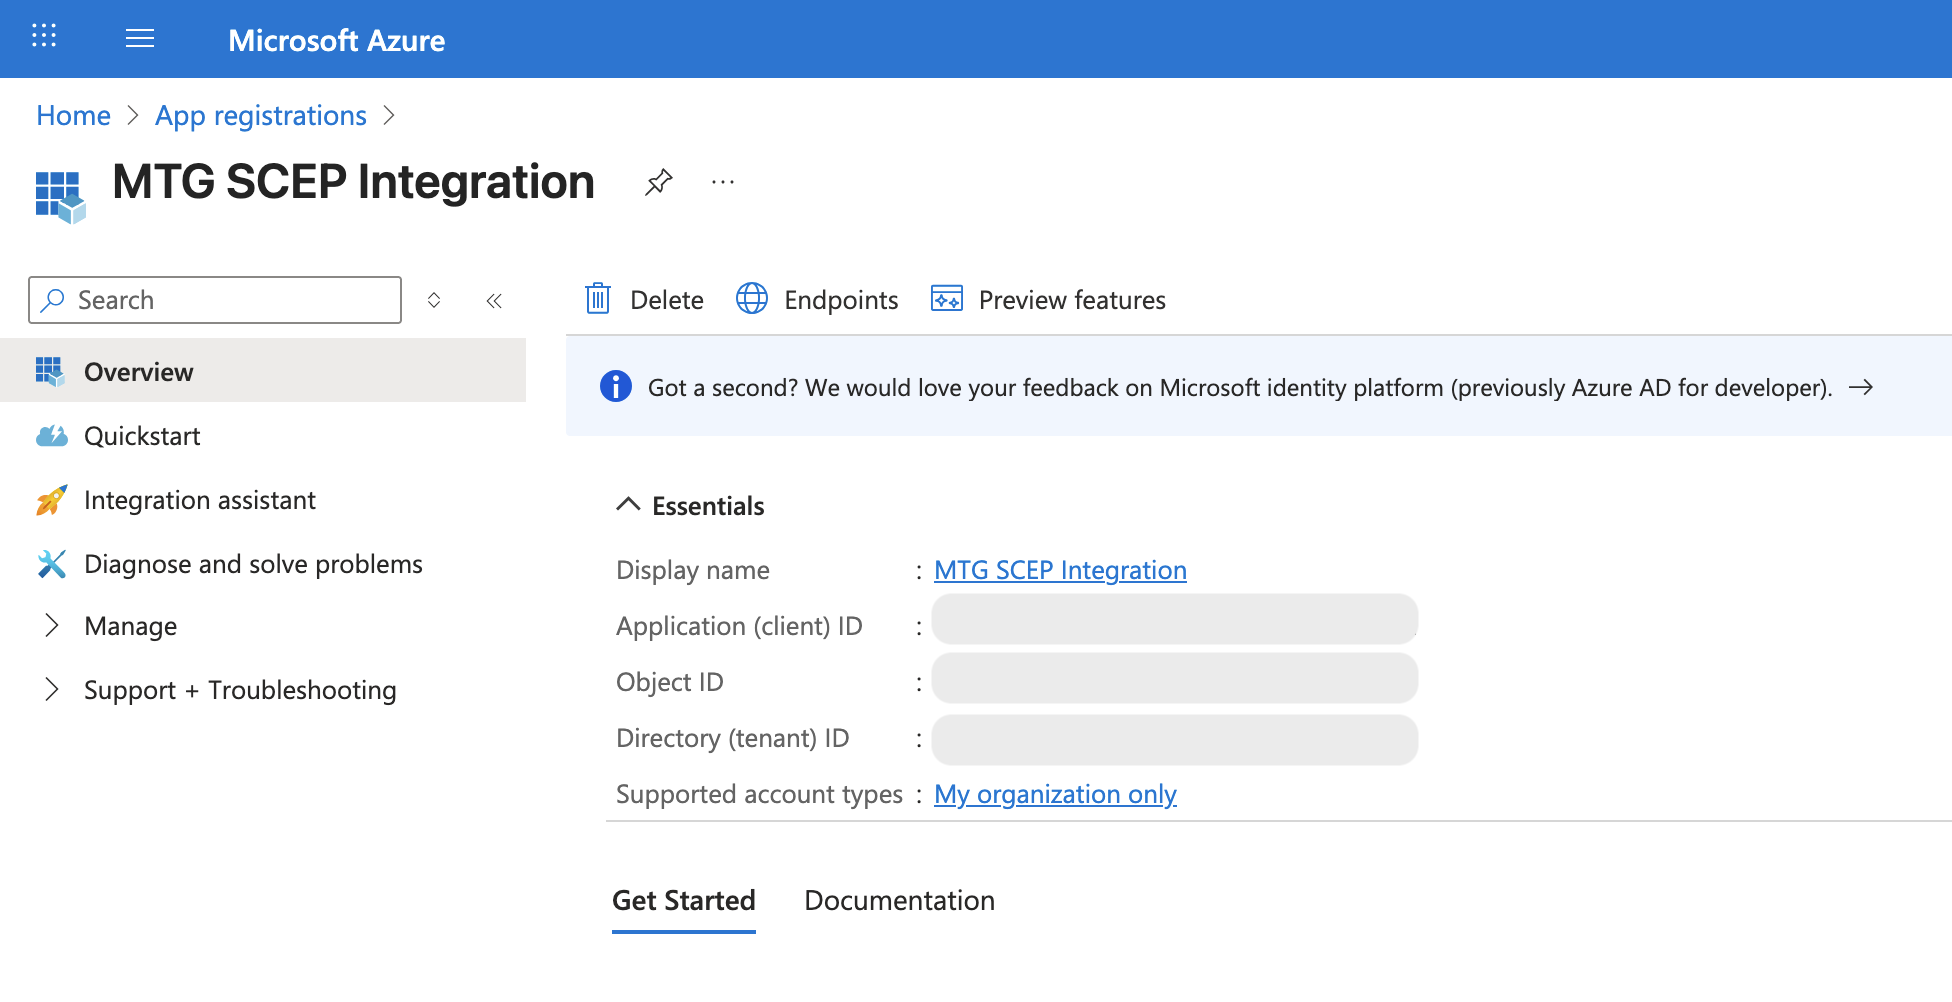
Capture Critical IDs
Immediately after creation, on the app overview page, locate and copy these two values:
-
Application (client) ID: A GUID like
12345678-1234-1234-1234-123456789abc -
Directory (tenant) ID: A GUID like
abcdef01-1234-1234-1234-abcdef012345Click to reveal screenshot
 ]
]
Save these IDs in a secure location now. You will need them for MTG SCEP configuration. The Application (client) ID identifies your app to Azure AD. The Directory (tenant) ID identifies your Azure AD instance. Both are required for MTG to authenticate correctly. -
-
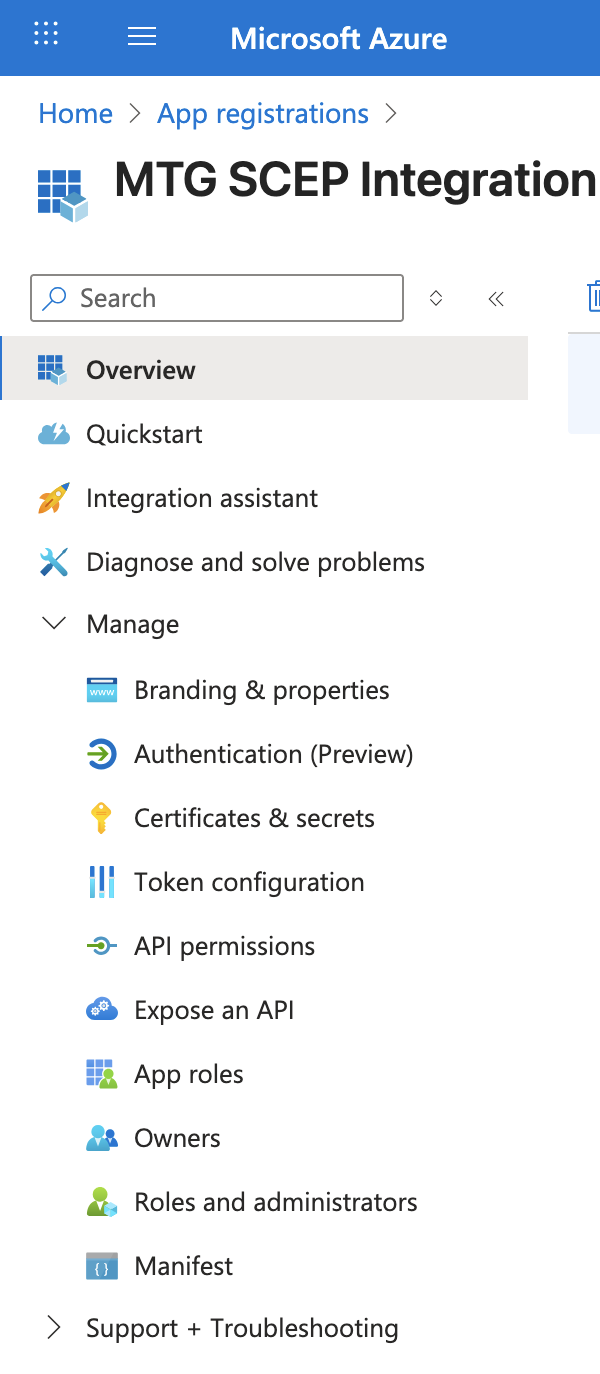
Navigate to Certificates & Secrets
In the left sidebar, click Certificates & secrets.
Click to reveal screenshot
-
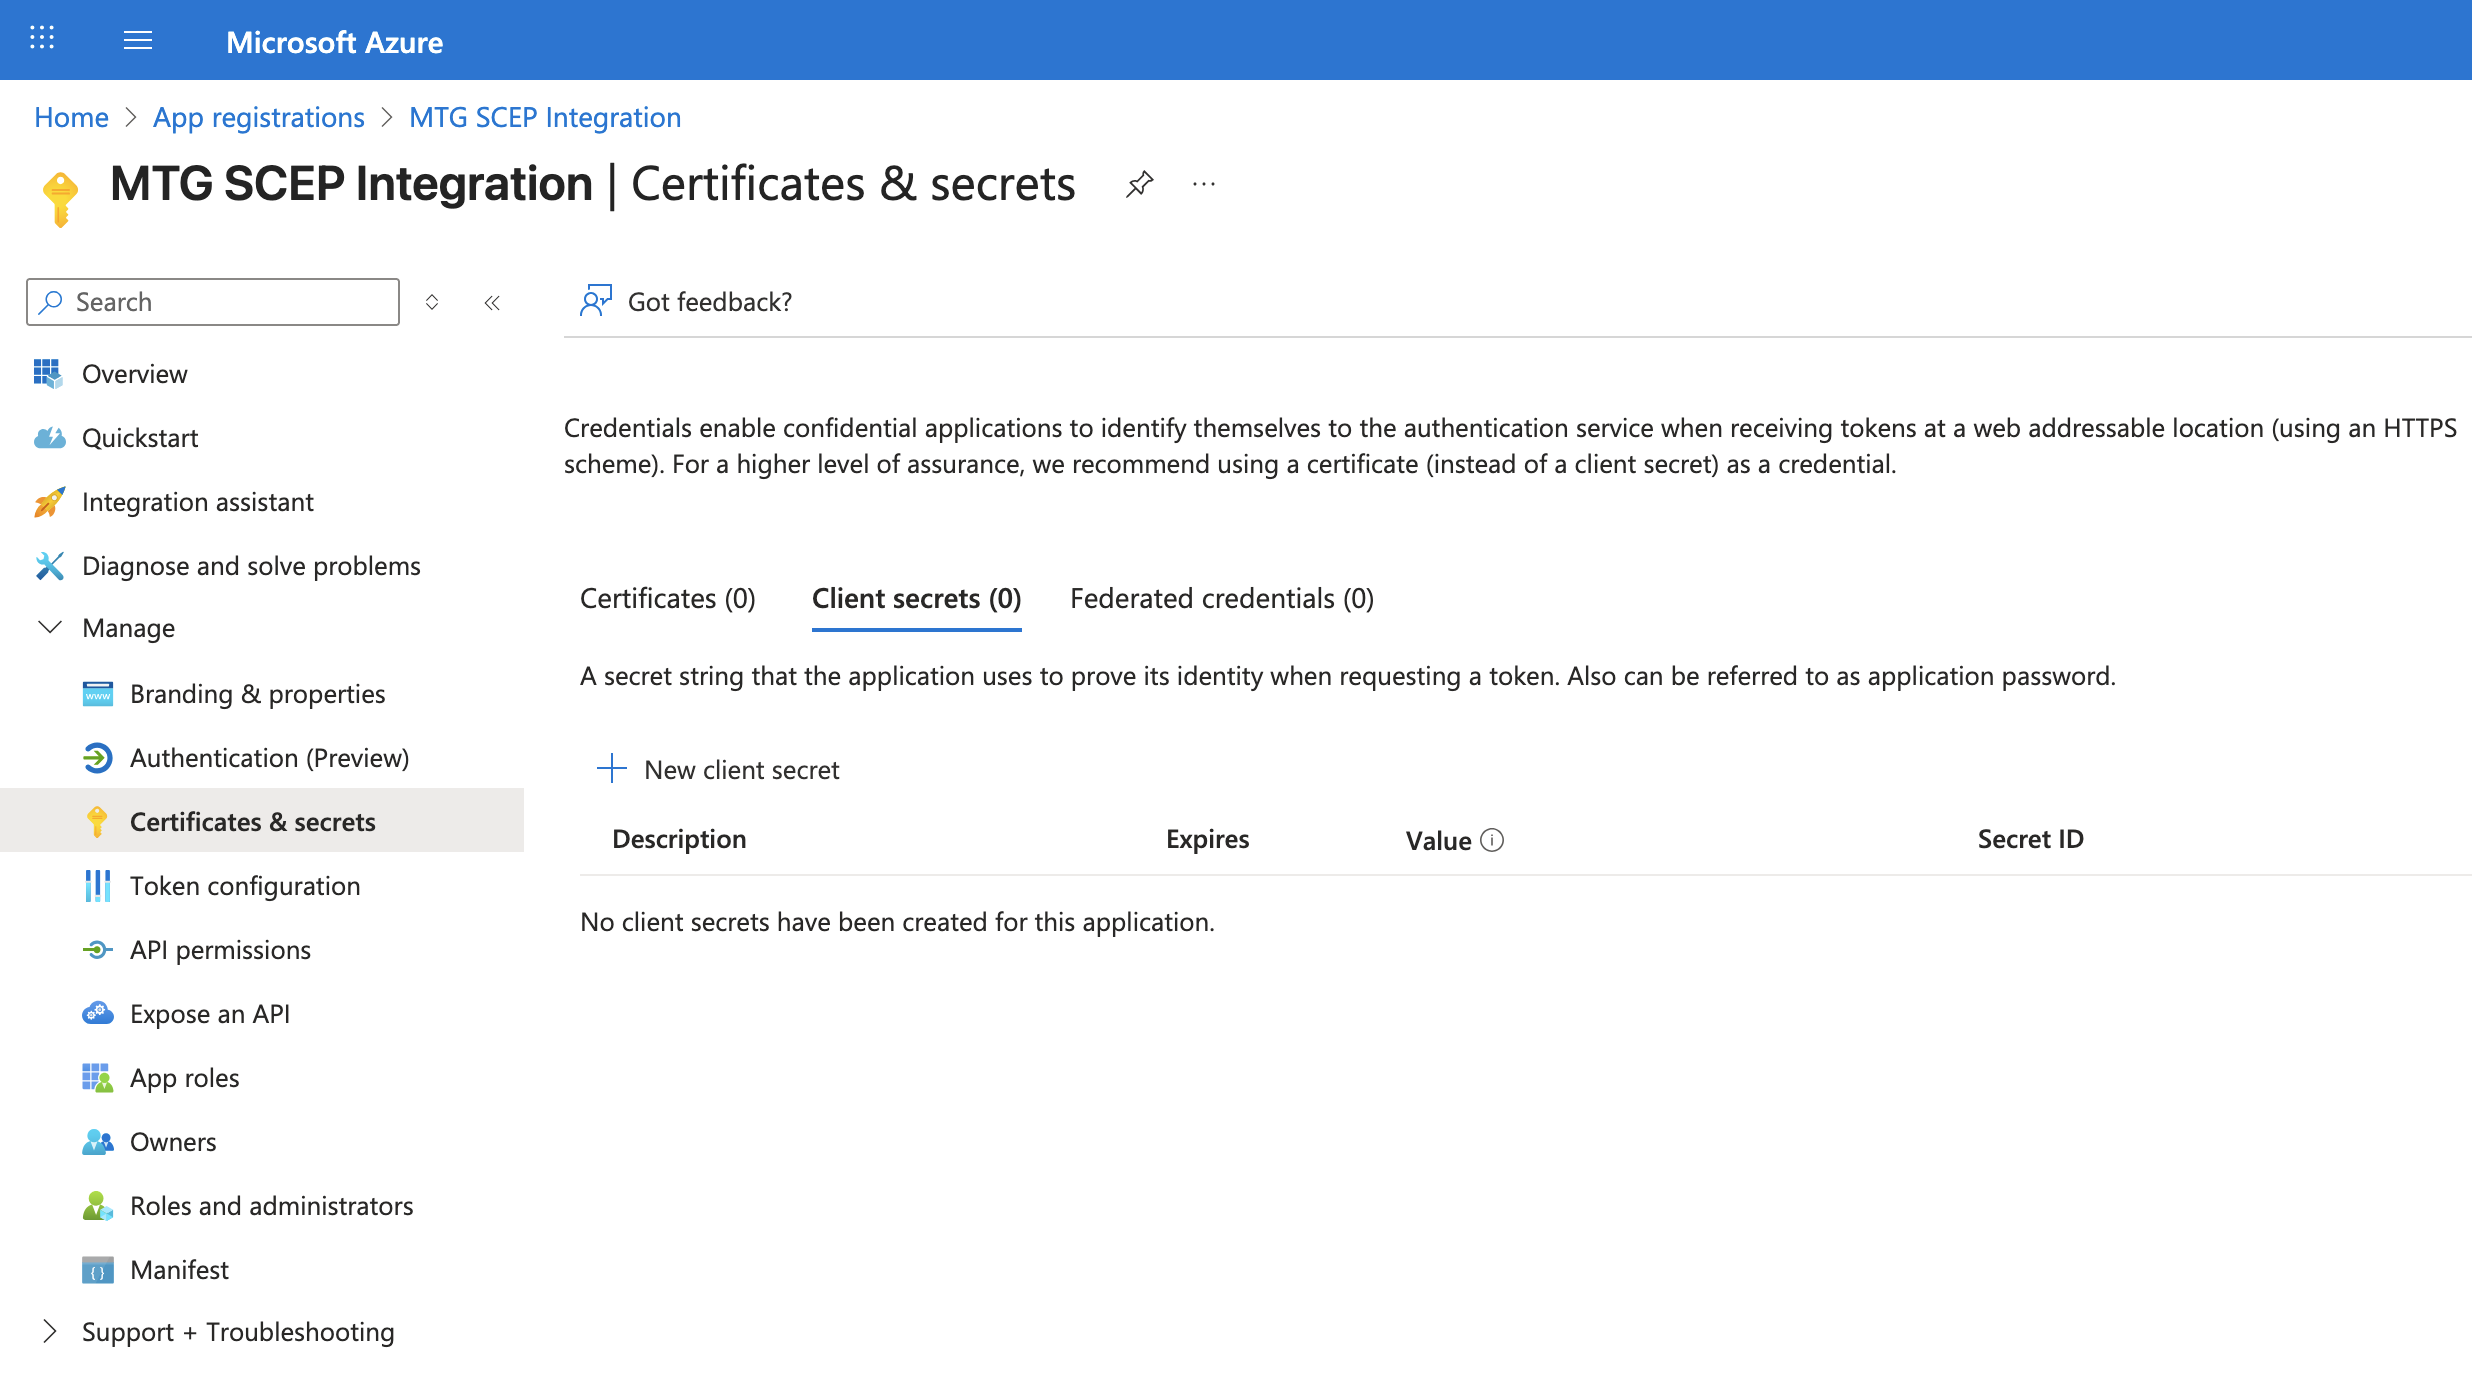
Create Client Secret
Click New client secret at the top of the page.
Click to reveal screenshot
-
Configure Secret Parameters
Complete the form:
-
Description: Enter "MTG SCEP Integration Key"
-
Expires: Select 12 months (or per your security policy)
Click to reveal screenshot
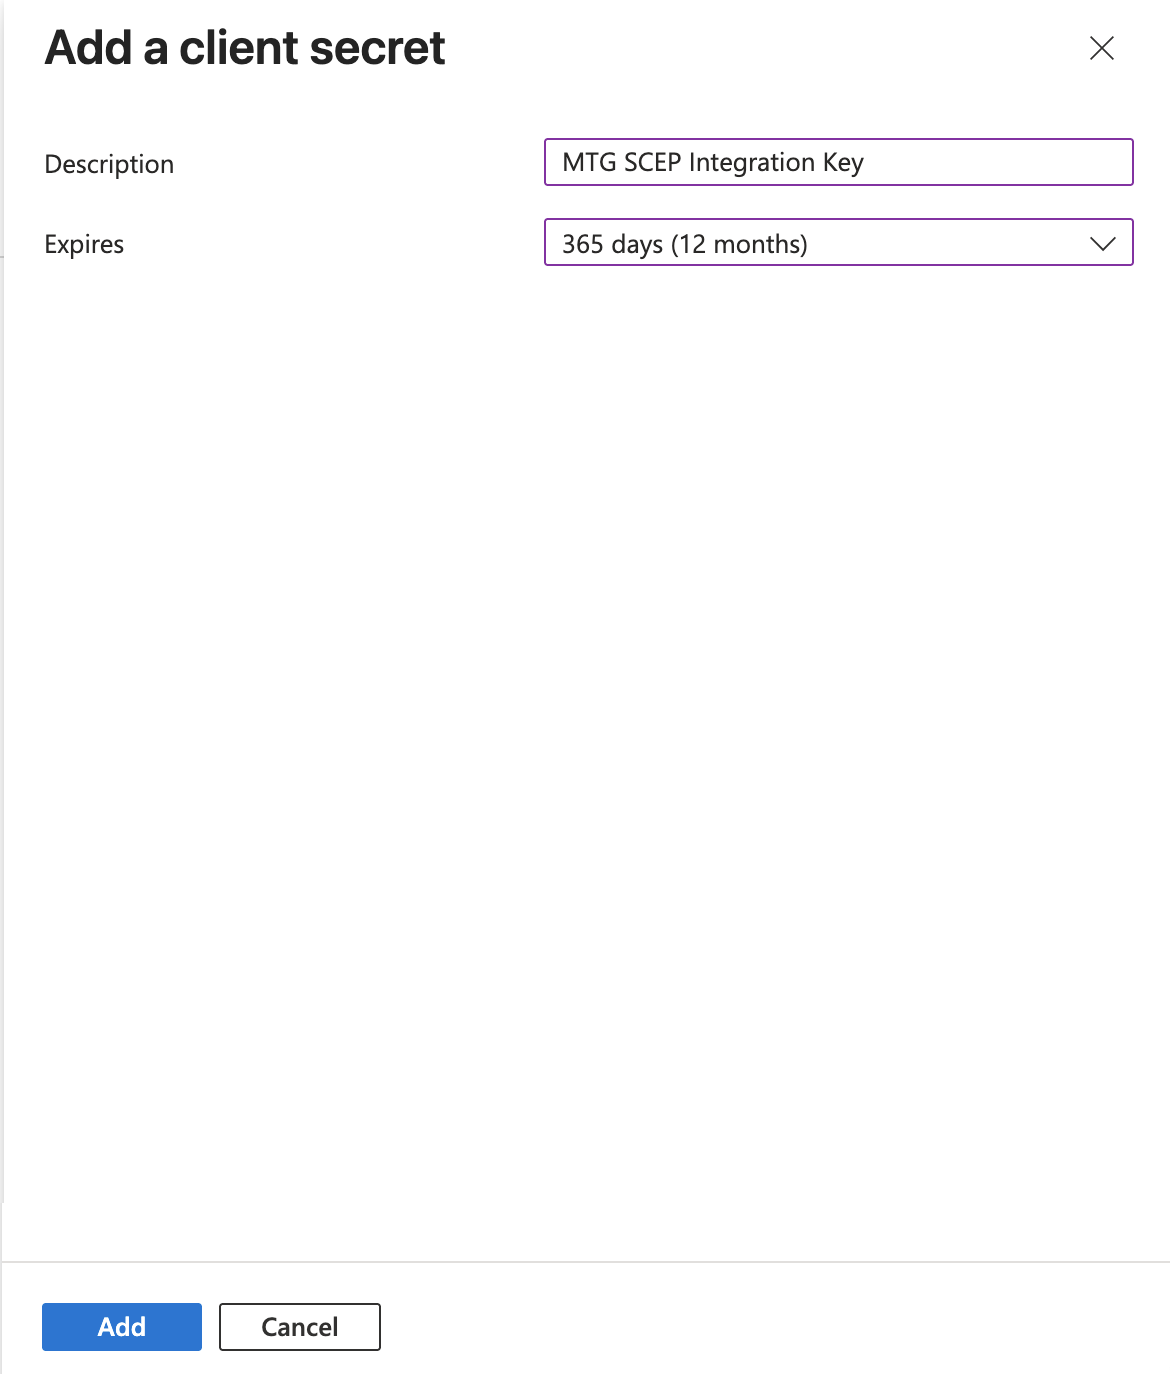
Click Add to create the secret.
-
-
Capture Client Secret Value
Immediately after creation, copy the Value (not the Secret ID!) from the table:
Click to reveal screenshot
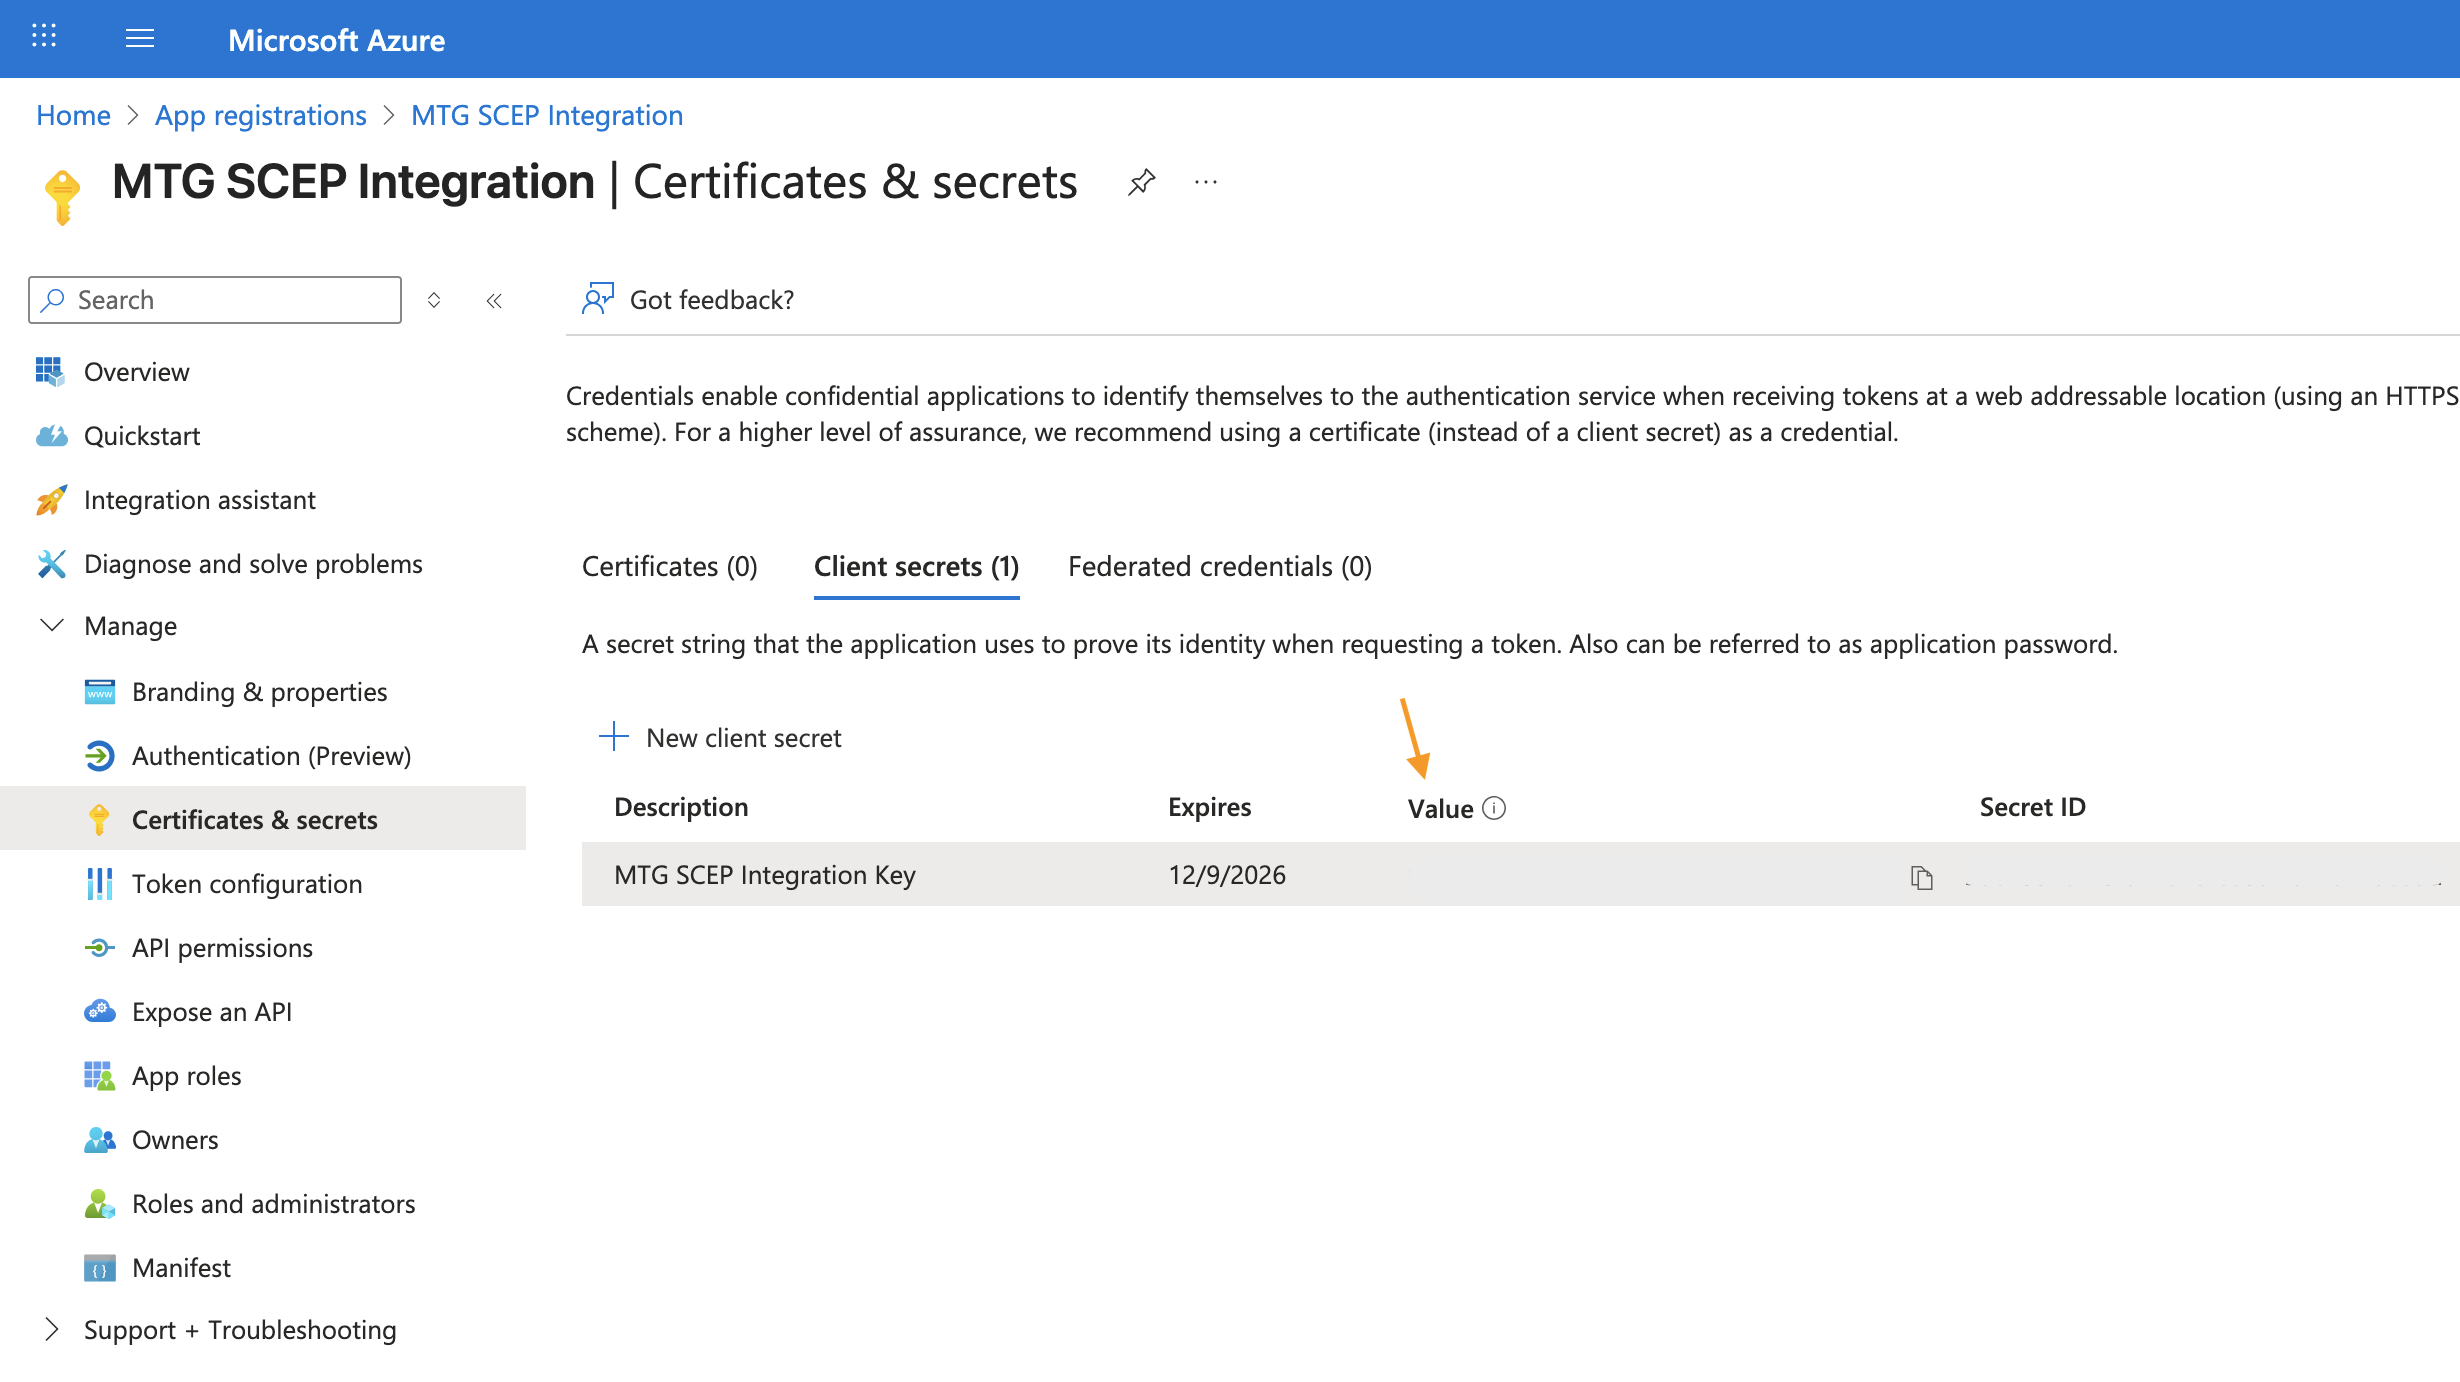
You can only view this value once. If you navigate away or lose it, you must generate a new secret. Store it alongside your Application ID and Tenant ID.
Configure API Permissions
Grant your Azure AD application permission to read device and configuration data from Microsoft Intune. MTG SCEP uses these permissions to validate that requesting devices are managed by Intune and to retrieve device attributes for certificate subject construction.
Step-by-step Instructions
-
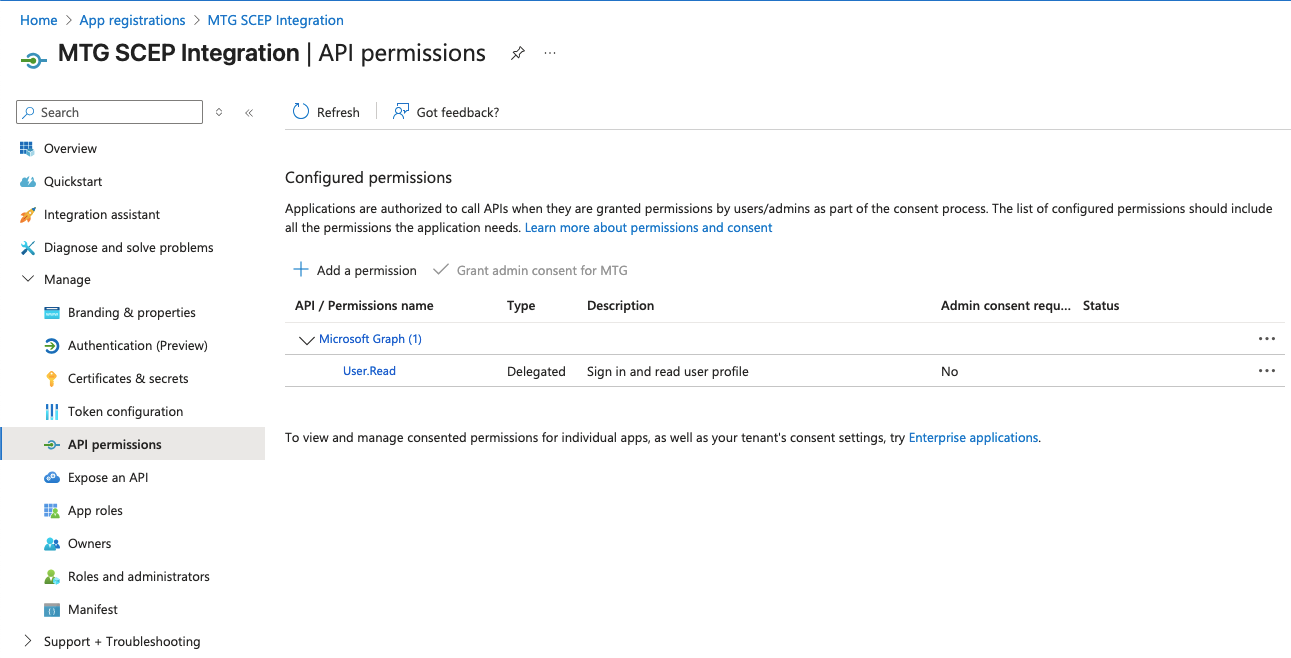
Navigate to API Permissions
In your registered application, select API permissions from the left sidebar.
Click to reveal screenshot
-
Add Microsoft Graph Permissions
Click to reveal screenshot
-
Click Add a permission at the top of the page.
-
Select Microsoft Graph from the list of available APIs.
-
Choose Application permissions (not Delegated permissions). SCEP validation uses app-only authentication, which requires Application permissions.
Application permissions allow the Azure AD app to access Intune data without a signed-in user. This is required for server-to-server authentication used by MTG SCEP. -
-
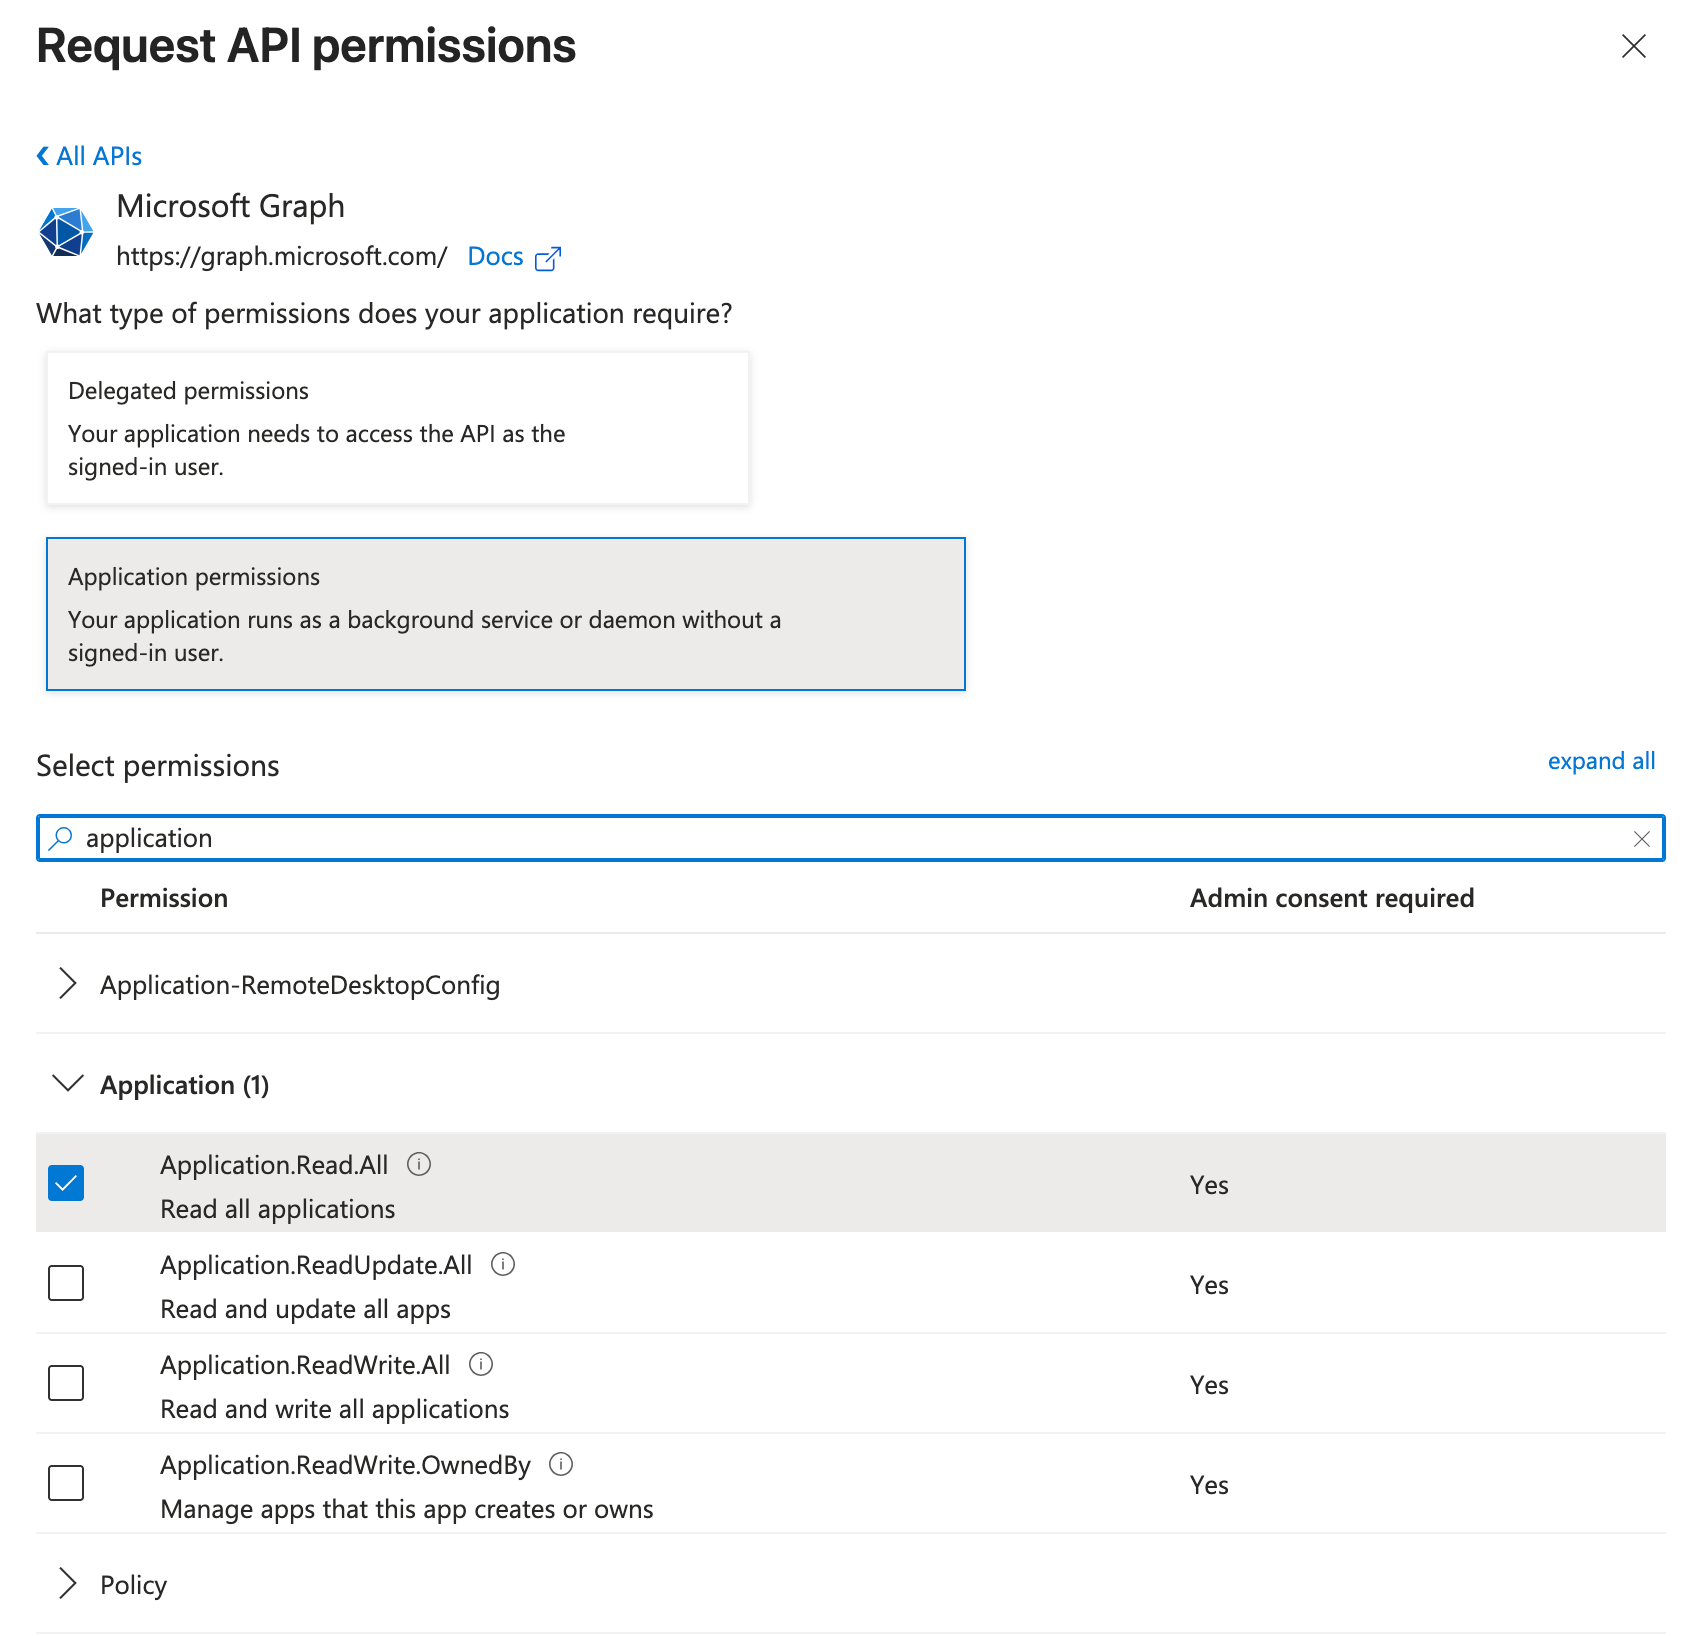
Search and Select Specific Permissions
In the search box, type "application" to filter the list. Check the following permission:
Application.Read.All
Click to reveal screenshot
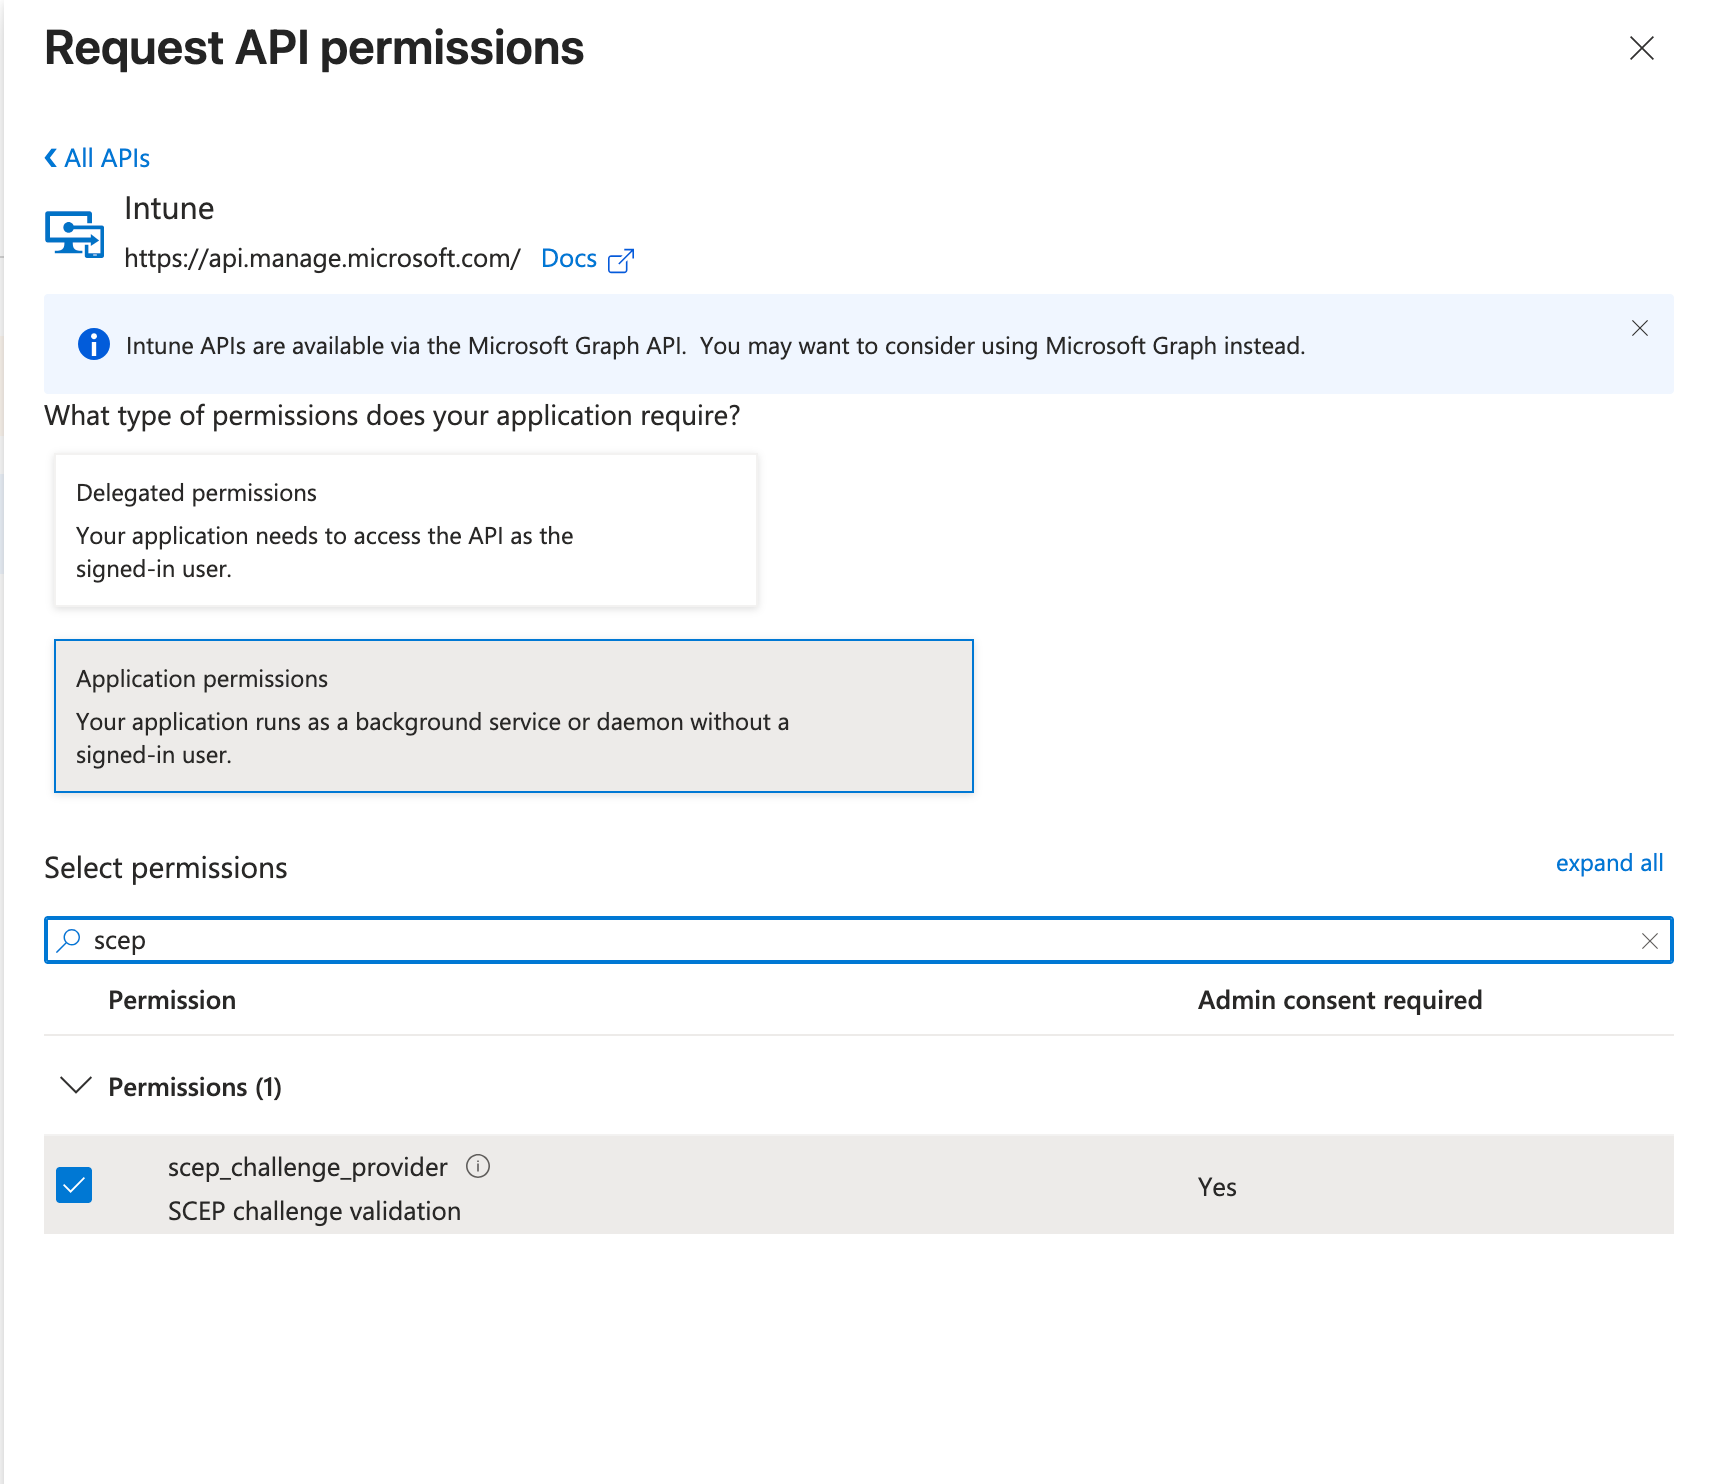
Switch back to the main application selection pane and instead of "Microsoft Graph" now select group "Intune".
In the search box, type "scep" to filter the list. Check the following permission:
scep_challenge_provider
Click to reveal screenshot
Click Add permissions at the bottom of the panel.
-
Grant Admin Consent
After adding permissions, you must grant admin consent for your organization. Click Grant admin consent for MTG at the top of the API permissions page.
Confirm the action when prompted.
-
Verify Status
The Status column for both permissions should now show a green checkmark and "Granted".
Click to reveal screenshot
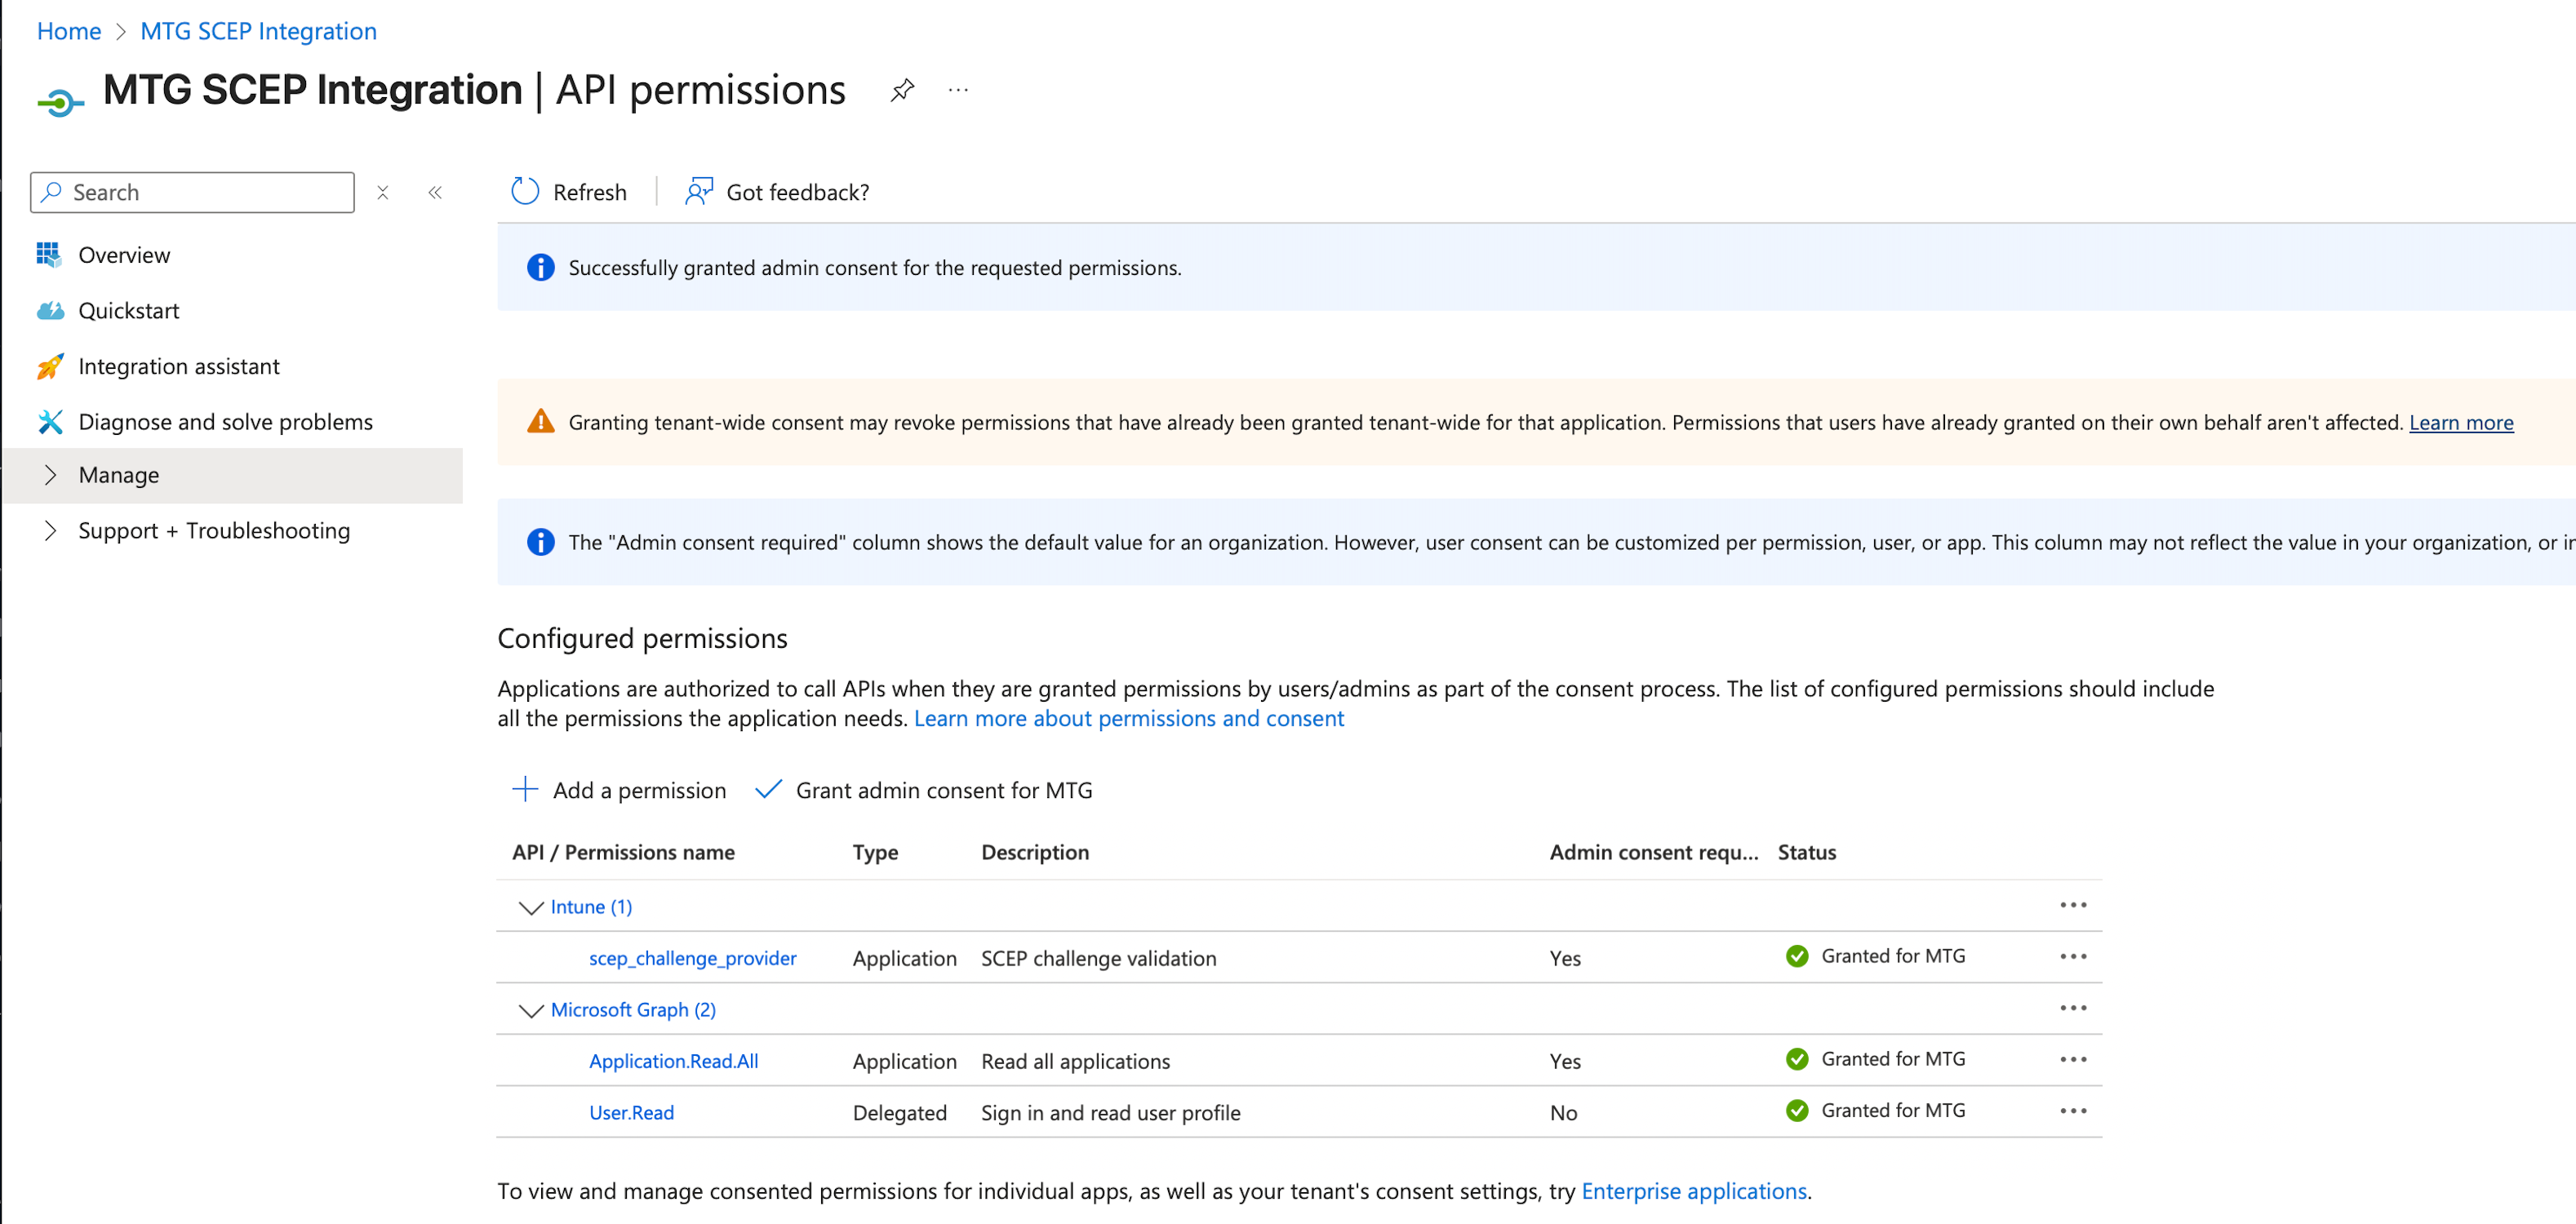
If status shows "Not granted," click Grant admin consent for MTG again.
Configure MTG SCEP Settings
Update SCEP Parameters
-
Access your MTG CLM application.properties file and navigate to the SCEP configuration section.
Required Configuration Parameters:
-
ms.intune.app.id: Your Azure AD Application (client) ID
-
ms.intune.app.key: Your generated client secret value
-
ms.intune.app.tenant: Your tenant identifier
Verify SCEP Status
Service Status Check
-
Verify SCEP service is running.
-
Confirm network connectivity from Intune to your SCEP endpoint.
-
Test SCEP URL accessibility: scep.example.com/scep.
Certificate Authority Validation
-
Ensure your issuing CA is properly configured.
-
Verify certificate templates are available for mobile device enrollment.
-
Confirm CA certificate chain is complete.
Deploy Root CA via Intune Trusted Certificate Profile
Upload the CLM root CA to Intune and deploy it to iOS devices as a trusted certificate. The profile is initially assigned to an empty security group to avoid impacting production devices.
Step-by-step Instructions
-
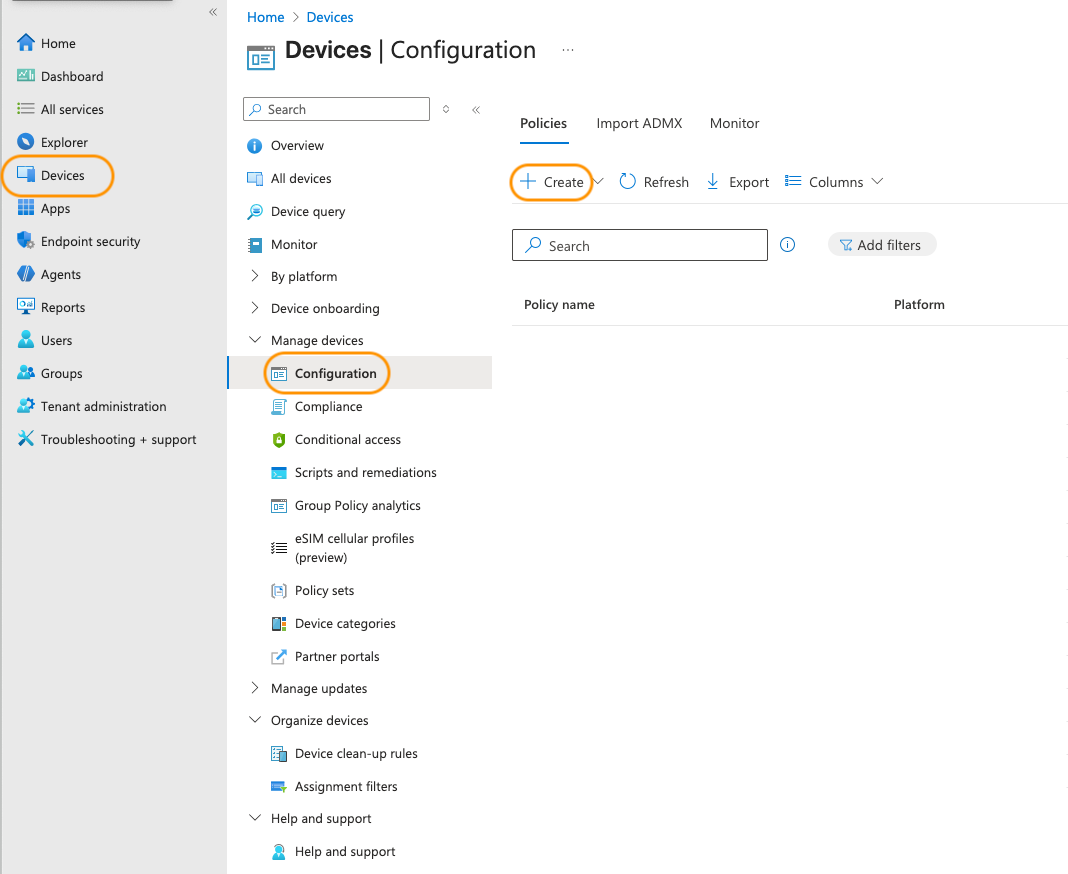
Navigate to Device Configuration
In the Intune admin center, go to Devices → Configuration.
Click to reveal screenshot
-
Create New Profile
Click Create profile at the top of the page.
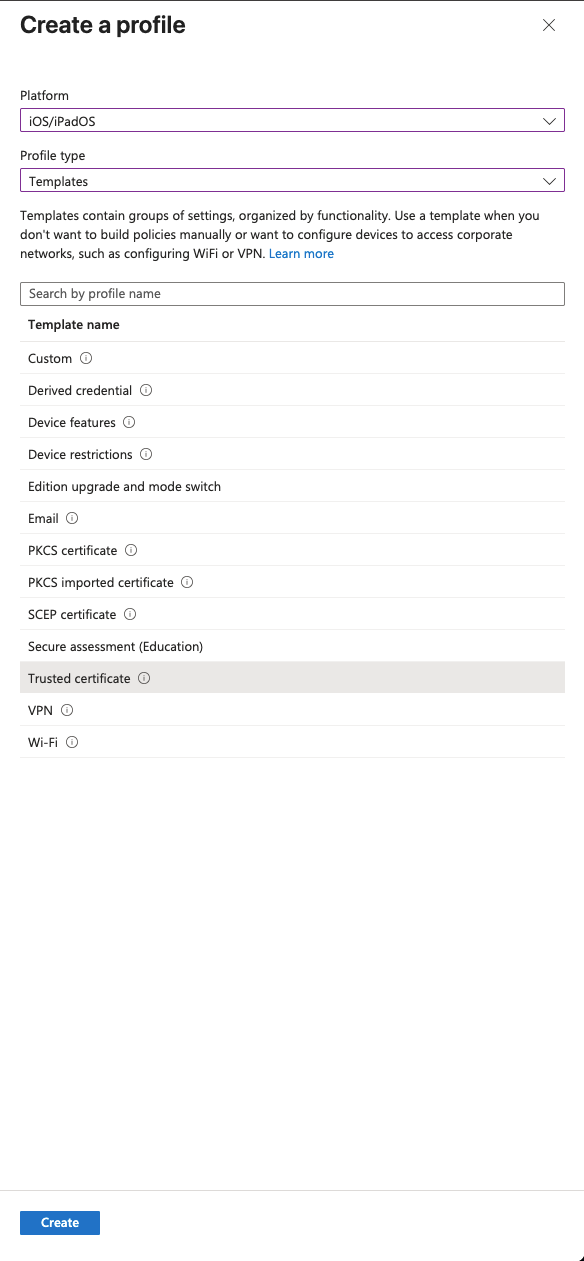
Select your preferred platform (in this example iOS) as the platform and Trusted Certificate as the profile type, then click Create.
Click to reveal screenshot
-
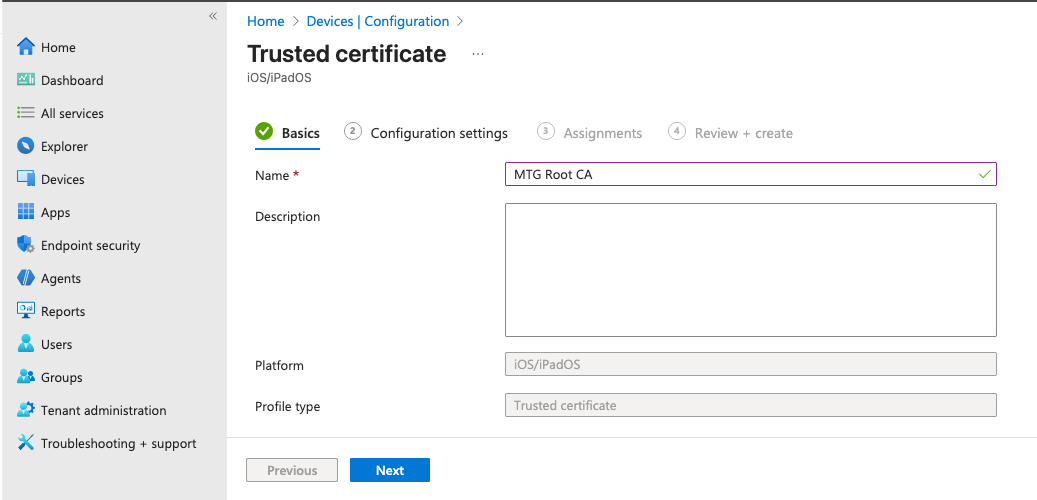
Configure Basic Settings
In the Basics tab, specify a distinctive name:
-
Name: CLM Root CA
-
Description (optional): E.g., Deploys the CLM root certificate to devices for SCEP validation
-
Click Next.
Click to reveal screenshot
-
-
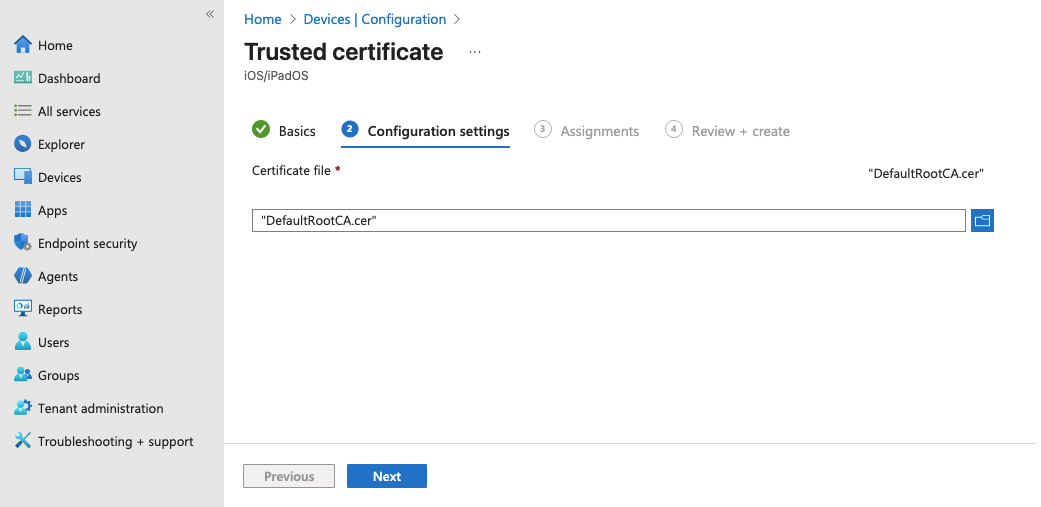
Upload Certificate File
In the Configuration settings tab, click the certificate file selector and choose your .cer format file.
Click Next.
Click to reveal screenshot
-
Assign to Security Group
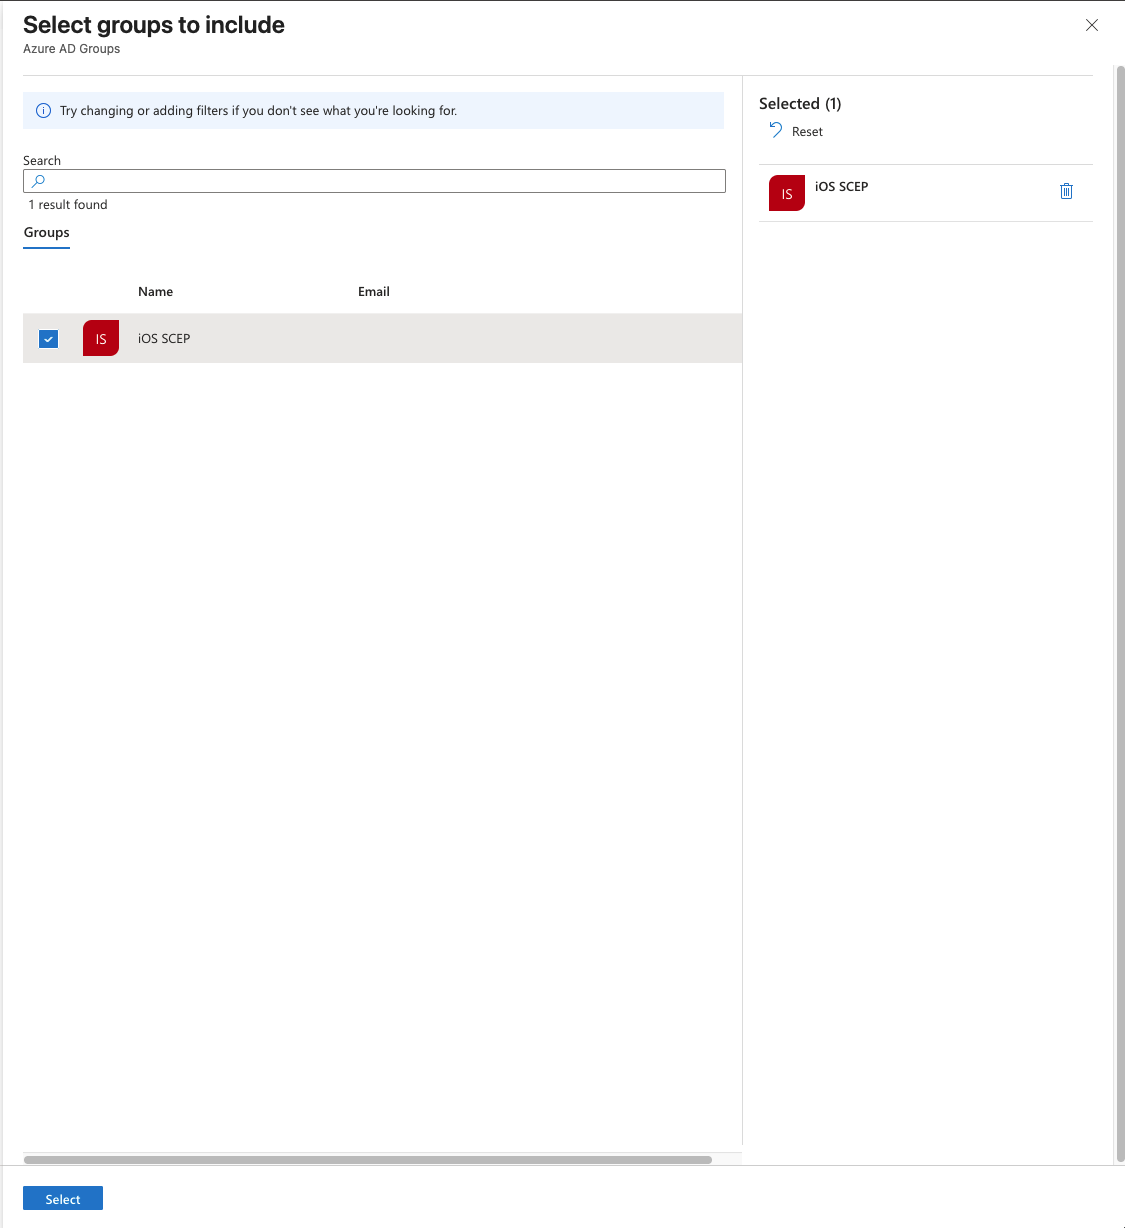
In the Assignments tab, click Add groups.
Search for and select the empty security group you created earlier.
Click Select, then click Next.
This step assumes you do not already have enrolled devices. The group shows 0 devices initially. This is expected and prevents the profile from affecting any devices until you explicitly add your device after enrollment. Click to reveal screenshot

Click to reveal screenshot
-
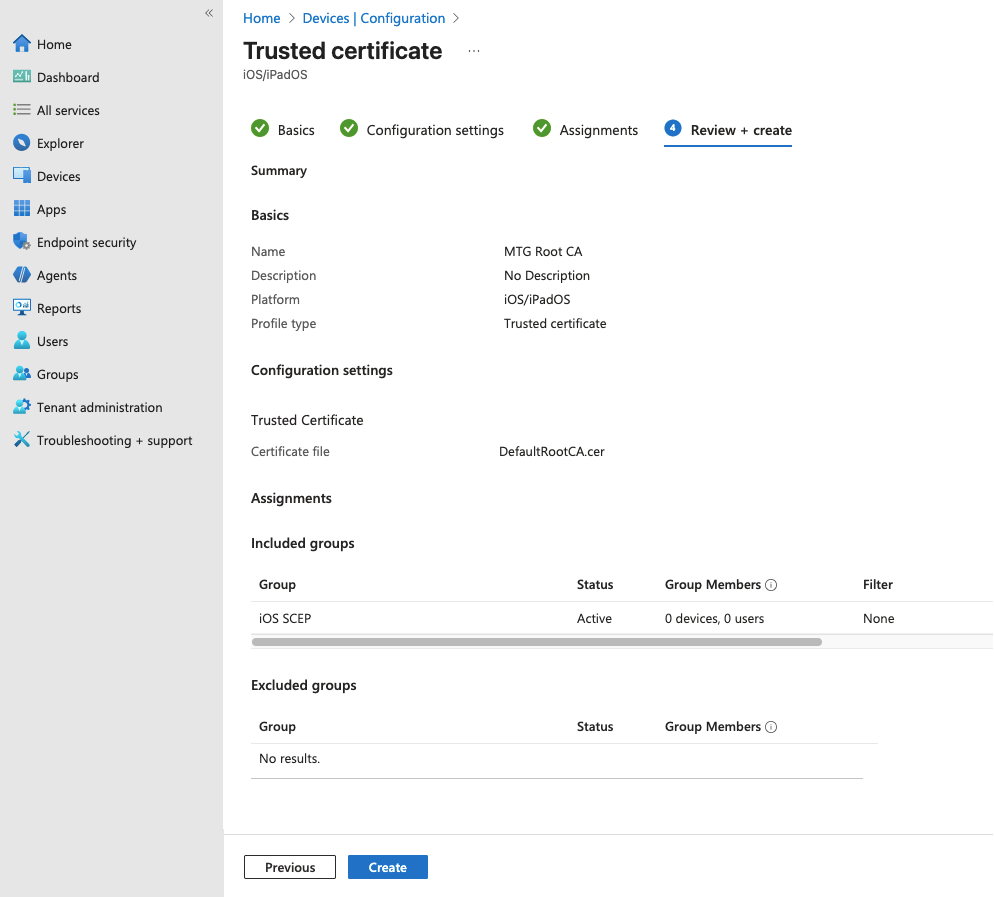
Review and Create
In the Review + Create tab, verify:
-
Platform is your desired one.
-
Profile type is Trusted Certificate.
-
Assignment shows your group with 0 devices currently.
-
Certificate file is attached.
Click Create.
Click to reveal screenshot
-
Verification Checklist
Before proceeding, confirm:
-
Profile appears under Devices → Configuration.
-
Assignment column shows your group with 0 of 0 devices.
-
Profile Status shows as Created or Active.
The trusted certificate profile is now ready but not deployed to any devices. The profile will apply automatically once your device enrolls and is added to the security group. Proceed to the next section to create the SCEP certificate profile that will reference this root CA.
Create SCEP Certificate Profile in Intune
Create a SCEP certificate profile that requests device certificates from MTG CLM. This profile references the trusted root CA and defines how certificates are issued to devices.
Step-by-step Instructions
-
Navigate to Device Configuration
In the Intune admin center, go to Devices → Configuration.
Click to reveal screenshot
-
Create New Profile
Click Create profile at the top of the page.
Select your platform, then Templates as the profile type and SCEP Certificate as template. Click Create.
Click to reveal screenshot

-
Configure Basic Settings
In the Basics tab, specify:
-
Name: e.g.,
CLM Device Certificate - iOS -
Description (optional):
Requests device certificates from MTG SCEP endpoint -
Click Next.
-
-
Configure MTG SCEP Settings
In the Configuration settings tab, enter the MTG SCEP details:
-
SCEP Server URL:
scep.example.com/scep(replace with your actual MTG SCEP endpoint) -
Subject name format:
CN={{DeviceName}}(or your preferred subject format) -
Certificate type:
Device -
Key size:
2048 -
Key usage: Digital signature and Key encipherment (check both)
-
Root CA: Select the trusted certificate profile created above
-
Renewal threshold:
20(percentage of certificate lifetime before renewal) -
Extended key usage: Add client authentication if needed
-
Hash algorithm: SHA-256 (default)
Click to reveal screenshot
Click Next.
-
-
Assign to Security Group
In the Assignments tab, click Add groups.
Search for and select the security group used above.
Click Select, then click Next.
The group shows 0 devices initially. This is expected and prevents the profile from affecting any devices until you explicitly add your device after enrollment. -
Review and Create
In the Review + create tab, verify:
-
Platform is your preferred one
-
Profile type is SCEP Certificate
-
SCEP Server URL is correct
-
Root CA references correct profile
-
Assignment shows your test group with 0 devices
Click Create.
-
Verification Checklist
Before proceeding, confirm:
-
Profile appears under Devices → Configuration alongside the root CA profile
-
Profile type column shows SCEP Certificate
-
Assignment column shows your test group with 0 of 0 devices
-
SCEP Server URL is correctly configured
-
Root CA points to the trusted certificate profile
The SCEP certificate profile is now ready but not deployed. When your device enrolls and receives both profiles: - The root CA profile makes the CLM root certificate trusted - The SCEP profile enables the device to request certificates from MTG CLM
Proceed to the next section to enroll your device in Intune.
Enroll device in Intune
Enroll your device in Microsoft Intune using the Company Portal app or Automated Device Enrollment (ADE). This establishes the device as managed and allows it to receive the configuration profiles created in previous sections.
| The enrollment steps below have been tested using an iPad (iOS device). While the general approach remains the same for other platforms, deviation is to be expected in some steps due to the nature of each device’s operating system and characteristics. |
Enrollment Prerequisites
Before starting enrollment, ensure:
-
Device is running iOS 13.0 or later
-
Apple ID is signed in on the device
-
Device is connected to Wi-Fi with internet access
-
Intune Company Portal app is installed from App Store (for user-driven enrollment)
Step-by-step Instructions
-
Install Company Portal (if not using ADE)
Open the App Store on your device and search for "Intune Company Portal". Install the application.
-
Launch Company Portal
Open the Company Portal app. Tap Sign In and enter your corporate credentials (the same account used in the Intune admin center).
-
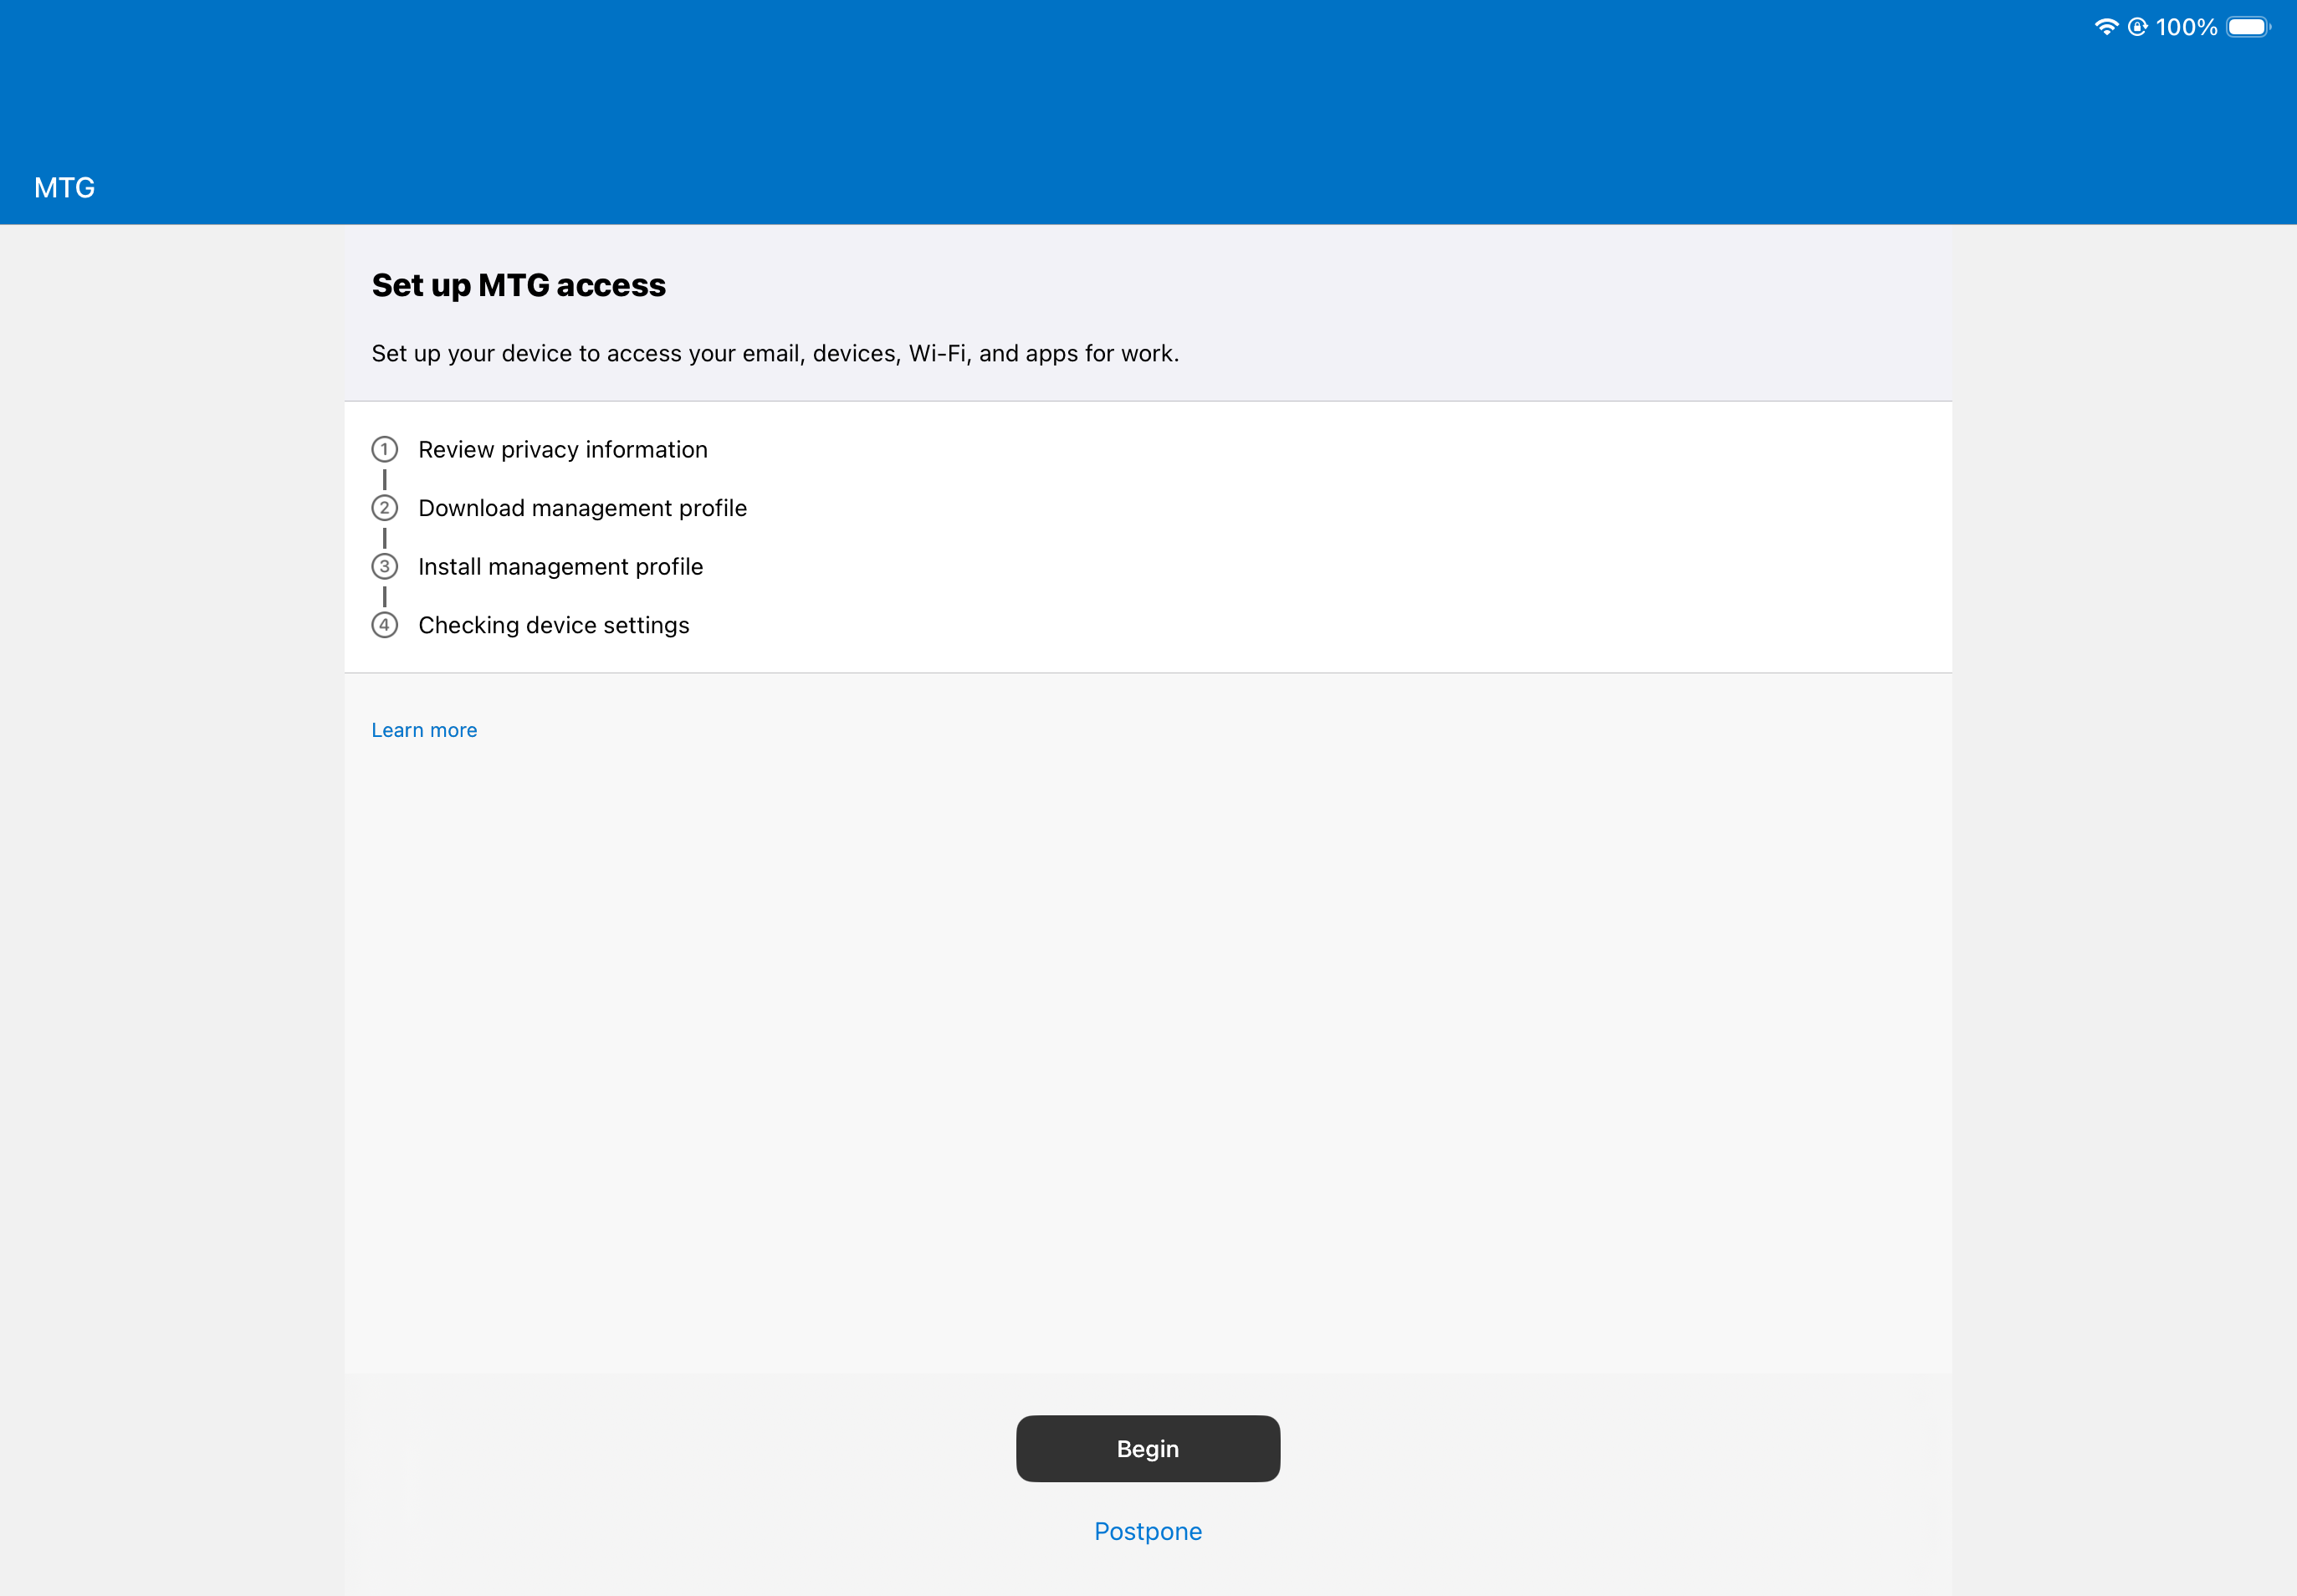
Begin Enrollment
After signing in, tap Begin or Enroll when prompted to register your device with Intune.
Click to reveal screenshot
-
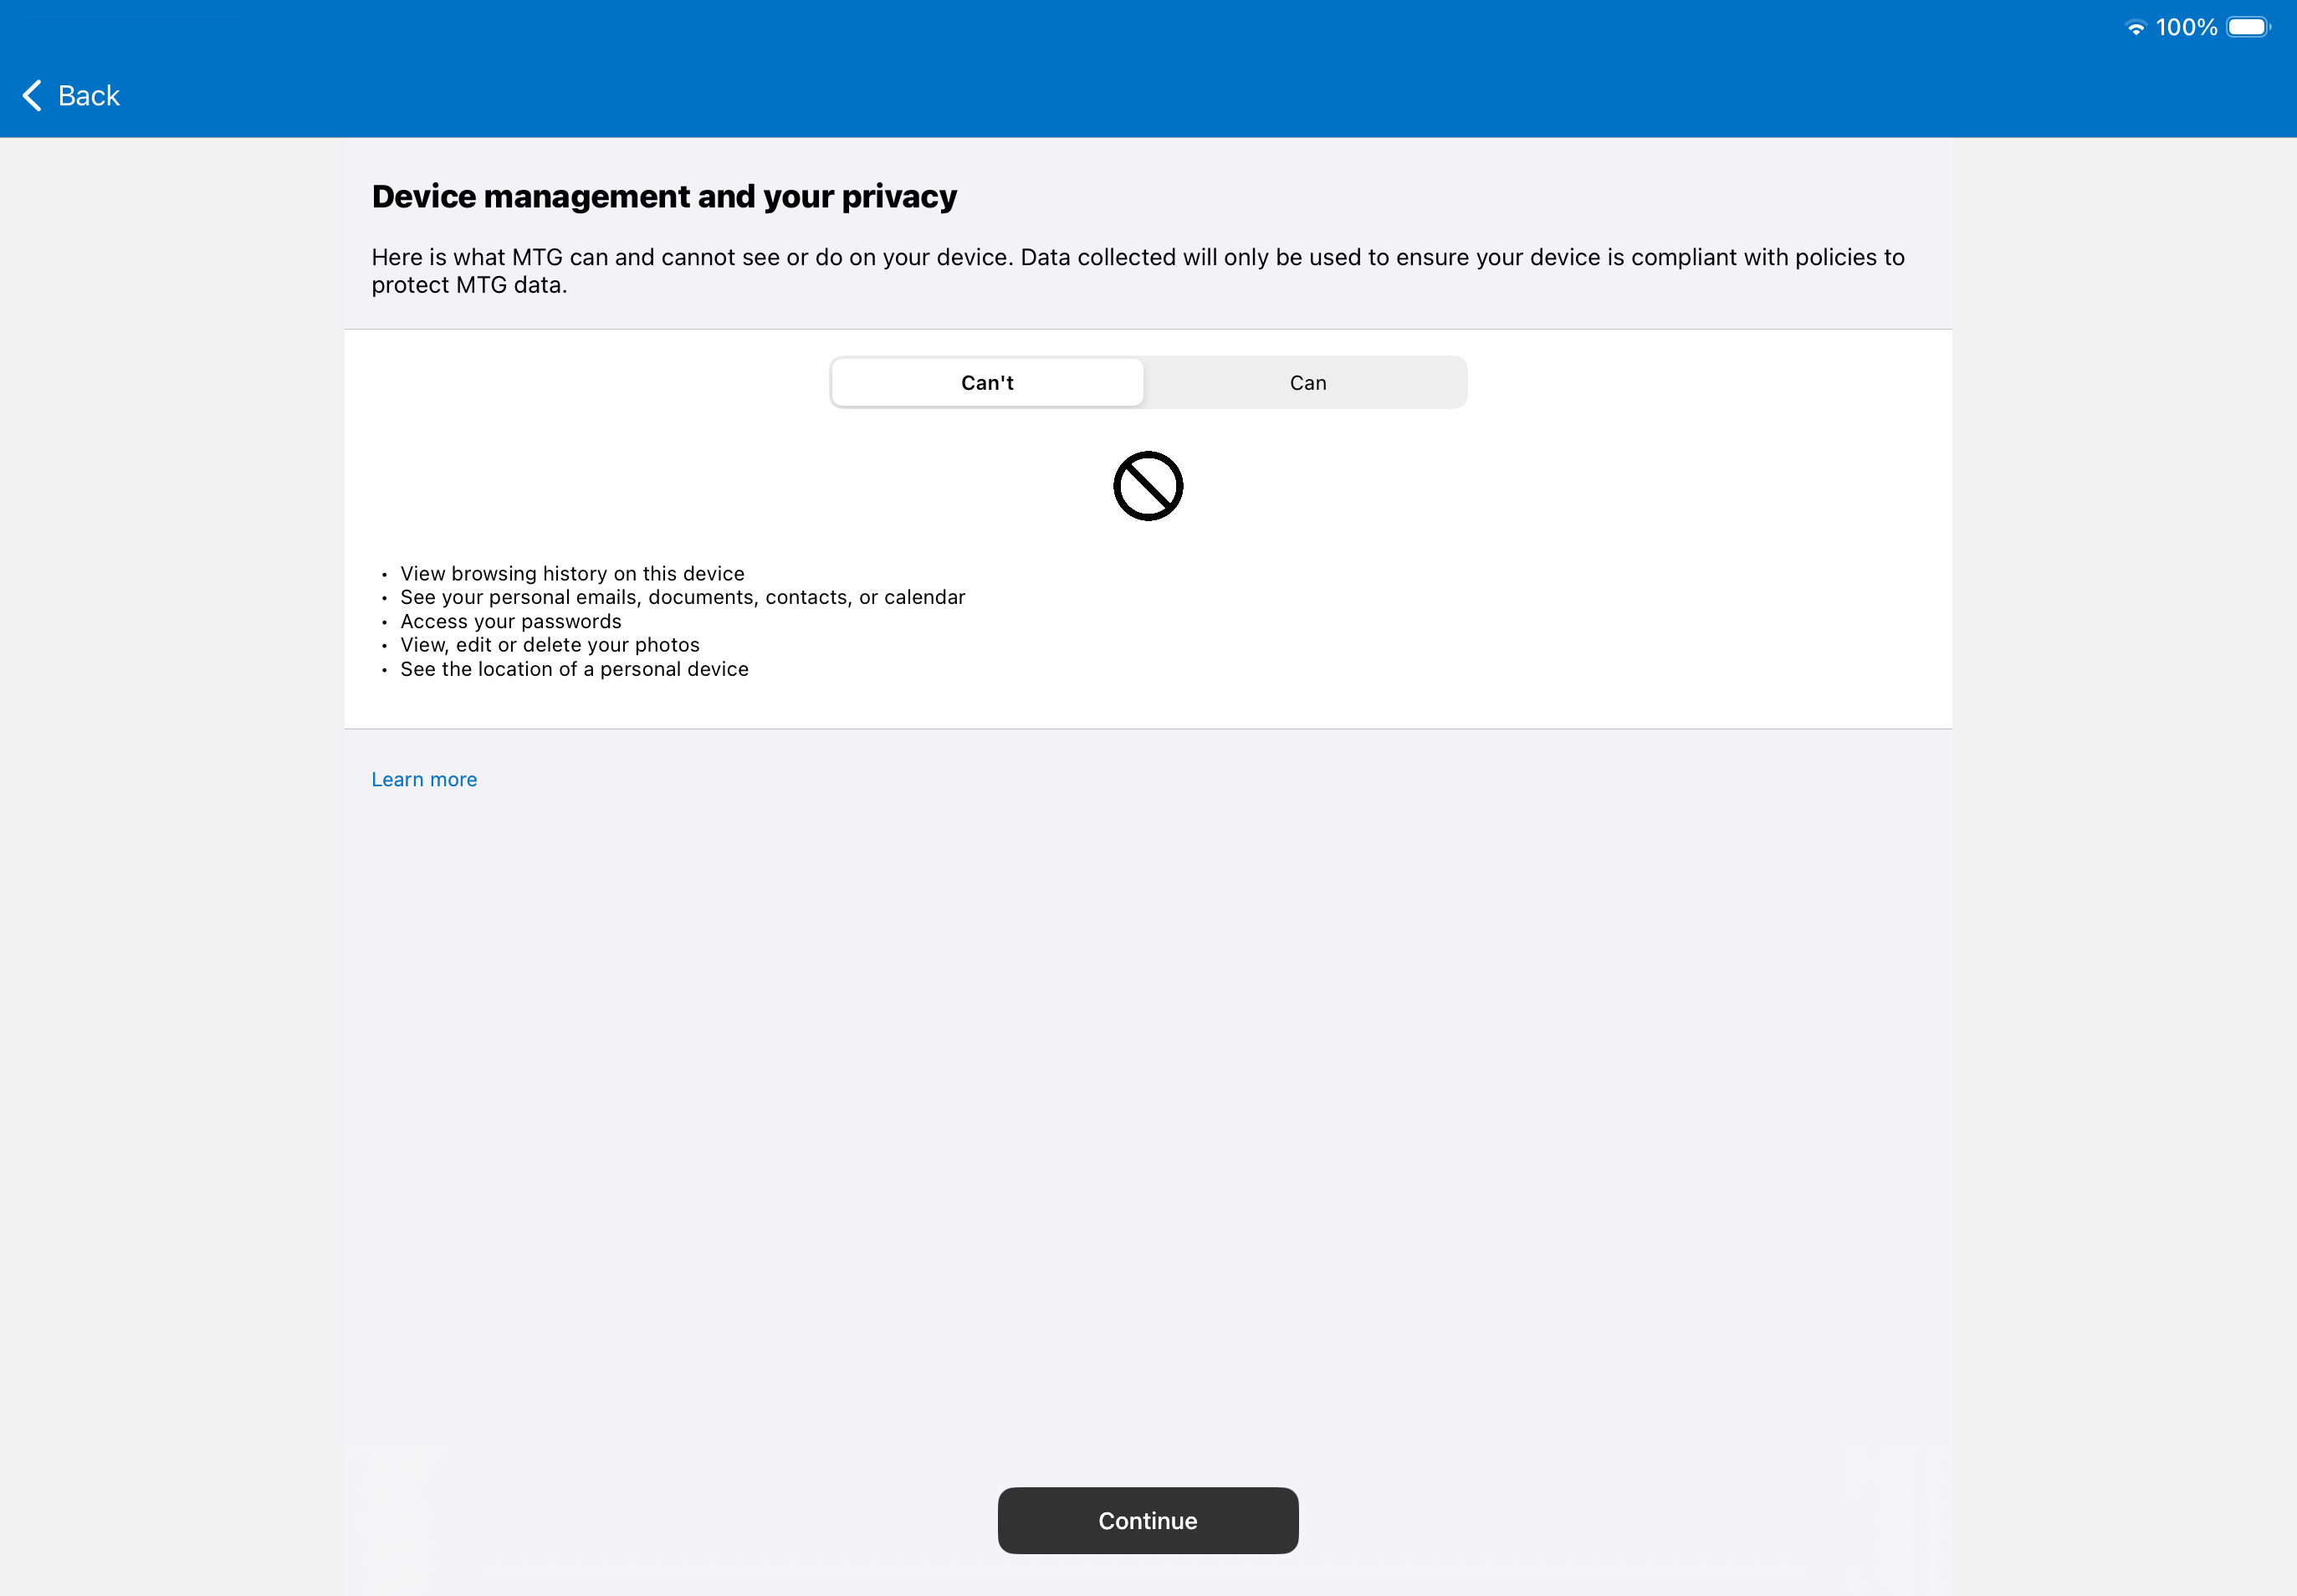
Accept Terms and Conditions
Review the privacy statement. Tap Continue to proceed.
Click to reveal screenshot
-
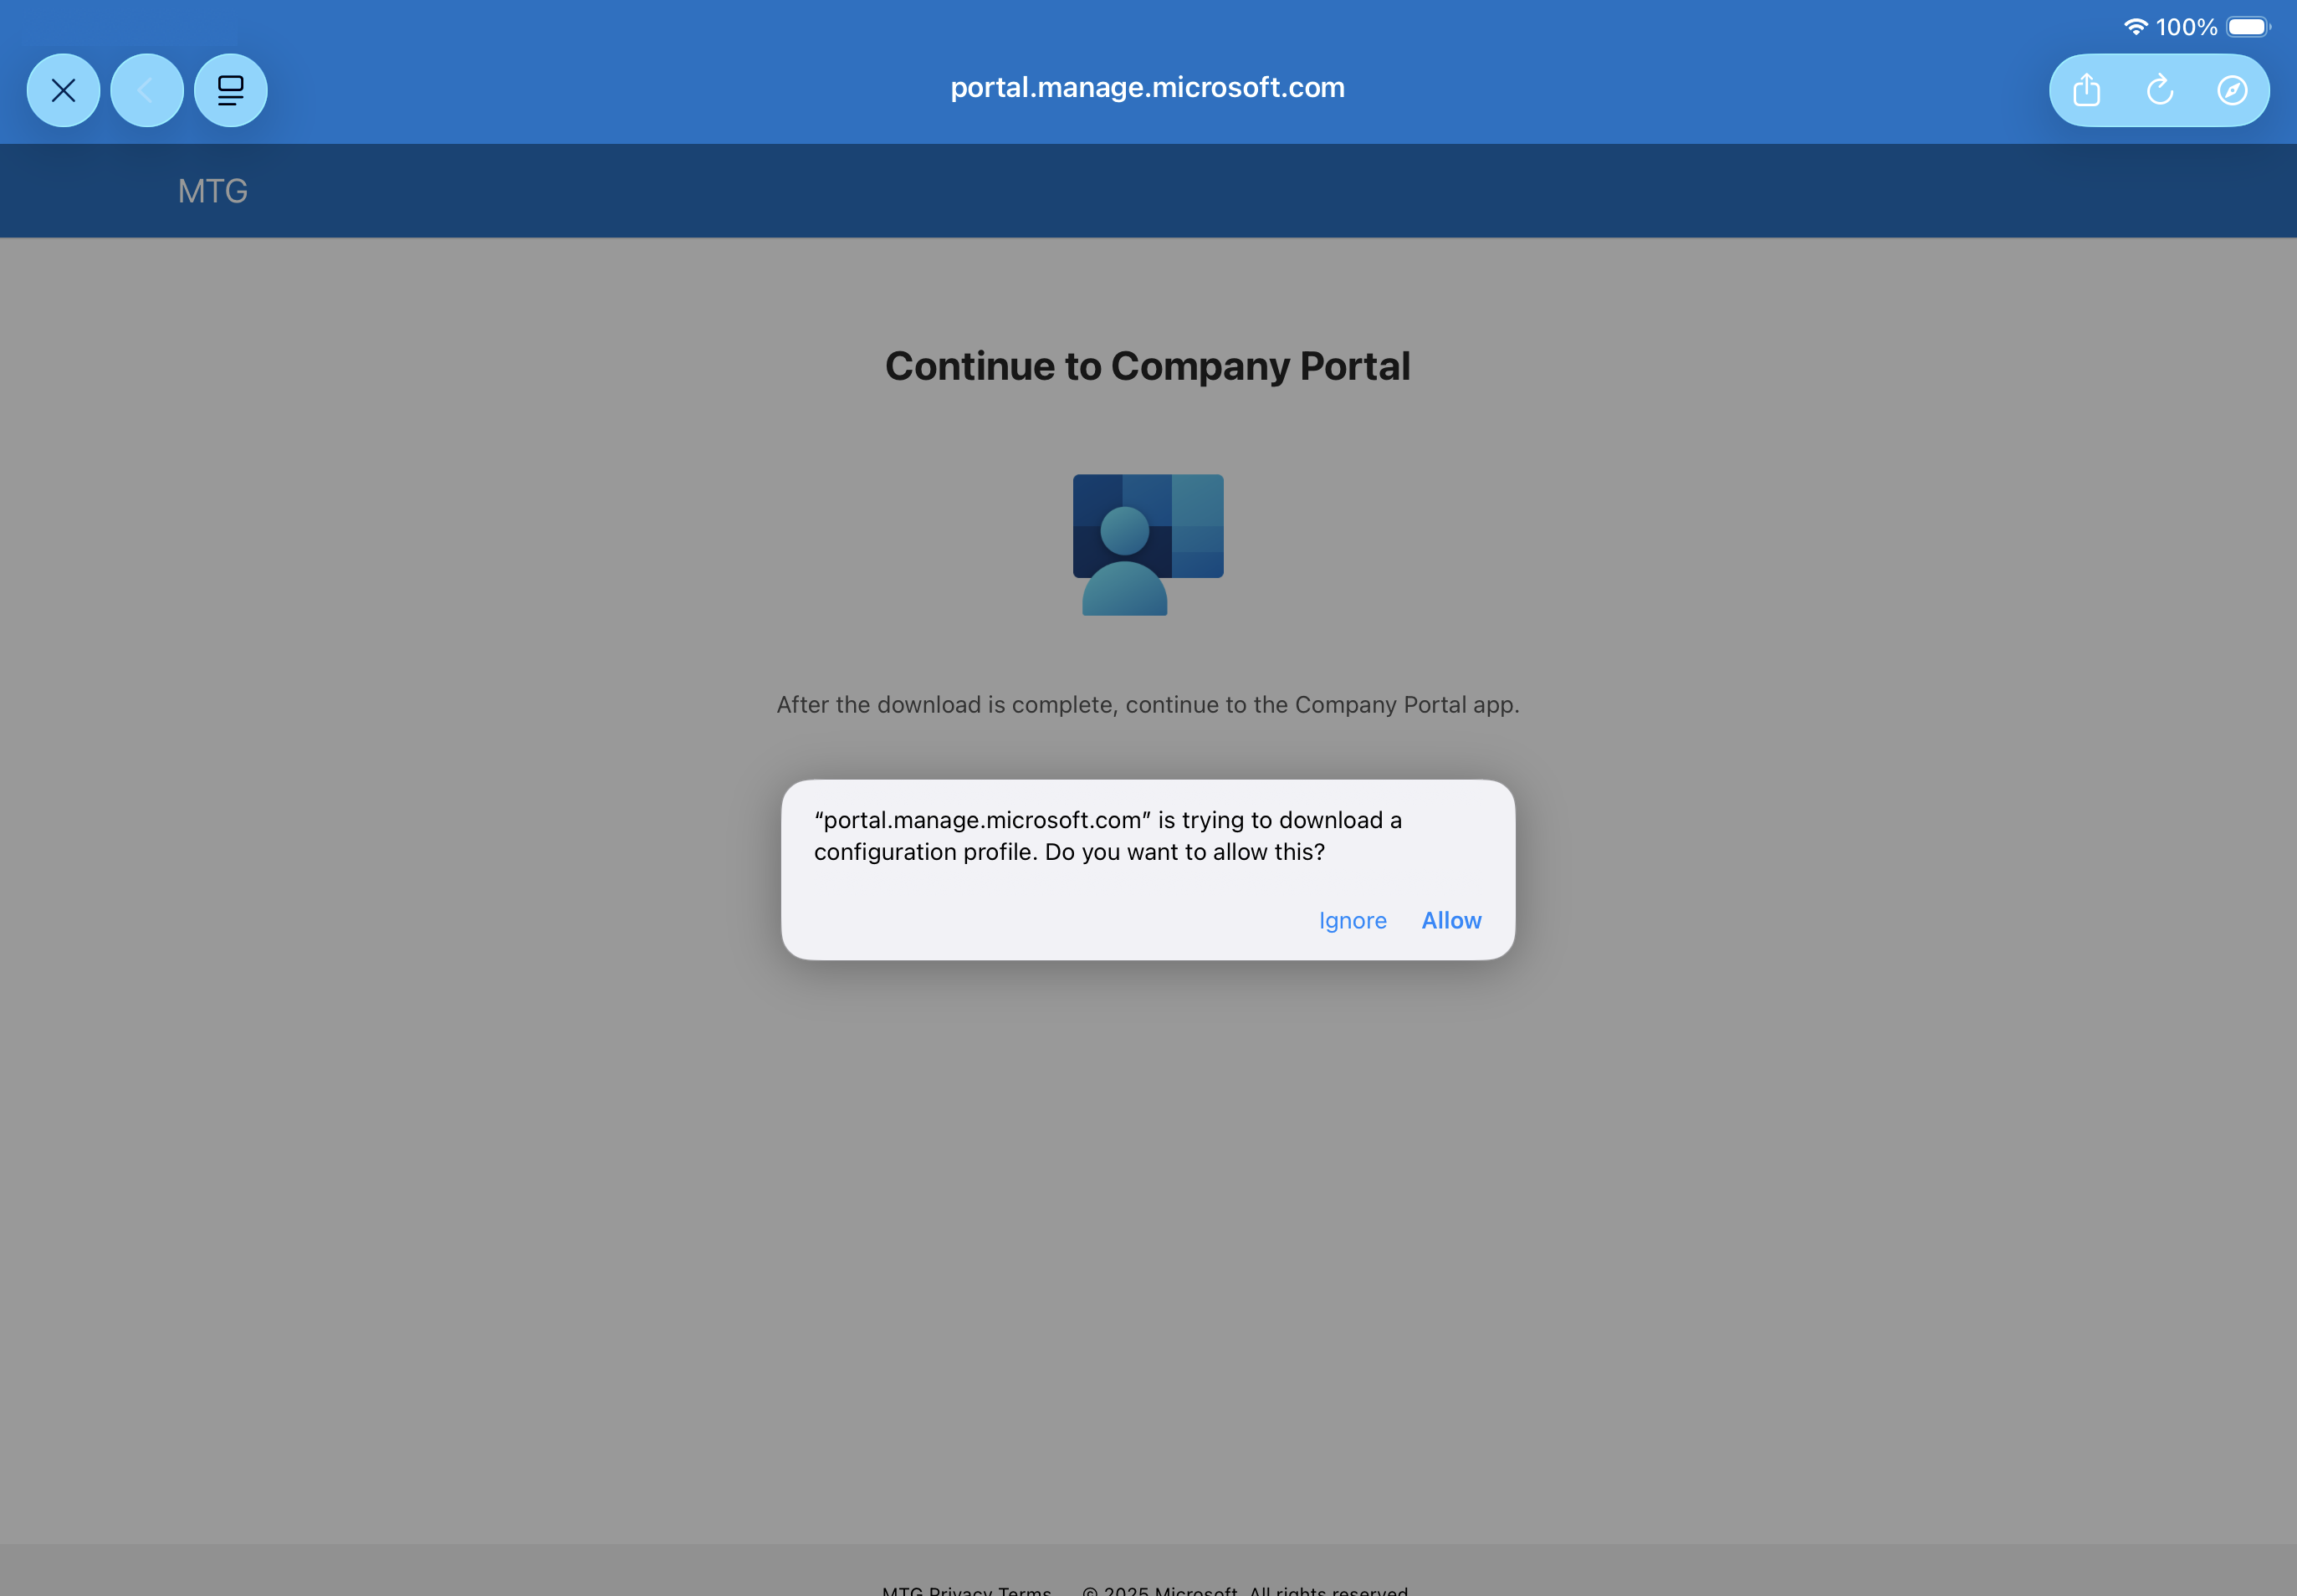
Download Management Profile
The app will prompt you to download a management profile. Tap Allow.
Click to reveal screenshot
-
Install Management Profile
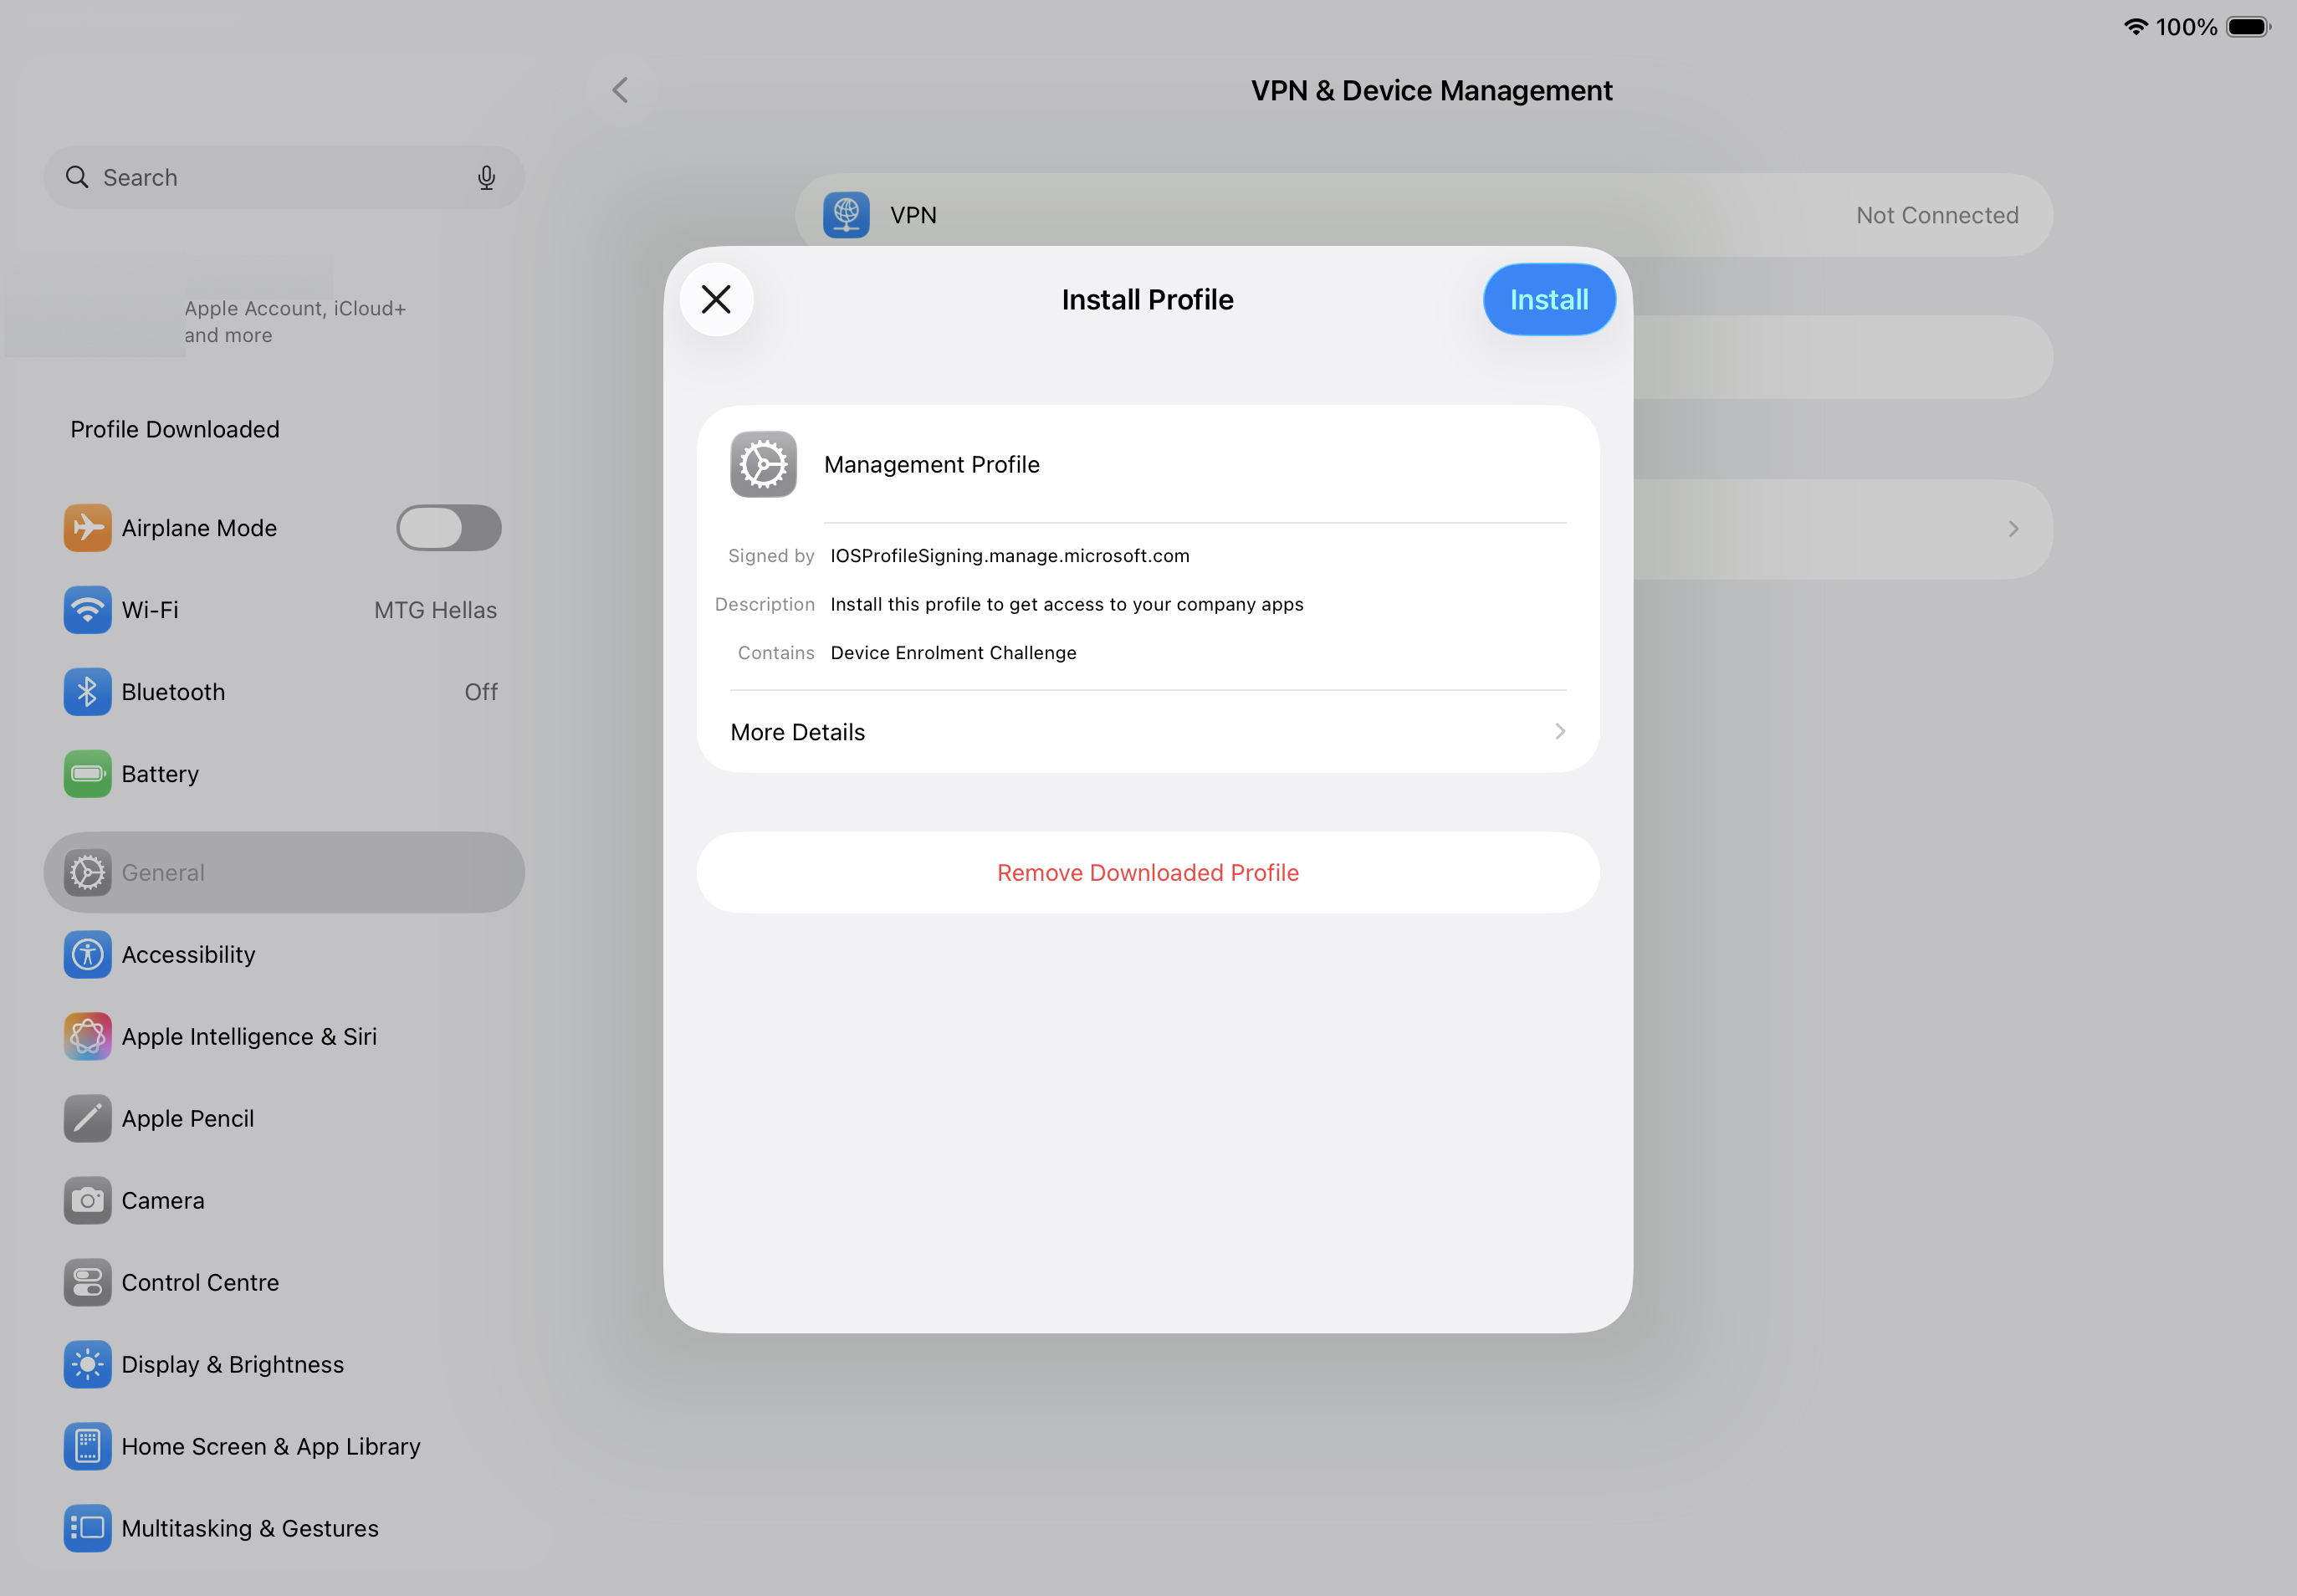
Navigate to Settings → General → VPN & Device Management. You should see a profile labeled "Management Profile" or similar.
Tap the profile, then tap Install. Enter your device passcode if prompted.
Click to reveal screenshot
-
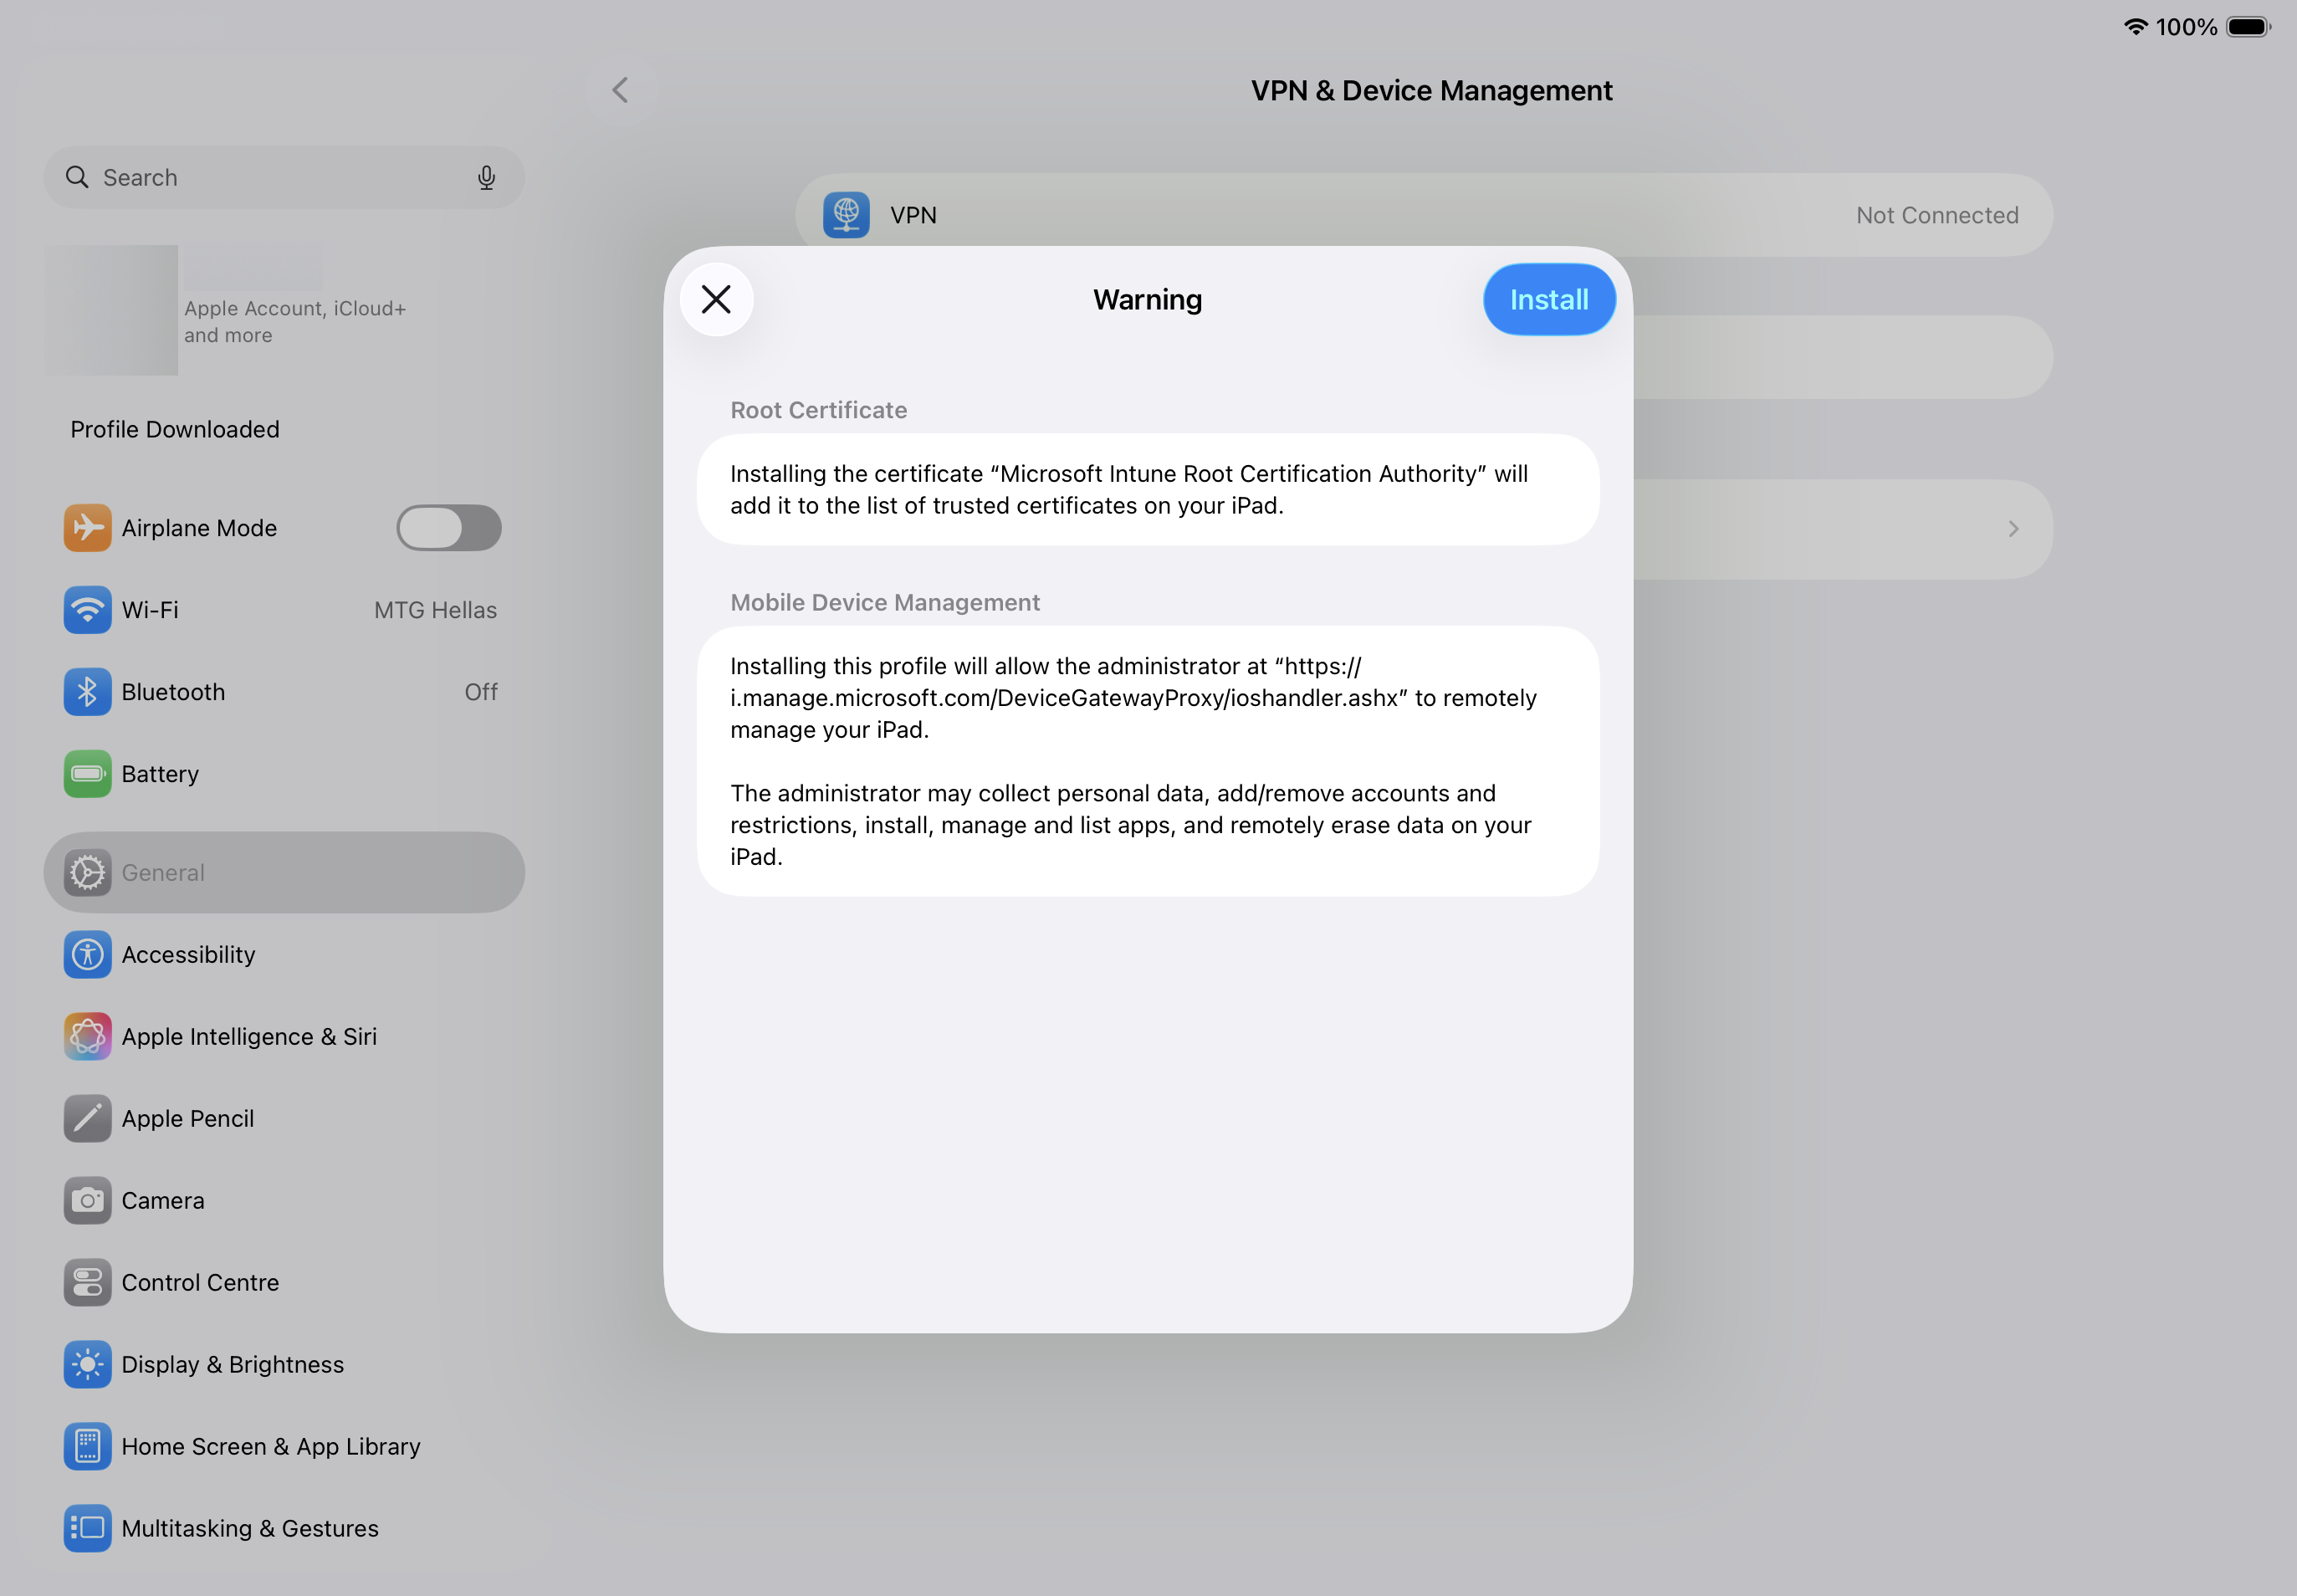
Trust Remote Management
A dialog will appear asking you to trust remote management. Tap Trust in the upper-right corner.
Click to reveal screenshot
-
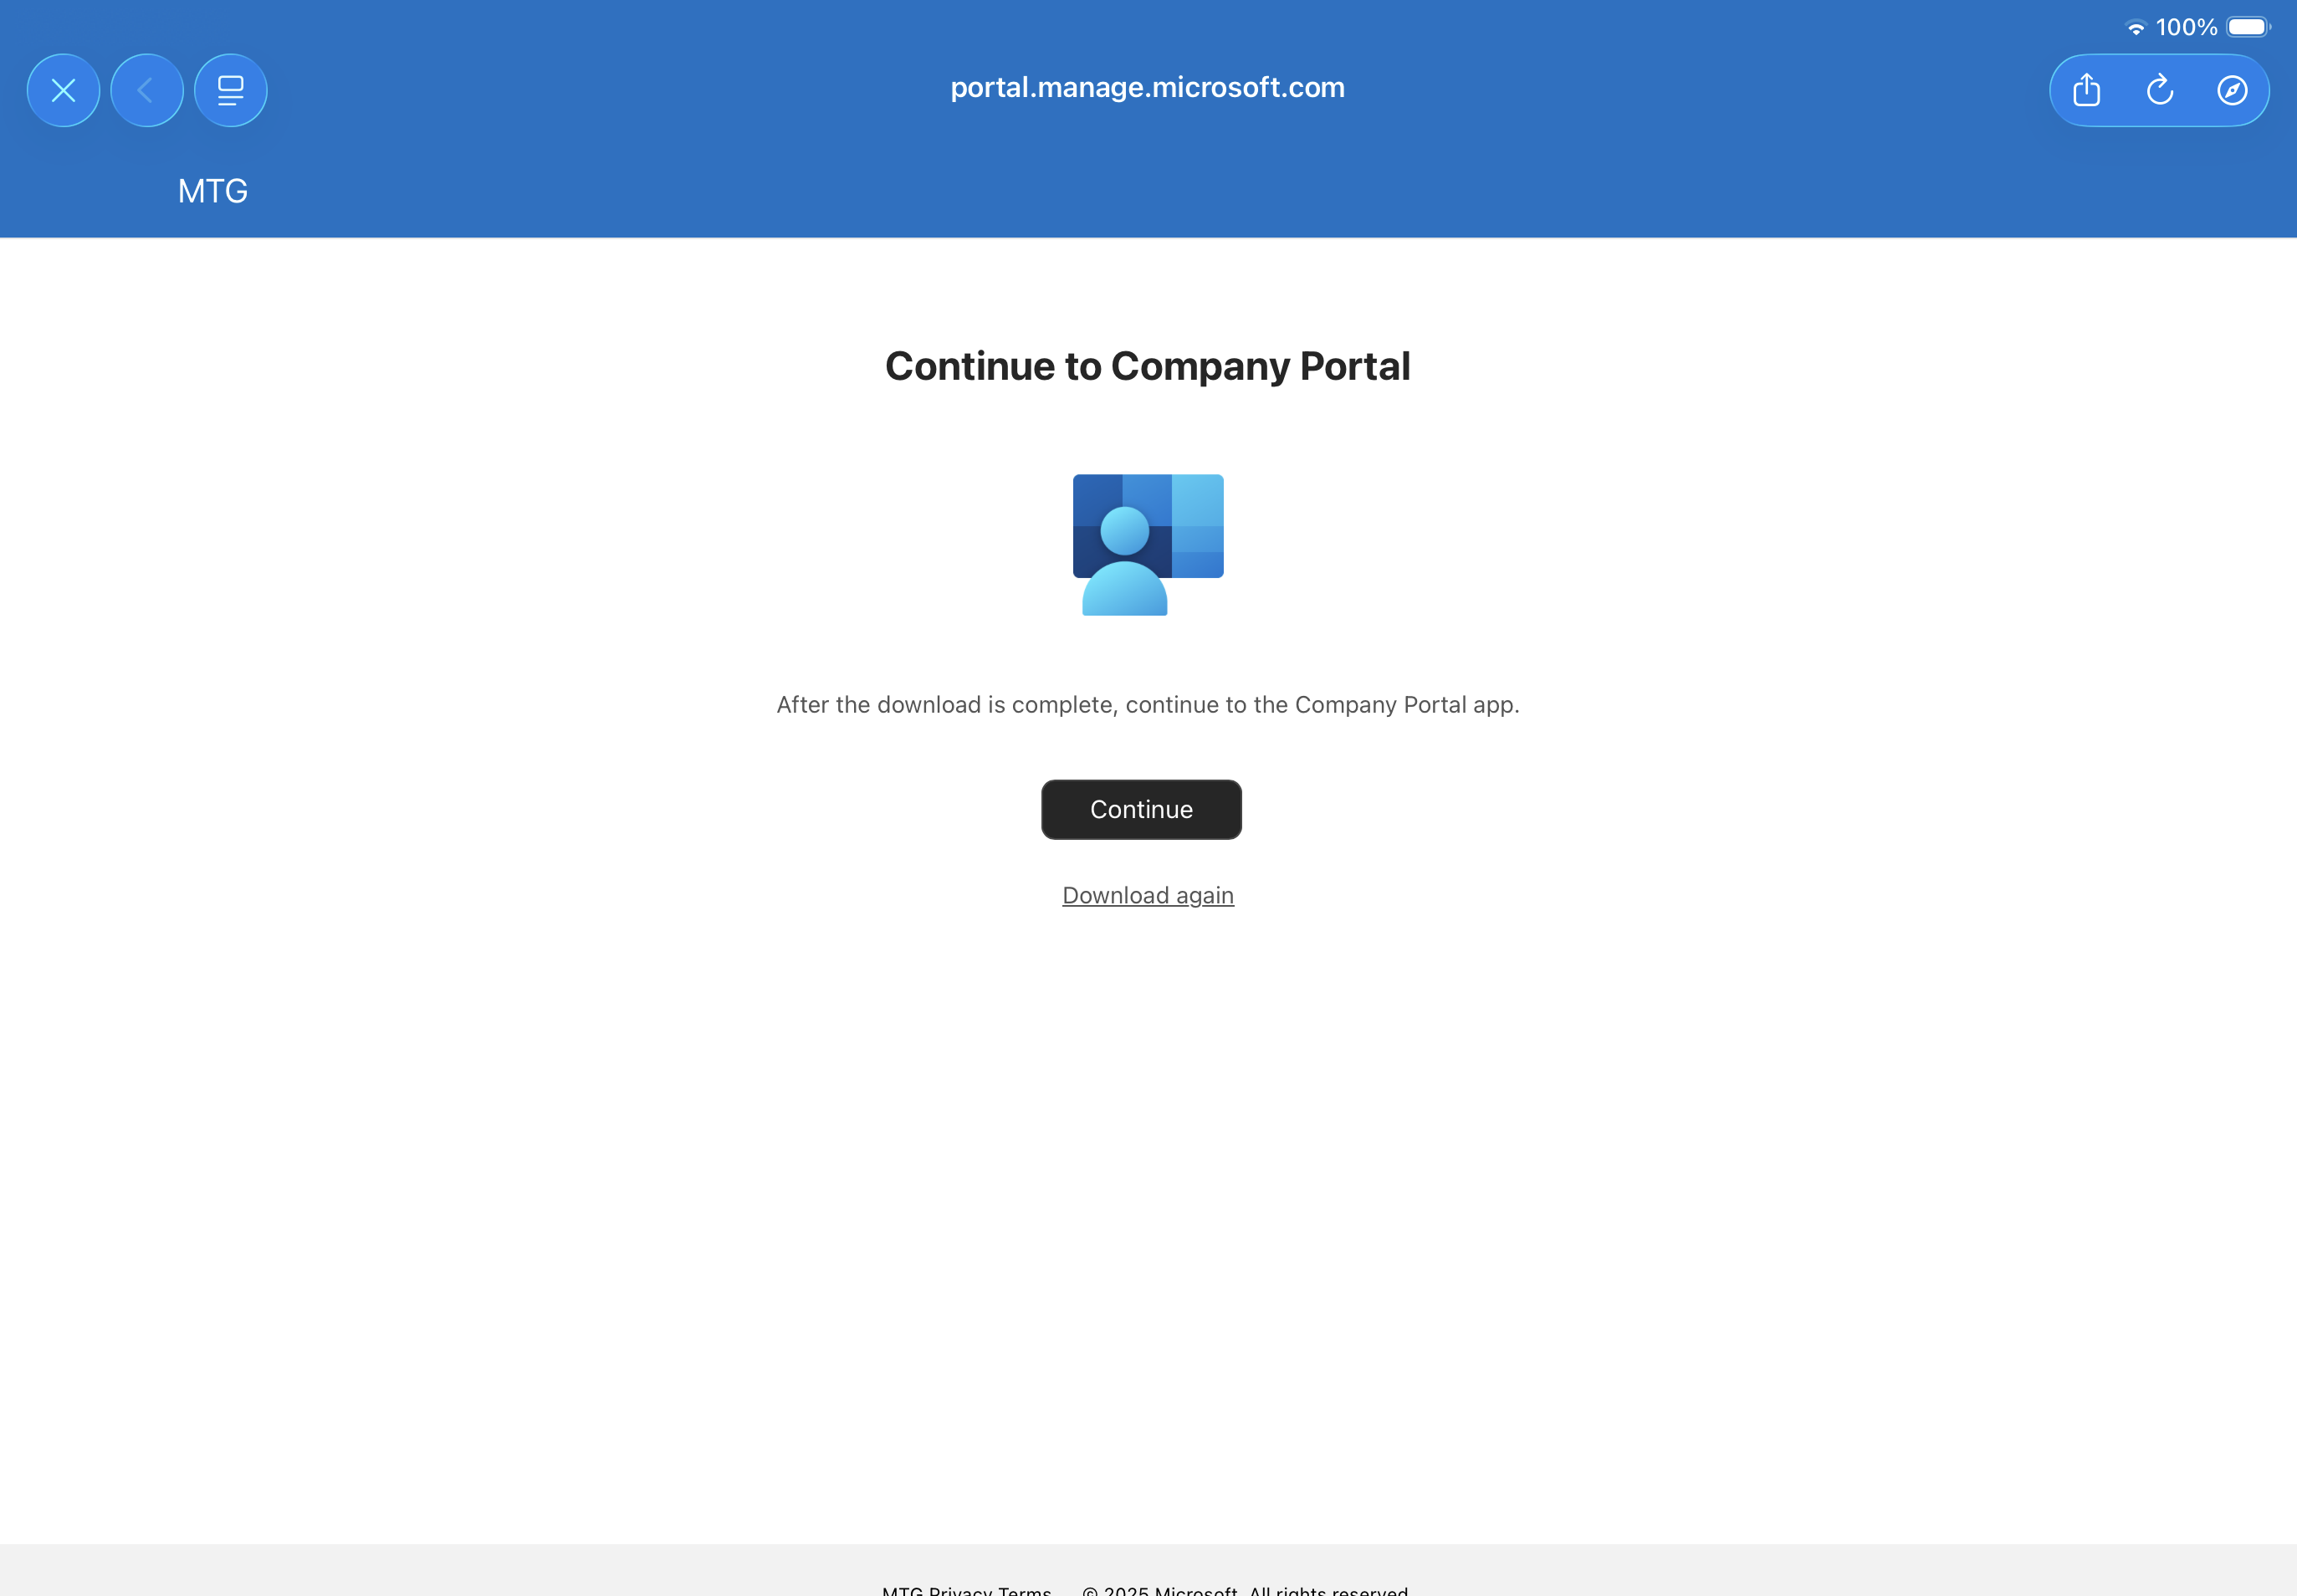
Continue Enrollment
Return to the Company Portal app. It should show a continue prompt.
Click to reveal screenshot
-
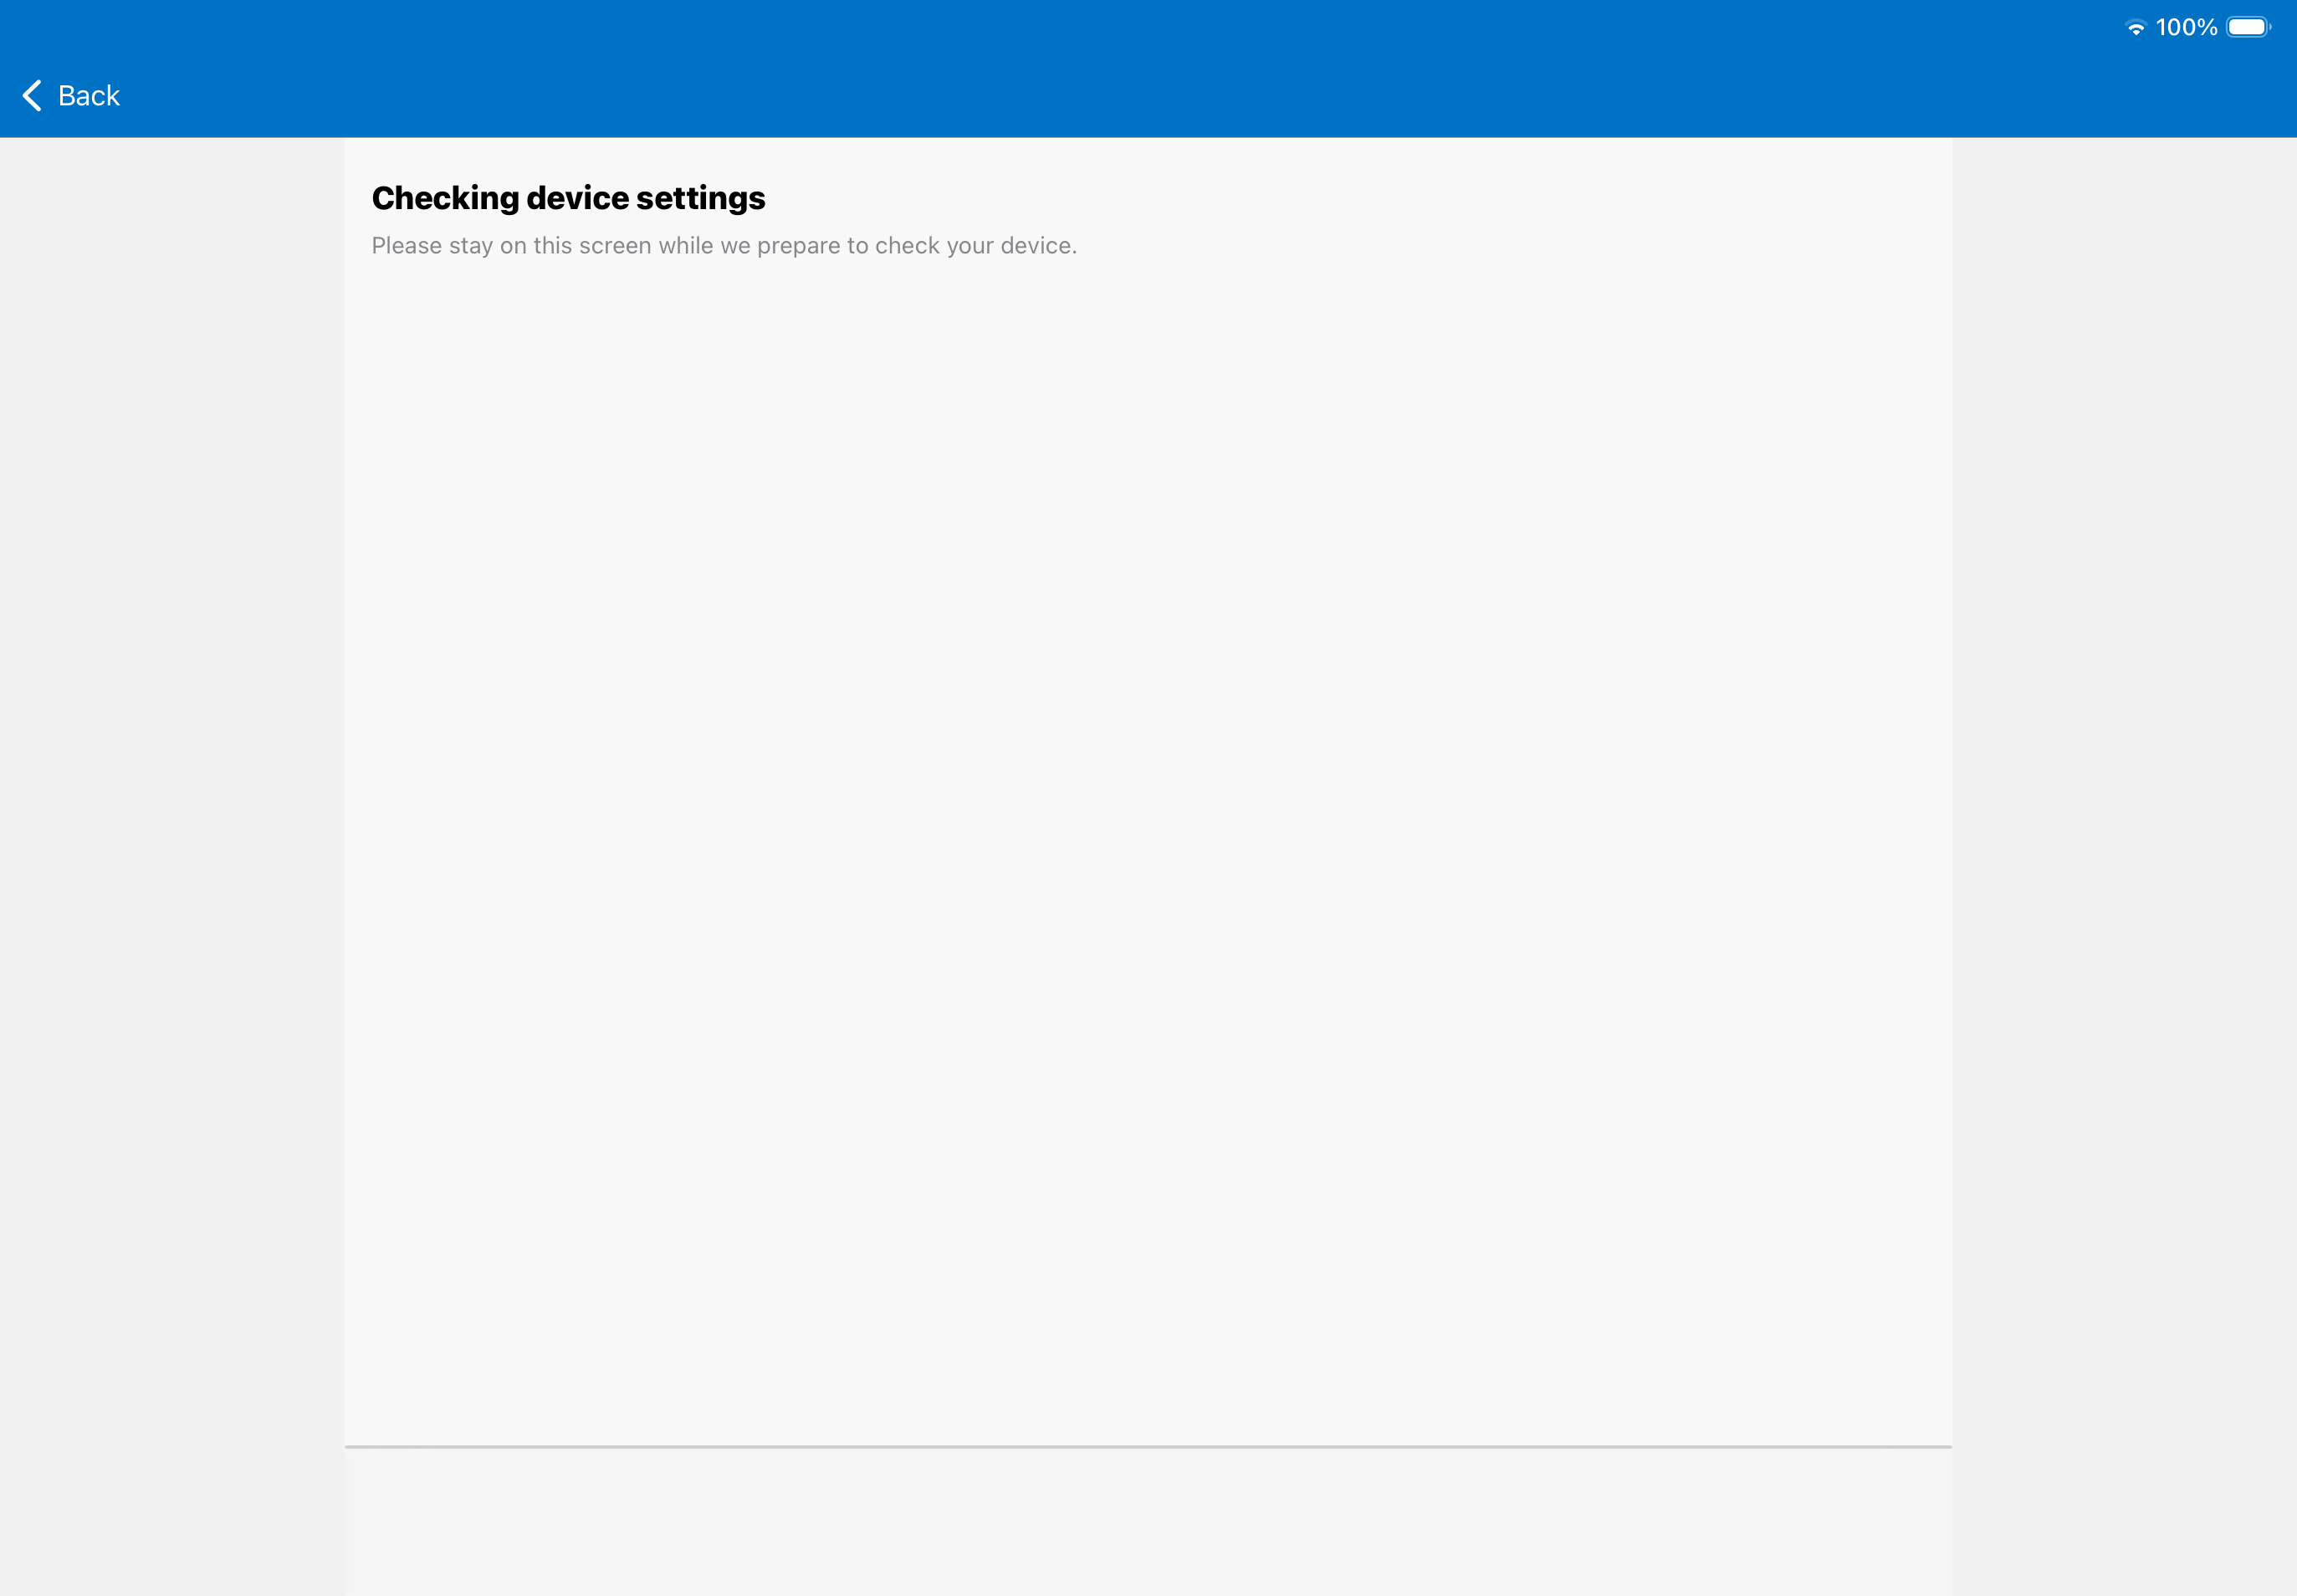
Checking Device Settings
Wait a few minutes for the Device Settings check to complete. Do not switch screens/apps during this process.
Click to reveal screenshot
-
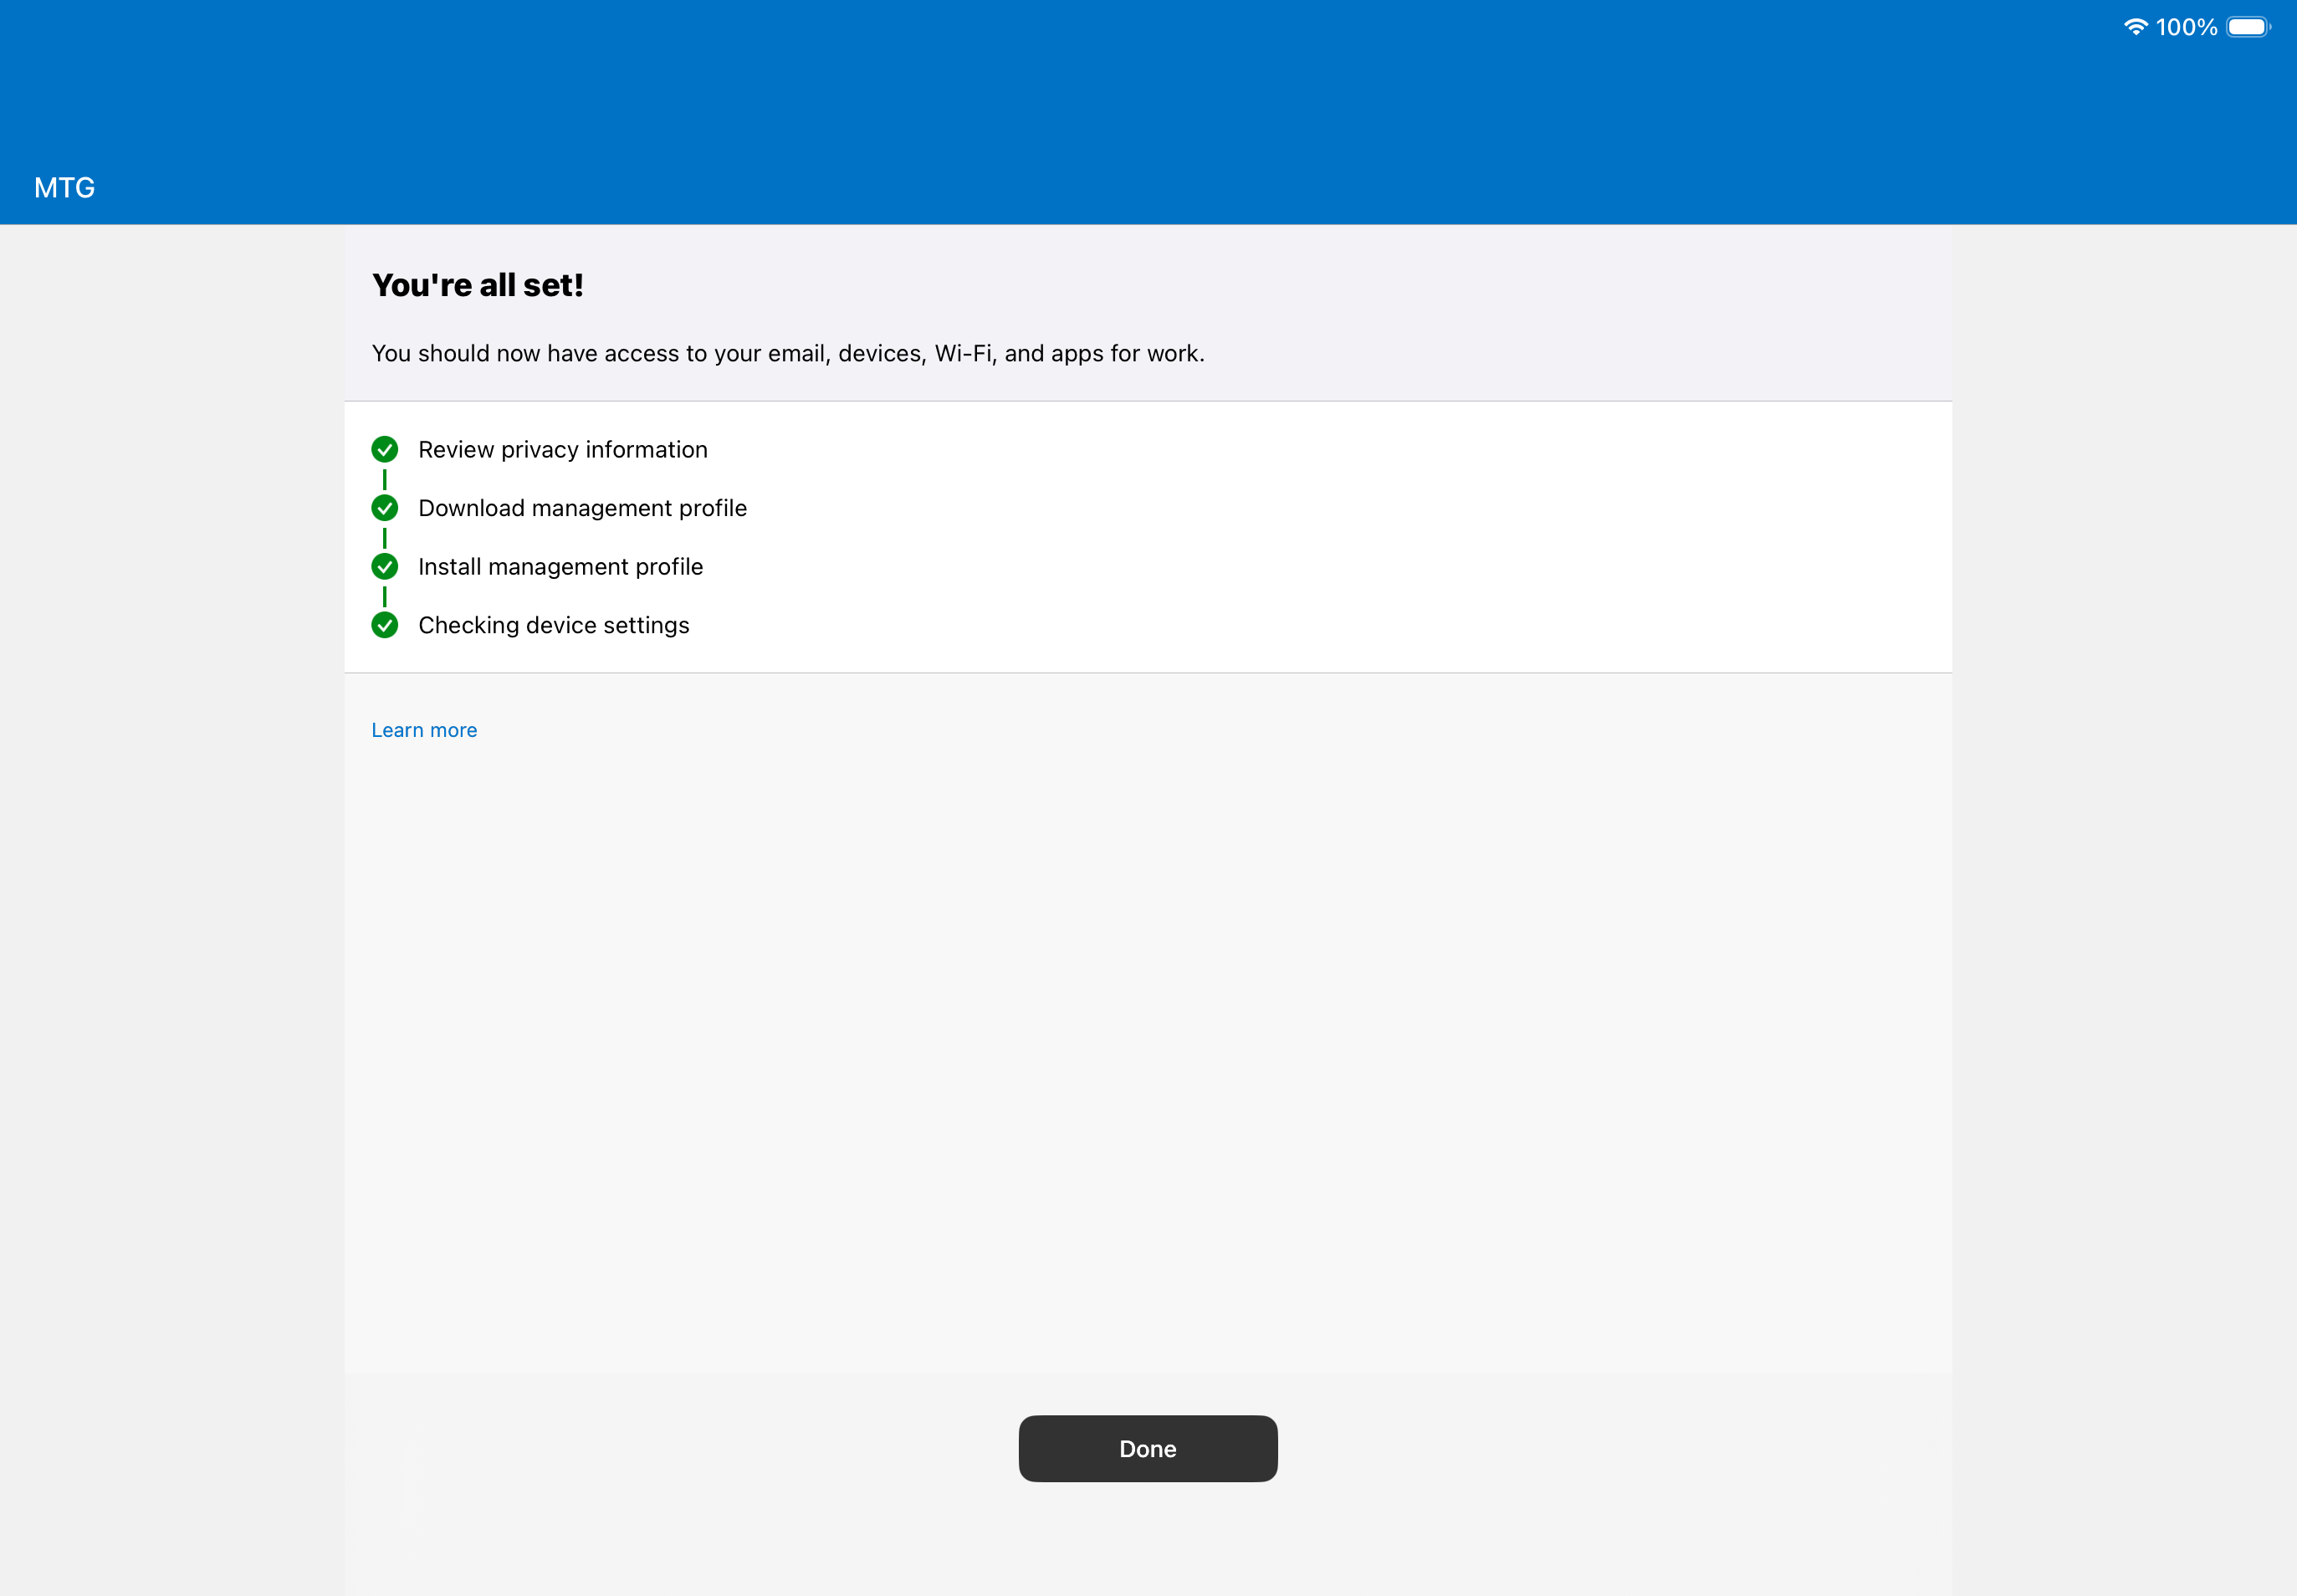
Checklist Complete
You should be now seeing a complete checklist of the previous steps with green checkmarks. Tap Done
Click to reveal screenshot
Verification Checklist
Before proceeding, confirm:
-
Company Portal shows device as enrolled and compliant
-
Device appears in Intune admin center → Devices → All devices
-
Device name matches your device’s name
-
Enrolled date is recent (today’s date)
-
Compliance status is "Compliant" or "Not Evaluated" (not "Non-compliant")
Troubleshooting
If enrollment fails:
-
Verify Apple MDM push certificate is active in Intune
-
Check that device is not already enrolled in another MDM
-
Ensure user has appropriate Intune license assigned
-
Review enrollment restrictions in Tenant administration → Enrollment device platform restrictions
With the device enrolled, it will automatically begin receiving assigned configuration profiles. Proceed below to verify profile delivery.
Verify Profile Delivery to Device
Confirm that the device has successfully received both the trusted root CA profile and the SCEP certificate profile . This verification ensures Intune’s profile delivery mechanism is working before attempting certificate issuance.
Step-by-step Instructions
-
Check Intune Admin Center
In the Intune admin center, navigate to Devices → All devices.
Click on your enrolled device to open the device details page.
-
Verify Profile Status
In the device details page, select Device configuration from the left sidebar (or scroll to the Configuration section).
You should see both profiles listed:
-
CLM Root CA - iOS (Trusted Certificate profile)
-
CLM Device Certificate - iOS (SCEP Certificate profile)
Check the Status column for each profile. It should show Succeeded or Pending.
-
-
Check Last Check-in Time
On the device details overview, note the Last check-in time. If it’s more than 15 minutes old, you may need to force a sync.
-
Force Device Sync (if needed)
On the device, open the Company Portal app.
Tap Devices → your device → Sync or Check Status to force an immediate sync with Intune.
Alternatively, in the Intune admin center, select the device and click Sync from the top menu.
-
Wait for Profile Delivery
Profiles typically deploy within 5-15 minutes after enrollment. Wait for the status to change to Succeeded on both profiles.
Verification Checklist
Before proceeding, confirm:
-
Both profiles appear in the device’s Device configuration list
-
CLM Root CA - iOS Test shows status Succeeded
-
CLM Device Certificate - iOS Test shows status Succeeded or Pending
-
Last check-in time is recent (within last 15 minutes)
-
Device is showing as Managed in Apple Configurator 2 (optional verification)
Troubleshooting
If profiles show Failed or remain Pending:
-
Verify the device is assigned to the correct security group
-
Check if there are any assignment filter conflicts
-
Review profile deployment status in Devices → Configuration → select profile → Device status
-
Ensure device OS version meets profile requirements
If only the SCEP profile fails:
This is expected if admin consent is not yet granted. The root CA profile should succeed regardless.
With both profiles delivered successfully, verify the root CA is trusted on the device in the next section.
Verify Root CA is Trusted
Verify that the CLM root certificate has been installed and is trusted in the iOS certificate store. This step ensures the device will accept certificates issued by your CA during the SCEP enrollment process.
Step-by-step Instructions
-
Open device Settings
On your enrolled device, open the Settings app.
-
Navigate to Certificate Trust Settings
Go to General → About → Certificate Trust Settings (scroll down to find this option).
-
Locate CLM Root Certificate
Under ENABLE FULL TRUST FOR ROOT CERTIFICATES, you should see your CLM root certificate listed.
The certificate will display with a name matching your CA’s subject (e.g., "CLM Root CA" or similar).
-
Verify Trust Status
The toggle next to your root certificate should be ON (green).
If the toggle is OFF, tap it to enable full trust.
-
View Certificate Details (optional)
Return to General → VPN & Device Management → Configuration Profile → More Details.
Tap on the root certificate entry to view: * Subject: Should match your CA * Issuer: Should be the same as Subject (self-signed root) * Expires: Certificate validity period
-
Verify with Safari (optional)
Open Safari and navigate to a test site that uses a certificate from your CA (if available).
If the root CA is trusted correctly, you should not see certificate warnings.
Verification Checklist
Before proceeding, confirm:
-
Root certificate appears in Settings → General → About → Certificate Trust Settings
-
Trust toggle is ON (enabled)
-
Certificate details show correct CA name and validity dates
-
Certificate subject and issuer match your CLM root CA
Troubleshooting
If certificate is not visible:
-
Verify the trusted certificate profile shows Succeeded in Intune
-
Force a device sync from Company Portal
-
Check if certificate was delivered to wrong certificate store (should be System/Root)
If trust toggle is OFF:
-
Enable it manually
-
Check if profile requires additional configuration for automatic trust enablement
If certificate shows but SCEP will still fail:
This is expected if admin consent is pending. Root CA trust is independent of API permissions.
The device now trusts your CLM root CA. Proceed below to initiate SCEP certificate enrollment and verify MTG CLM issues a valid device certificate.
Verify Certificate Issuance
Trigger SCEP enrollment on your device and confirm that MTG CLM has issued a device certificate that chains to the CLM root CA.
Step-by-step Instructions
-
Trigger SCEP Enrollment
On the enrolled device, open the Company Portal app.
Tap Check status to force a device check-in and trigger the SCEP certificate request.
-
Verify Profile Status in Intune
In the Intune admin center, go to Devices → All devices and select your device.
Open the Device configuration tab and locate both profiles:
-
CLM Root CA – iOS Test(Trusted certificate) -
CLM Device Certificate – iOS Test(SCEP certificate)
Ensure:
-
CLM Root CA – iOS Test shows Succeeded
-
CLM Device Certificate – iOS Test shows Succeeded (not Error or Pending)
-
Verify Certificate on device
-
On your device, open Settings → General → VPN & Device Management and select the Intune management profile.
Tap More Details and verify that:
-
A new certificate is present under Certificates.
-
Issuer matches your CLM issuing CA and chains to the CLM root CA.
-
Subject matches the SCEP subject format configured above (for example
CN={{AAD_Device_ID}}orCN={{Device_Serial}}).-
Verify Certificate in MTG CLM
-
In MTG CLM, open the Certificates menu.
Confirm that:
-
The certificate subject and serial number match the certificate visible on your device.
Verification Checklist
Before marking the above as complete, confirm:
-
SCEP profile status is Succeeded for the device in Intune.
-
A valid device certificate appears in the Intune management profile on your device.
-
The certificate chains to the CLM root CA.
-
MTG CLM shows the request as Issued, not Rejected or Failed.
SCEP Troubleshooting Reference
Use this section if the SCEP profile shows Error or the certificate does not appear on your device after running Check status.
Common Error Patterns
HTTP 403 / Authorization_RequestDenied
-
Symptom (SME logs):
-
code":"Authorization_RequestDenied","message":"Insufficient privileges to complete the operation"when the SCEP service calls Intune/Graph.
-
-
Likely causes:
-
The Entra app used by the SCEP server is missing Intune → scep_challenge_provider or required Graph application permissions.
-
Admin consent was not granted for the app, or was granted in the wrong tenant.
-
-
Fix:
-
In the app registration, add Intune → scep_challenge_provider, then re‑grant admin consent.
-
Verify the SCEP server uses the same Application (client) ID, Tenant ID, and a valid client secret/certificate from that app.
-
SubjectNameMismatch
-
Symptom (SCEP logs):
-
ErrorCode: SubjectNameMismatch, ErrorDescription: Subject Name in CSR and challenge do not matchwith different CN strings and lengths.
-
-
Likely causes:
-
Subject template in Intune adds quotes or extra characters
-
Device name contains characters that are normalized differently between Intune and the CSR.
-
-
Fix:
-
In the SCEP profile, set Subject name format to a simple template without quotes, for example:
-
CN={{AAD_Device_ID}}orCN={{Device_Serial}}
-
-
Save the profile and re-run Check status on your device.
-
SCEP Server Returned Invalid Response / Generic Error
-
Symptom (Intune device view):
-
SCEP profile status Error, details similar to “The SCEP server returned an invalid response.”
-
-
Likely causes:
-
SCEP endpoint URL mismatch between Intune and the published URL.
-
NDES/MTG SCEP service not reachable or wrong certificate bound in IIS.
-
Intune certificate connector or SCEP policy module not healthy.
-
-
Fix:
-
Verify the SCEP URL in the Intune profile matches the SME’s URL exactly (protocol, host, path, no stray slash).
-
From a browser, hit the SCEP URL and confirm you get the expected NDES/SCEP landing 403, not 404 or connection failure.
-
Check SCEP/NDES and Intune Certificate Connector logs for HTTP status codes and detailed error text.
-
Template / CA Rejection (0x80094800 and similar)
-
Symptom:
-
Device never gets a certificate; CA logs show errors such as 0x80094800 or “The request does not contain a certificate template extension.”
-
-
Likely causes:
-
SCEP certificate template on the CA does not allow the requested key size, EKU, or subject format.
-
NDES service account lacks Enroll permission on the template.
-
-
Fix:
-
Verify the SCEP template:
-
Key size and algorithm align with the Intune profile.
-
EKU includes Client Authentication (1.3.6.1.5.5.7.3.2).
-
Template is published on the issuing CA.
-
-
Grant the NDES / SCEP service account Enroll permission on the template and restart the SCEP/NDES service.
-
When to Re-run the Test
After any backend change (app permissions, SCEP config, CA template):
-
SME verifies logs are clean for the last change.
-
On the device, open Company Portal and tap Check status.
-
In Intune, refresh the device’s Device configuration tab and confirm whether the SCEP profile moves from Error to Succeeded.
If SCEP still fails, capture:
-
The current Intune error message for the SCEP profile on the device.
-
The current SCEP/NDES log entry for that same request.
Use these two together with this troubleshooting reference to identify the next configuration issue.