Business Processes
The following processes are tasks that arise when managing resources and processes for administrators of the {project-name} via the {project-name} GUI.
The {project-name}-UI provide methods for
-
Management of certificate templates
-
Connection management with Hardware Security Modules (HSMs)
-
Creation and deletion of different HSM Users.
-
Creation and management of CAs and SubCAs.
-
Download of CA certificates.
The necessary identification and authentication against the {project-name} application is outlined in the following process steps:
P-MLCA-ADM -01 – Login in to the {project-name}
To set the administrator (or client password), a BCrypt Hash has to be created and set into the application.properties as the representative value for minica.admin.password (or minica.client.password).
After those steps, the login can proceed:
| Process steps | |
|---|---|
01 |
Call the URL of the {project-name} application with the browser (<server-address>:8081/minica), e.g. 192.168.138.3:8081/minica |
02 |
Log in with the representative username and password. Click on the ‘OK’ button to log in with the selected values. |
P-MLCA-ADM-02 – Certificate Templates (Create, Modify, Delete)
| Profile | |
|---|---|
Designation |
P-MLCA-ADM-02 – Certificate Templates (Create, Modify, Delete) |
Purpose |
For a flexible and efficient management of certificates, the {project-name} is capable of preparing certificate templates. |
Responsibility |
{project-name}-ADMIN |
Working tool(s) |
Browser, {project-name}-UI web application for the {project-name} Admin and Client |
Precondition/ |
The {project-name} is up and running. The administrator is logged into the {project-name} UI. The user has to be on the template website (see Table 3 step 1) |
Postcondition/ |
|
Remarks |
The {project-name} is able to provide certificate templates for either CAs as well as End-Entity certificates. |
| Process steps | |||
|---|---|---|---|
01 |
Displaying the certificate template object List
|
||
02 |
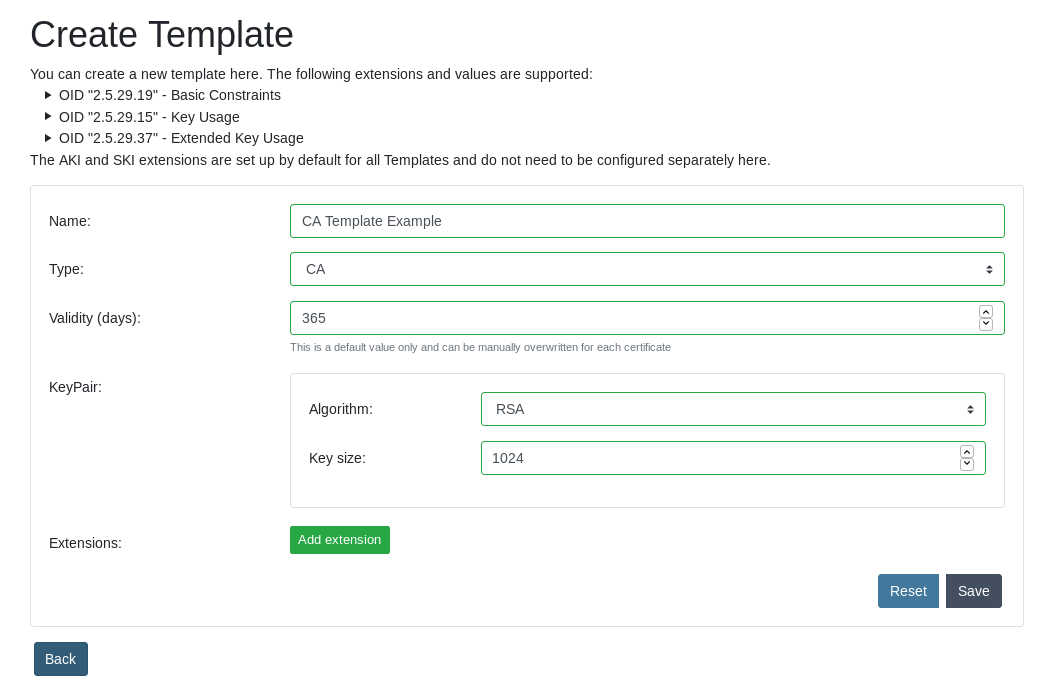
Follow these steps to create a certificate template (see Image 2):
|
||
03 |
To edit a certificate template, follow these steps:
|
||
04 |
For the deletion of a certificate template, follow these steps:
|
||
Figure 1 "Create certificate template" : click to reveal screenshot
P-MLCA-ADM-03 – HSMs (Create, Modify, Delete)
| Profile | |
|---|---|
Designation |
P-MLCA-ADM-03 – HSMs (Create, Modify, Delete). |
Purpose |
To ensure a high level of entropy for the key generation and for the secure storaging of the private key material, the {project-name} is capable of managing different Hardware Security Modules (HSMs). |
Responsibility |
{project-name}-Administrator |
Working tool(s) |
Browser, {project-name} UI web application for {project-name}-Admin. |
Precondition/ |
The {project-name} platform is up and running. The administrator is logged into the {project-name} UI. An HSMs is running and responsive. The user has to be on the HSM’s website (see Table 6 step 1) |
Postcondition/ |
|
Remarks |
The {project-name} supports the following HSMs:
|
| Process steps | |
|---|---|
01 |
Displaying the HSM object List
|
02 |
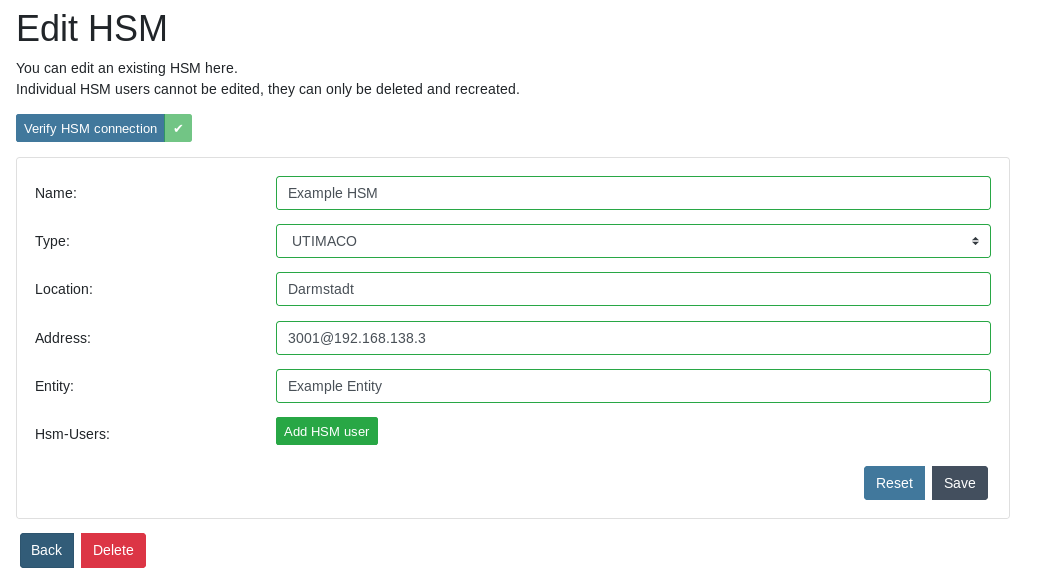
Create a new HSM by following these steps (see Image 3):
|
03 |
To edit an HSM connection, follow these steps:
|
04 |
For the deletion of an HSM connection, follow these steps:
A pop-up window occurs. Click “OK” to delete the HSM connection or “Cancel” to return back to the previous view. |
Figure 2 "Create HSM" : click to reveal screenshot
P-MCLA-ADM-04 – CAs (Create, Modify, Delete, Download Certificate)
| Profile | |
|---|---|
Designation |
P-MCLA-ADM-04 – CAs (Create, Modify, Delete) |
Purpose |
The {project-name} is capable of creating and managing CAs, SubCAs and their respective certificates. Certificates can also be downloaded through the {project-name} UI. |
Responsibility |
{project-name} Administrator |
Working tool(s) |
Browser, {project-name} UI web application for {project-name} Admin. |
Precondition/ |
The {project-name} is up and running. The administrator is logged into {project-name} UI. The user has to be on the CA’s website (see Table 8 step 1) |
Postcondition/ |
|
Remarks |
None |
| Process steps | |
|---|---|
01 |
Displaying the CAs object List
|
02 |
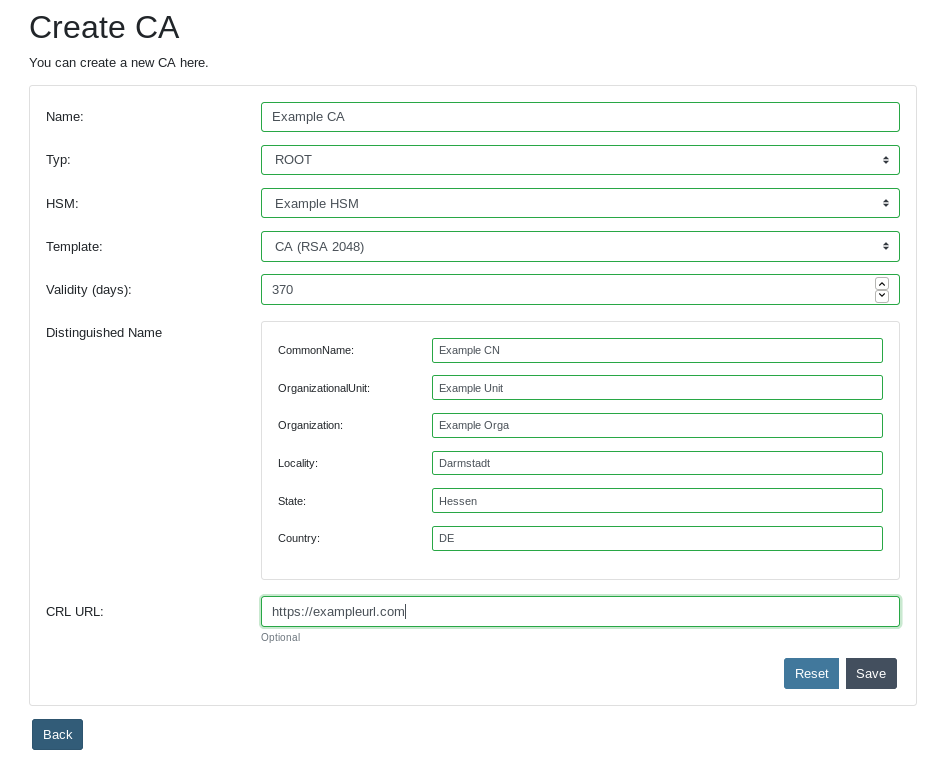
Create a new CAs by following these steps (see Image 4):
|
03 |
To edit a CA or a SubCA, follow these steps:
|
04 |
For the deletion of a CA, follow these steps:
A pop-up window occurs. Click “OK” to delete the CA or “Cancel” to return back to the previous view. |
05 |
To download a certificate, follow these steps:
|
Figure 3 "Create CA" : click to reveal screenshot