|
For the latest version, please use Key Management System 3.15.0! |
Business Processes
This chapter describes the processes and tasks performed by the KMS-Admin via the KMS-Admin.
The KMS-Admin provides methods for the following tasks:
-
Manage or add KMS-Admin users
-
Manage the own KMS-Admin account
-
Manage or add KMS-Tenants
-
Manage or add HSM devices
-
Manage or add Tenant-HSM-Profiles
-
Manage KMS licenses
The necessary identification and authentication against the KMS-Admin application is outlined in the following process steps:
| Process steps | |||
|---|---|---|---|
01 |
Call the URL of the KMS-Admin application with the browser, e.g. and log in with username and password provided by the KMS-Admin (e.g. in a sealed envelope or in an encrypted e-mail) (see chapter P-KMS-ADM-01 – KMS-Admin account (create, modify, delete)): 
|
||
02 |
When logging in for the first time, the user is automatically prompted to change his initial password: 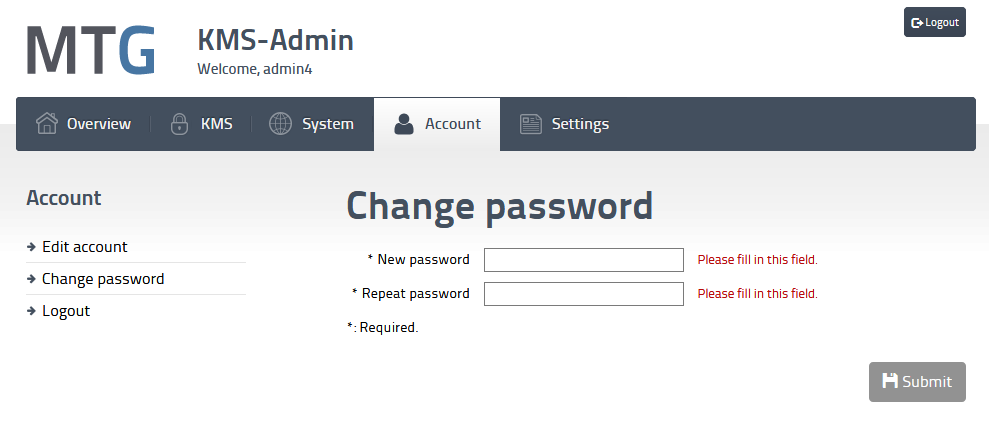
|
||
03 |
After a successful login, the start page is displayed. If there are any open proposals, they will be listed. The workspace is shown in the image below. The page is divided into different areas, which are highlighted in color. The partitioning is typical for most pages of the KMS-Admin. 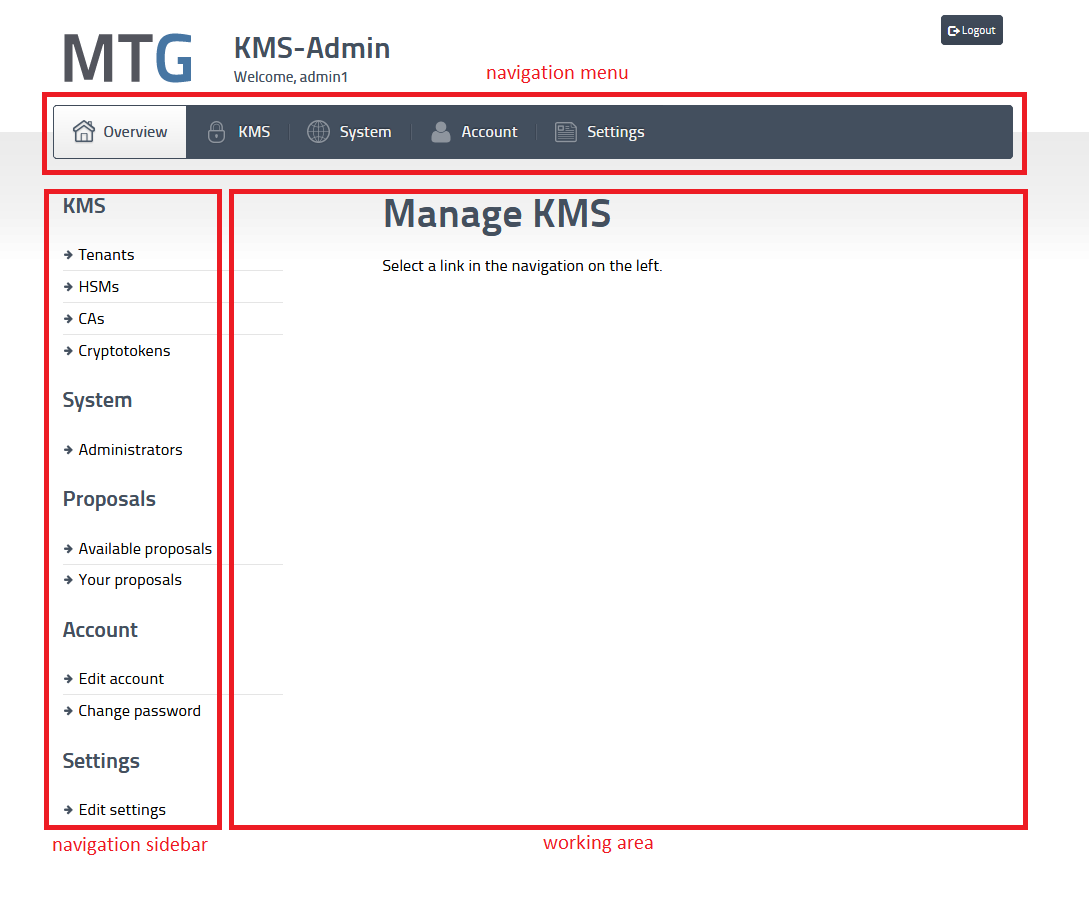
|
||
04 |
From any page (see step 03), the desired functionality can be selected at any time. The following steps must be performed:
The functions offered in the sidebar depend on the selected submenu item. A functionality can also be selected via the sidebar. 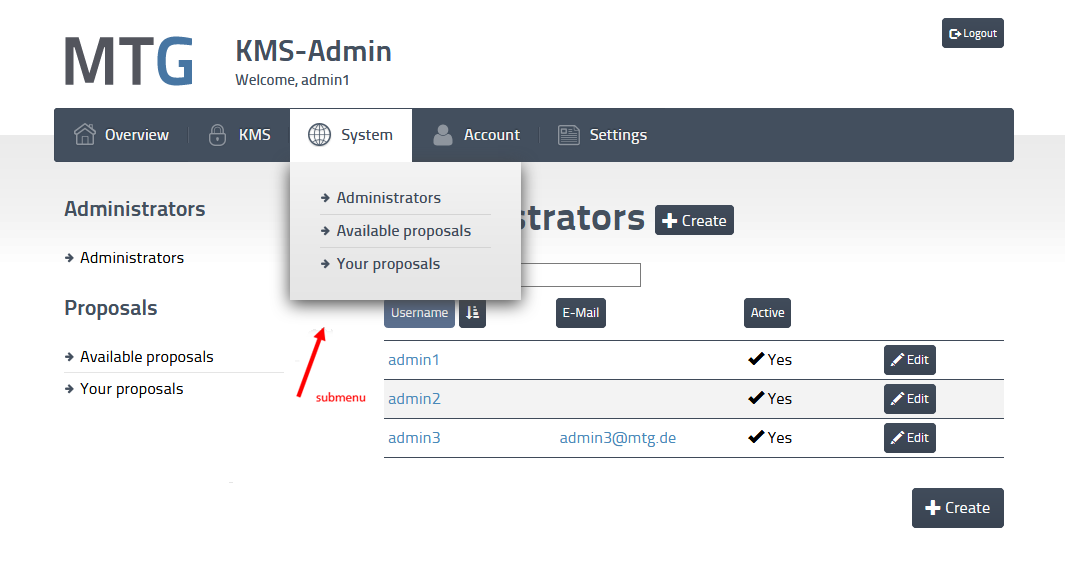
|
||
P-KMS-ADM-01 – KMS-Admin account (create, modify, delete)
| Profile | |
|---|---|
Designation |
P-KMS-ADM-01 – KMS-Admin account (create, modify, delete) |
Purpose |
Only KMS-Admins may use the KMS-ADMIN, which provides methods to manage KMS-Admins accounts, KMS-Tenants, HSM devices and HSM-Profiles. The description of the management of KMS-Admin accounts is the subject of P-KMS-ADM-01. This includes in particular the management of the own account as well as the creation of further KMS-Admin accounts. |
Responsibility |
KMS-Admin |
Working tool(s) |
Browser, KMS web application for KMS-Admin (KMS-Admin) |
Precondition/ |
The KMS platform is up and running. The KMS-Admin is logged into KMS-Admin. |
Postcondition/ |
|
Remarks |
In order to support the principle of dual control, it must be possible for orders to be entered by one KMS-Administrator and released by another KMS-Administrator (see chapter [managing-dual-control-orders]). Therefore, at least two administrator users should be predefined during installation (with default UserID/Password). These must be replaced by the actual administrator users during commissioning. When deleting a KMS-Admin, at least two (active) administrator users must remain. After creating a new KMS-Admin, the initial password should be sent securely to the responsible person (e.g., via e-mail). The current administrator should not be able to use and reset this initial password without the new administrator noticing (e.g., to avoid abusing the new account by the approving KMS-Admin). Therefore, when logging in for the first time with a newly created KMS-Admin account, the administrator is prompted to change his initial password. Creating a new administrator account as well as deleting an administrator account are treated as dual-control orders. This means that the order remains in an open state until a second administrator finally unlocks the order (see chapter P-KMS-ADM-05 – “Dual control” orders (vote, retract, reject)). |
| Process steps | |||
|---|---|---|---|
01 |
Display the list of KMS-Admins:
|
||
02 |
Create KMS-Admin account – Step 1: Create creation request (proposal):
If the process was successful, an open order (proposal) has been created waiting to be accepted by a second administrator (see step 03 or chapter P-KMS-ADM-05 – “Dual control” orders (vote, retract, reject)).
|
||
03 |
Create KMS-Admin account – Step 2: Vote for creation request (proposal):
|
||
04 |
Modify KMS-Admin account:
|
||
05 |
Delete KMS-Admin account – Step 1: Create deletion request (proposal):
If the process was successful, an open order (proposal) has been created waiting to be accepted by a second administrator (see step 06 or chapter P-KMS-ADM-05 – “Dual control” orders (vote, retract, reject)).
|
||
06 |
Delete KMS-Admin account – Step 2: Confirm deletion request by a second administrator:
|
||
07 |
Change own password:
|
||
P-KMS-ADM-02 – KMS-Tenant (create, modify, delete, assign KMS resources)
| Profile | |
|---|---|
Designation |
P-KMS-ADM-02 – KMS-Tenant (create, modify, delete, assign KMS resources). |
Purpose |
The tenant is a logical entity in the KMS platform separating the managed key material in own key domains. The administration of tenants, e.g., creating, changing and deleting tenants and assigning and withdrawing of the tenant’s KMS resources (e.g. KMS-Tenant-Users, Tenant-HSM-Profile, HSMs) is the task of the KMS-Admin. The description of the management of KMS-Tenants is the subject of P-KMS-ADM-02. |
Responsibility |
KMS-Admin |
Working tool(s) |
Browser, KMS web application for KMS-Admin (KMS) |
Precondition/ |
The KMS platform is up and running. The KMS-Admin is logged into KMS-Admin. HSM (see chapter P-KMS-ADM-03 – HSM-Object (create, modify, delete)) is configured. |
Postcondition/ |
|
Remarks |
When creating a KMS-Tenant, the first time the "Manage existing tenant user" action is called, several tenant users with the KMS-Tenant role will be created (see steps 05). The access data generated by this process (userID and password) for access to the KMS-Tenant component must be transmitted by the KMS-Admin to the responsible persons of the Tenant in a confidential manner, e.g., in a sealed envelope or in an encrypted e-mail. This is an organizational process that is individually agreed by the platform operator with tenants. With these credentials the tenant user can then use the KMS-Tenant component to configure and edit tenant-specific resources (see [User-Manual]). Due to the principle of dual control when generating the private keys of the client, at least two tenant users are required and created. It is important that the KMS-Tenant is set to the status "Active" so that all functions of the KMS-Tenant are available to the KMS-Tenant Users. An HSM-Profile is created to a tenant (see chapter P-KMS-ADM-04 – KMS-Tenant-HSM-Profiles (create, delete)). A KMS-Tenant cannot be deleted until all links to the resources it uses (HSMs, HSM-Profile, KMS-Tenant-Users) have been deleted. Deleting a tenant is an action that cannot be undone and must therefore be authorized by a second KMS-Admin according to the dual control principle (see step 07,08). |
| Process steps | |||
|---|---|---|---|
01 |
Displaying the list of tenants:
|
||
02 |
Create tenant:
The tenant has been created, but further configurations are still to be done to prepare the tenant for full use:
|
||
03 |
Modify tenant:
|
||
04 |
Link or unlink tenant to HSM:
|
||
05 |
Create KMS-Tenant-User (with KMS-Tenant role):
|
||
06 |
Delete KMS-Tenant-User:
|
||
07 |
Delete tenant - Step 1: Create deletion request (proposal):
The deletion request must now be confirmed by a second admin user (see step 08) |
||
08 |
Delete tenant – Step 2: Confirm deletion request by a second administrator:
|
||
08 |
Attach CA:
Click on "Detach" in the list of attached CAs to detach a CA. |
||
09 |
Attach a CMP Configuration:
CMP-Server
CMP Server TLS
Signer
Click on "Save" to store the CMP configuration. |
||
10 |
Delete a CMP Configuration:
|
||
P-KMS-ADM-03 – HSM-Object (create, modify, delete)
| Profile | |
|---|---|
Designation |
P-KMS-ADM-03 – HSM-Object (create, modify, delete) |
Purpose |
The HSMs serve as secure containers for private cryptographic key material. The KMS platform can manage multiple HSMs and then use them for cryptographic functions and storage of private keys of KMS-Tenants. The KMS-Admin must make the HSM objects known to the platform, modify them and delete them if necessary. They must work closely with the HSM-Admin (see chapter [architecture-overview]). The description of the management of HSM-Objects is the subject of P-KMS-ADM-03. |
Responsibility |
KMS-Admin |
Working tool(s) |
Browser, KMS web application for KMS-Admin (KMS) |
Precondition/ |
The KMS platform is up and running. The KMS-Admin is logged into KMS-Admin. |
Postcondition/ |
|
Remarks |
None |
| Process steps | |||
|---|---|---|---|
01 |
Display the list of HSM objects:
|
||
02 |
Create HSM object:
|
||
03 |
Modify HSM object:
|
||
04 |
Delete HSM object:
|
||
P-KMS-ADM-04 – KMS-Tenant-HSM-Profiles (create, delete)
| Profile | ||||||||||||||||||||||||||
|---|---|---|---|---|---|---|---|---|---|---|---|---|---|---|---|---|---|---|---|---|---|---|---|---|---|---|
Designation |
P-KMS-ADM-04 – KMS-Tenant-HSM-Profiles (create, delete) |
|||||||||||||||||||||||||
Purpose |
HSM-Profiles are used to manage the relationships between tenants and their assigned HSMs, in which the tenant’s KEKs are stored in a protected manner. The "key management" and "key usage" users set up on the HSM by the HSM-Admin for the tenant, including their authentication information (credentials), are stored AES-encrypted in the HSM-Profile (see also chapter [tenant-hsm-profiles]). The HSM users to be entered when generating a HSM-Profile must first be created in the HSMs (and HSM-HA, if installed) by the HSM-Admin. They are stored together with their credentials in the KMS database within the HSM-Profile object encrypted using a data-encryption-key (DEK). The DEK itself is protected using the MTG Secrets Protection Manager workflow (see Secrets Protection Business Processes for details). With the help of the DEK the HSM credentials stored in the HSM-Profile can be decrypted so that the KMS applications can log into the HSM. Afterwards, key management operations on the HSM (e.g. key generation for the client, chapter [tenant-hsm-profiles]) can be performed by the KMS applications. Additionally, "key management" operations on the HSM are only possible using the "four-eyes principle" via the KMS-Tenant application (see chapter [managing-dual-control-orders] for details). The description of the management of KMS-Tenant-HSM-Profiles is the subject of P-KMS-ADM-04. |
|||||||||||||||||||||||||
Responsibility |
KMS-Admin |
|||||||||||||||||||||||||
Working tool(s) |
Browser, KMS web application for KMS-Admin (KMS) |
|||||||||||||||||||||||||
Precondition/ |
The KMS platform is up and running. The KMS-Admin is logged into KMS-Admin. Tenants (see chapter P-KMS-ADM-02 – KMS-Tenant (create, modify, delete, assign KMS resources)) and HSMs (see chapter P-KMS-ADM-03 – HSM-Object (create, modify, delete)) are set up. In the HSM, the following HSM users have been created for the KMS tenant with the name <UserId> by the HSM-Admin (recommendation).
The KMS-Admin must know this authentication information (username, password) of the tenant and enter it into the corresponding mask fields when creating an HSM-Profile. |
|||||||||||||||||||||||||
Postcondition/ |
|
|||||||||||||||||||||||||
Remarks |
A HSM-Profile object cannot be changed after its creation. It is only possible to delete the object. |
|||||||||||||||||||||||||
| Process steps | |
|---|---|
01 |
Display the list of HSM-Profiles:
|
02 |
Link HSM-Profile object:
|
03 |
Display HSM-Profile object:
The following information is displayed:
|
05 |
Delete HSM-Profile object:
|
P-KMS-ADM-05 – “Dual control” orders (vote, retract, reject)
| Profile | |
|---|---|
Designation |
P-KMS-ADM-05 – “Dual control” orders (vote, retract, reject) |
Purpose |
For security reasons, the principle of dual control (see chapter [managing-dual-control-orders]) is applied to certain processes executed by the KMS-Admin. This means that when a proposal is created, it has to be accepted (voted) by another administrator. The following proposals are handled separately in the KMS:
In summary, the following actions can be performed upon a proposal:
A proposal has the following properties, which are displayed to the administrator during editing:
Actions that require the 4-eye principle:
|
Responsibility |
KMS-ADMIN |
Working tool(s) |
Browser, KMS web application for KMS-Admin (KMS-Admin) |
Precondition/ |
The KMS platform is up and running. The KMS-Admin is logged in the KMS-Admin. |
Postcondition/ |
|
Remarks |
None |
| Process steps | |||
|---|---|---|---|
01 |
Display the list of “your proposals”:
|
||
02 |
Retract “your proposal“:
|
||
03 |
Display the list of “available proposals”:
|
||
04 |
Accept “available proposal“:
|
||
05 |
Reject “available proposal“:
|
||
P-KMS-ADM-06 – “CAs” orders (display)
| Profile | |
|---|---|
Designation |
P-KMS-ADM-06– “CAs” orders (display) |
Purpose |
For a better overview MTG KMS provides an overview about attached Issuer CAs. Those CAs were generated by the Mini-CA and automatically attached to the MTG KMS. |
Responsibility |
KMS-ADMIN |
Working tool(s) |
Browser, KMS web application for KMS-Admin (KMS-Admin) |
Precondition/ |
The KMS platform is up and running. The KMS-Admin is logged in the KMS-Admin. |
Postcondition/ |
None |
Remarks |
None |
| Process steps | |
|---|---|
01 |
Display the list of attached CAs:
|
02 |
Display CA Details:
|
P-KMS-ADM-07 – “Settings” orders (edit)
| Profile | |
|---|---|
Designation |
P-KMS-ADM-07– “Settings” orders (edit) |
Purpose |
MTG KMS allows the Administrator to set multiple options about automated tasks for managed objects or debug tracing. |
Responsibility |
KMS-ADMIN |
Working tool(s) |
Browser, KMS web application for KMS-Admin (KMS-Admin) |
Precondition/ |
The KMS platform is up and running. The KMS-Admin is logged in the KMS-Admin. |
Postcondition/ |
None |
Remarks |
None |
| Process steps | |
|---|---|
01 |
Edit Cron expressions:
|
02 |
Switch to Debug mode for tracing:
|
03 |
Enable the KMIP Digest generation:
|
04 |
Set the email server for license notification:
|
05 |
Set the SNMP server for license notification:
|
P-KMS-ADM-08 – “Licenses” (request, import)
| Profile | |
|---|---|
Designation |
P-KMS-ADM-08– “Licenses” orders (request, import) |
Purpose |
MTG KMS allows the Administrator to request and import KMS application licenses. |
Responsibility |
KMS-ADMIN |
Working tool(s) |
Browser, KMS web application for KMS-Admin (KMS-Admin) |
Precondition/ |
The KMS platform is up and running. The KMS-Admin is logged in the KMS-Admin. |
Postcondition/ |
|
Remarks |
At least one valid license is required for the KMS application to run correctly. Licenses are checked initially at KMS-Server startup and once every 7 days afterward. |
| Process steps | |
|---|---|
01 |
Request a license:
|
02 |
Import a license:
|